Difference between revisions of "Common Functionality"
(→Local) |
(→Shared) |
||
| Line 393: | Line 393: | ||
The ‘shared file’ option allows a link to the document location to be added, but this does not load the file into the database. | The ‘shared file’ option allows a link to the document location to be added, but this does not load the file into the database. | ||
| − | |||
| − | + | [[File:Shared_File1.png|600px]] | |
| Line 417: | Line 416: | ||
An alternative view of the attachments is in a table on the form as opposed to the menu option. | An alternative view of the attachments is in a table on the form as opposed to the menu option. | ||
| − | |||
| − | |||
===Multi Select Scan=== | ===Multi Select Scan=== | ||
Revision as of 11:46, 21 November 2016
Contents
Common Functionality
Throughout the Agility application, there is a common ‘look and feel’. This is designed to provide a consistent and intuitive user environment.
Global Search
Each user has the ability to search Agility using the Global Search functionality on the main menu header and on the scan and detail headers.

Once the field highlighted above is populated it will compile an initial search, and will return results if available where the Global Search function is enabled.
For example, if a user wishes to search for specific work order number e.g. 123456, and this exists in the system as a unique piece of data in a specific field, it will bring the user directly to this work order.
However if the user does not have work orders visible in their menu it will not return any results regardless if the work order number exists in the system.
The Global Search functionality only searchers 4 sections:
- Work Orders
- Equipment
- Purchase Orders
- Inventory

If what has been searched for appears in more than one field the Global Search will only return the 5 most popular results, if any more are available click on ‘More Results’ items highlighted below:

The Global Search does take into account the permissions of a user, e.g. If the logged in user does not have the permission to see certain items, the search will not populates these, e.g. if a user has the permission to see all of the items in inventory on the global search if an item within Inventory is a match it will appear, however if a user who does not have permission to see the Inventory items, using the same search no results will appear.
The Global Search is configurable; please contact your Administrator for more detail regarding configuring the Global Search.
Icons
Agility uses a standard set of icons throughout the system.
Viewing Detail Records
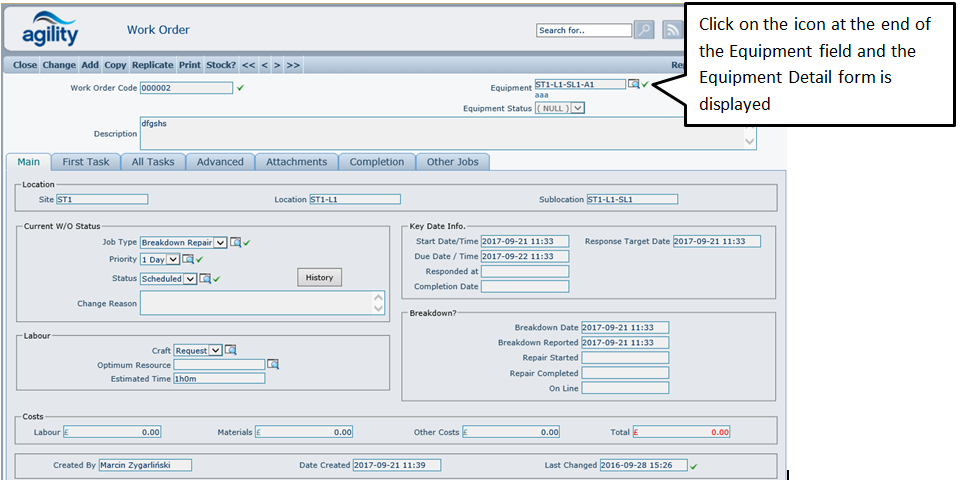
A magnifying glass ![]() is used to symbolise looking into the detail of a record. This could be from a scan form or on a details form.
is used to symbolise looking into the detail of a record. This could be from a scan form or on a details form.
The magnifying glass shows you the detail record of the row it is located on:

Clicking on a magnifying glass within a detail form that is against a field will then drill down into the detail of the content of the adjacent field. For example clicking the magnifying glass next to this ‘Equipment’ field will then show the equipment detail.

Selection Lists
In change mode a blue help icon ![]() may be displayed next to a field.
may be displayed next to a field.
![]()
Select the question mark and a selection form will be displayed. The operation of tree views is explained later in this section.
To select an item to populate the field highlight the desired item, and click the ‘use selected’ button.

Pick a record by highlighting an item and lick on the 'Details' button.
To select the record you want to populate the field with, navigate through the Tree View structure and select the desired item. Then click on the ‘Use Selected’ button to close down the Tree View form and populate the field in the original form with your selection.
Calendar
When a calendar icon ![]() is displayed at the end of a field it can be clicked on to select the date to populate the field.
is displayed at the end of a field it can be clicked on to select the date to populate the field.

The date can be selected by clicking on the appropriate date on the calendar, different months and years can be selected by use of the drop down arrows or by using the forward or reverse navigation buttons either side of the month/year options at the top of the form.
Up and Down Arrows
![]()
The up and down scrolling arrows ![]() are displayed at the end of number or date fields.
are displayed at the end of number or date fields.
If the ‘up arrow’ is clicked at the side of a number field, then the value is incremented by one. Conversely, if the ‘down arrow’ is clicked then the value is decreased by a value of one.
Similar functionality is provided if the field is defined as a date field. However, the value would be increased or decreased by a value of 1 day. If the date field is blank and the ‘up arrow’ is clicked, the date will be set to ‘today’.
Once the field has a value in it the arrows can be used to adjust that value by plus or minus one at each click of the arrow.
Scan Forms
The scan is a read only, tabular, often summarised version of the record set that you are viewing. It is the starting point to the detail of the record. Select the magnifying glass to view the detail; it is from this detail form that the record can be changed.
Data displayed in scan can be sorted by click on the heading of the column you wish to sort by. The sort order depends on how many times you click on the heading. When the heading is clicked once it is sorted ascending, twice and it is sorted descending and three times the sorting is switched off for that column. It is possible to apply sorts to more than one column, in which case the importance of the sort is indicated by a number alongside the column heading.

‘Filter Sets’ can be added to the scan menu. Filters that are used frequently can be predefined and added to the filter sets for easy querying by the user. One filter set can be added as a default, when the scan is opened this filter is always used to display the data. The filter set that is set as default will say [Default] next to it in the list. The active filter will be marked with a green tick.

Details of any currenty applied filter criteria are displayed in the grid header detail.
Filter sets are useful for restricting the quantity of returned records down by using specific criteria and relevant criteria.
For example there may be 100 active work orders currently on the system for today. Overdue work orders would be a priority, but instead of scanning through 100 work orders to find the overdue ones, a filter set to simply return those that are overdue would be far more efficient.
Within scan forms many of the columns also support an additional filter function that allows the column content to be searched using a partial or complete string search.
For example in this work order scan the words ‘air’ and ‘conditioning’ is used many times in relation to air conditioning units;
In the filter description filter,
Typing the word ‘air’ would return all of the work orders where the description starts with the word ‘air’.

However typing the word ‘con’ would return no work orders, this is because although the string; ‘con’ exists in the description, the description does not start with ‘con’.

But this can be overcome by pre-fixing the search string with the % symbol we can tell the filter to look anywhere in the description column for the search word. So in this example changing the word ‘con’ to ‘%con’ will now return any work orders where the string ‘con’ appears anywhere in the description.

If a predefined filter set has been selected then the standard filter will operate on the records found from the predefined filter set.
Customisation
Each user has the facility to store the filter criteria and grid settings so that they are in place the next time that the scan form is opened. This is stored on per user basis. An option to reset the scan form back to deafult setting is also available. Once the form has been reset the form is displayed in it’s default state as defined within the form definition.
Each column that is available in a scan form can be hidden or displayed. On clicking the columns setting button a menu will be displayed listing the columns available for the current scan form. Each column has a check box which shows or hides the column.
The order of the grid columns can be also changed. This is accomplished by moving columns using mouse drag and drop. The column header is grabbed using left mouse click, moved whilst continuing to hold the left mouse button and then dropped onto the column that is positioned to the right of where you want the column to be inserted. Columns are inserted immediately to the left of the column onto which they were dropped.
The apply button, which is in the custom settings menu, will store all the custom changes, visible columns, column order, selected sort order, used filter and current filter values against the currently logged on user. The reset button will reset all of the items back to default. This functionality is only available for users who have been defined as having this functionality within their profile.

Tree Views
A Tree View is an alternative method of viewing records to a Scan Form. A scan form uses a tabular format sometimes referred to as a data grid, a tree view displays records in a pre-defined structured hierarchy.
When in change mode in a detail form a blue help icon 16x16px may be displayed next to a field allowing data lookup to be performed. Clicking on this icon will display a Tree View Form which provides a structured system for locating and selecting records. Although the actual Tree (or hierarchy) display may differ depending upon system configuration, the key elements will remain identical:

The tree view structure can be expanded or collapsed by clicking on the ‘+’ or ‘–’ icons adjacent to each node, in a similar way to navigation within Microsoft Windows Explorer.
Each node that has ‘+’ or ‘-‘symbol next to it can be expanded to show items that exist within that structure. When no symbol exists you have reached the extent of that particular element.
Tree views are a good method of structuring and displaying items so that they can be easily found by working through the organised structure. Good structure can greatly assist with making searches and item location more efficient.
View Record Details
Records are selected in a tree view by using a single left click on the item which will highlight the item. This applies focus to the selected item. Once an item has been highlighted the details of that item can be viewed by clicking on ‘Details’ button located int he right panel. In the example below, clicking on the ‘Details’ button will open the Equipment Detail record of the “Graphixscan 1800” item:

Searching Records within a Tree View
Tree View forms offer the functionality to search for records within the Tree Structure. This is a free text search facility, so will retrieve all records which contain the search string in the Tree Header Codes (in the example of the Asset Tree Structure this would search the Site Code, Location Code, Sub Location Code or Asset Code).
To perform a search, enter a Search String in the field at the top left of the Tree View Form and click on ‘Find First’. In the example below, the Records will be searched for the phrase ‘AC’:

When the user selects ‘Find First’, the first record within the Tree Structure containing the search string will be shown:

Click on ‘Find Next’ to continue searching the Tree Structure, this will find the next instance within the tree structure that contains the search string and will continue to find the next instance each time until no further matching criteria can be found.
Selecting Records
To select a record within the Tree Structure, simply click on the desired item and click on the ‘Use Selected’ button. This will close down the Tree View form and populate the field in the original form with your selection.
Select All
When a scan form shows a check box, there is a quick method to select all the records rather than check each individual one. Click on the x16px icon in the column heading. This will automatically tick all check boxes. Click on the icon again to de-select the records.

Links
Any field that is underlined on a scan, grid or form will link to further details about that field. For example, within the work order scan form, items within the equipment column are ‘linked’ clicking on the item click will open the detail view for that item. The detail view form will be opened in a new tab or window.

Attachments
‘Attachments’ are usually available as a tab on a Detail Form to enable documents to be loaded against any part of the system. The ‘attachments’ tab contains a scan form of any attached files and allows viewing of any existing documents attached to an item or new ones to be added when in change mode. Attachments can be selected from different sources;
- Document Registry
- Local files
- Shared files
To view a document, simply click on the view details icon which is available in the grid, the same way as enquiring on any item in a scan form.
When adding a new attachment a new blank detail form will be opened. The document source (file mode) can now be selected from the following options.
Document Registry
Selecting the ‘Document’ option allows a document from the Document Registry to be attached. The document registry is a source of documents that are registered within the Agility system.

Click on the help icon to open the help scan form to select a document currently stored in the documents registry.

Click the green tick check box to select the document. The document will remain in the register but also be attached to the current record. If this attachment is one that is required to be printed along with a Work Order then the ‘AutoPrint’ box should also be checked. This will ensure that each time a work order is produced and printed against the currently selected item; this specific document will be printed automatically.
The 'Keep Document As Link' allows to determine the way how attachments are stored after there are copied from the source record. If field is checked, the replicated documents are stored as DOCUMENT attachments linked to the document. This option is applied only to Document attachment type.

Local
Select ‘local file’ if the document is stored or accessed from the local PC on which the session of Agility is running, A browse option is then displayed to select the appropriate document. Navigate to the file, in the same manner as opening any file in windows, click on ‘Open’ and the file path and name will be entered onto the form.

The document will then be added into the form:

By then clicking on Upload and the chosen document will then be uploaded and stored within the Agility Database.
The ‘shared file’ option allows a link to the document location to be added, but this does not load the file into the database.

The full pathname should be entered into the field; a browse button has been added to assist in locating the file and constructing the path name. This mode also allows other paths to be added, for example a URL for an intranet or internet website can be typed into this location, for example. http://www.softsolsgroup.com
There is no limit on the number of documents that can be loaded.
The code and description are both free text.
Any type of document can be attached to a record including technical drawings, images and word processed documents. These can be viewed from within Agility which will open the file using windows program designated for this. If suitable software is not available on the pc to open the document the option to save it will be given.
An alternative view of the attachments is in a table on the form as opposed to the menu option.
Multi Select Scan
On some help selection grids there is a Multi Select Scan form option; this allows you to be able to select several records rather than just one. For example when completing work orders more than one fault code may be applicable.
By using a multi select scan form it is possible to select multiple items at the same time. To select the records to add click the check box adjacent to the item required. Once all of the items required are selected click ‘Get selected row(s)’ link. This will close down the scan form and return all the checked records to the previous screen.
Menu Options
At the top of the Agility work spaces (scan form, tree view forms etc.) a menu will be generated. The menu contains options for performing standard functions. The options available will vary dependant on where you are in the system, but the function will remain the same. All the actions are applicable to the current window in which the link was clicked
Close
This will close the current window. If any windows are still open which were opened from viewing links from within the current window these will also be closed down.
Refresh
This can be used to refresh the content of the current window.
Add New
This option will create a blank form to fill in relative to the context of the current window. I.e. In an equipment scan, clicking ‘add new’ will open a blank form to add new equipment.
Delete
This will delete the item currently selected within the current window.
Copy
This option copies the data from all the fields in the current form.
Paste
This option will paste the contents, obtained using the ‘copy’ option above in to a new blank form.
Replicate
This will create a duplicate record based upon the current window.
Change
The takes the system out of view mode and enters change mode for the current item. This has the effect of making all fields and grids editable where applicable.
Ok
This option saves the record with any changes that have been made.
Cancel
This will cancel any changes made and not save the record.
Navigation
89x20px
These links are used for navigating the records within the current record set. This is much the same way as pages in a book. First, takes you to the first record in the set, next to the next, previous to the preceding record and last to the last record in the set. The record set may be limited by filtering options.
Additionally a page count and ‘row count’ facility have been included with the navigation buttons.
Clicking the (count rows) link will return the number of records in the currently returned set.
When the rows have been counted, an additional 2 navigation buttons become available. These provide facility to jump forward or backwards by 10 pages at a time.
Filters
The ‘filters’ button can provide access to filtering options for the current logged on user. This will provide access to the ‘filter sets’ and the ‘extended filter’ option.
Filter Sets
When the scan form is launched a default filter set will be in place. By clicking on this option the other available filter sets that are available for selection can be accessed. The menu will always contain an ‘Empty Filter’ option which will clear all applied filters and therefore show all records. The current filter in use will be indicated by a green tick.
Extended Filter
The extended filter option allows a user to specify more discreet filter criteria applicable to the context of the current scan form and based upon the available options within the filter form.
Home
This will return you to the main menu and close down all open Agility forms.
Menu
This will return you to the main menu it will not close any open Agility forms.
Design
This option is restricted and is dependent upon the system license and user permissions. This option allows changes to be made to the design, layout and behaviour of the form. Please refer to the customisation documentation for further details.