Difference between revisions of "Agility config xml"
Collection (Talk | contribs) |
Collection (Talk | contribs) (→Asset Structure) |
||
| (35 intermediate revisions by the same user not shown) | |||
| Line 31: | Line 31: | ||
'''Obsolete''' | '''Obsolete''' | ||
| − | This is checkbox to set supplier as obsolete. When it is checked than obsolete date field appears near. | + | This is checkbox to set supplier as obsolete. When it is checked than obsolete date field appears near. Obsolete date is automatically set to actual date. Obsolete Supplier cannot be use to create any document except GRN and Invoice. |
| − | Obsolete date is automatically set to actual date. Obsolete Supplier cannot be use to create any document except GRN and Invoice. | + | |
| Line 2,941: | Line 2,940: | ||
A purchase order can be cancelled without affecting costing, stock levels or creating stock movements by clicking the ‘Cancel PO’ option from the | A purchase order can be cancelled without affecting costing, stock levels or creating stock movements by clicking the ‘Cancel PO’ option from the | ||
| − | purchase order detail form. A purchase order can be cancelled at any stage or status. Once a purchase order has been cancelled no further action | + | purchase order detail form. A purchase order can be cancelled at any stage or status. Once a purchase order has been cancelled no further action can be taken with the order. |
| − | can be taken with the order. | + | |
| Line 2,961: | Line 2,959: | ||
| − | [[File:Additional_Purchase_Order_Functions2.png| | + | [[File:Additional_Purchase_Order_Functions2.png|750px]] |
| Line 2,985: | Line 2,983: | ||
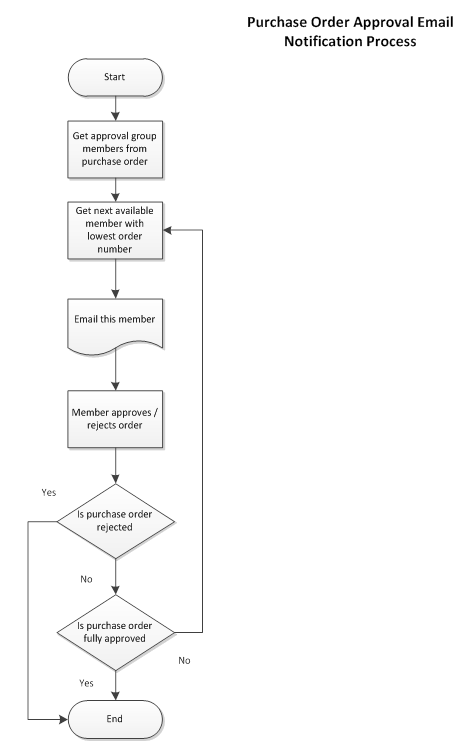
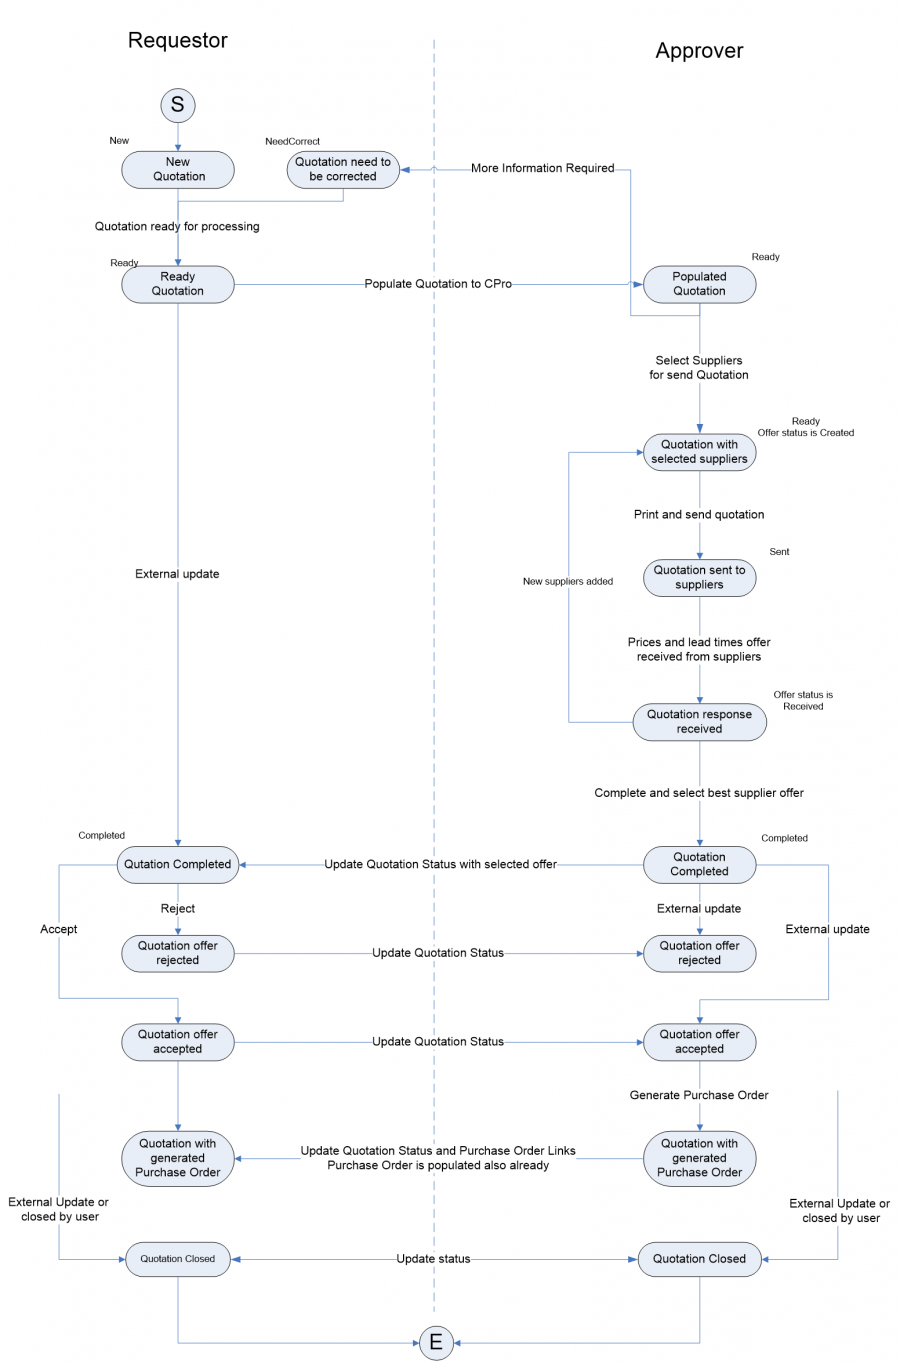
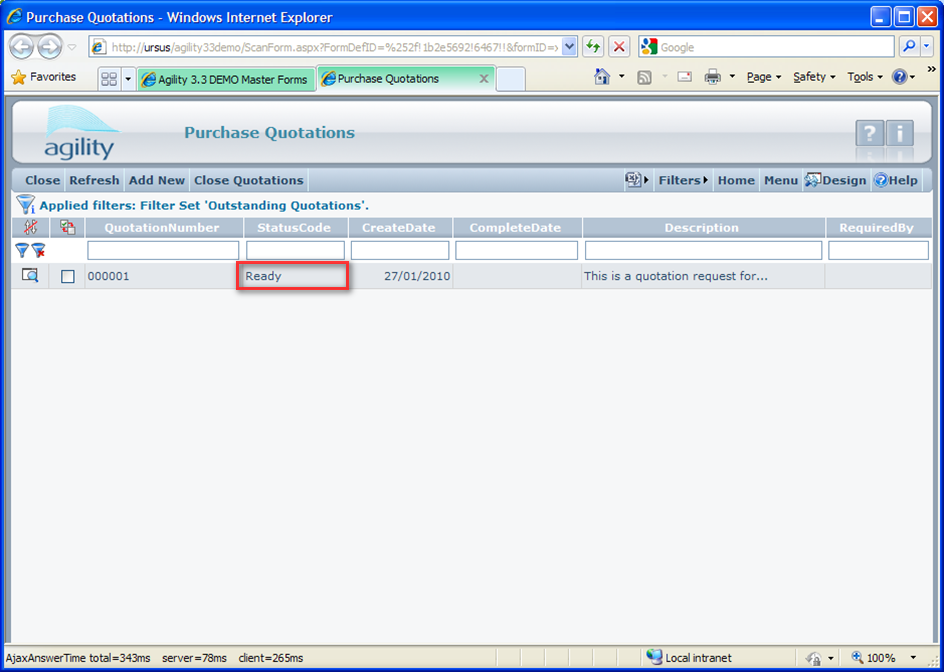
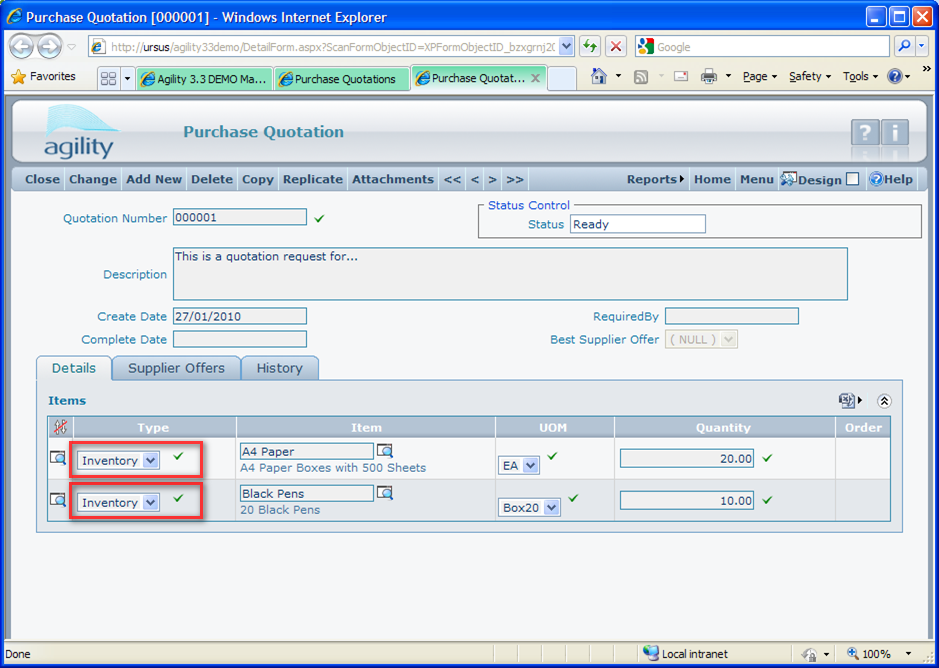
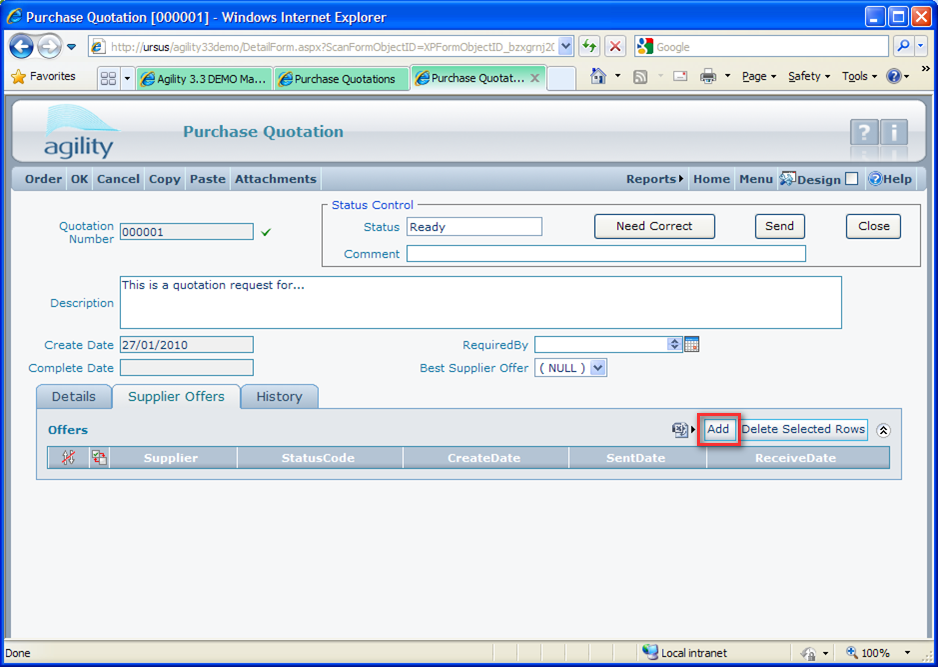
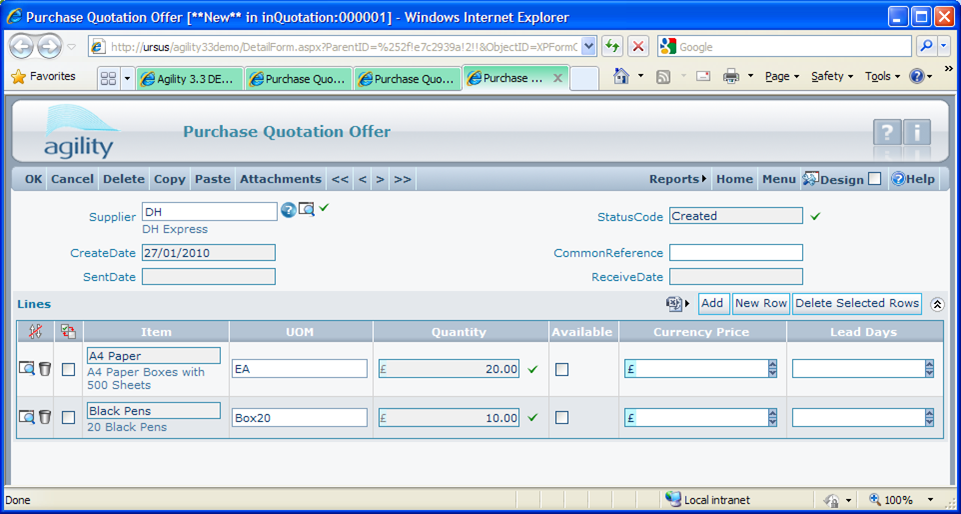
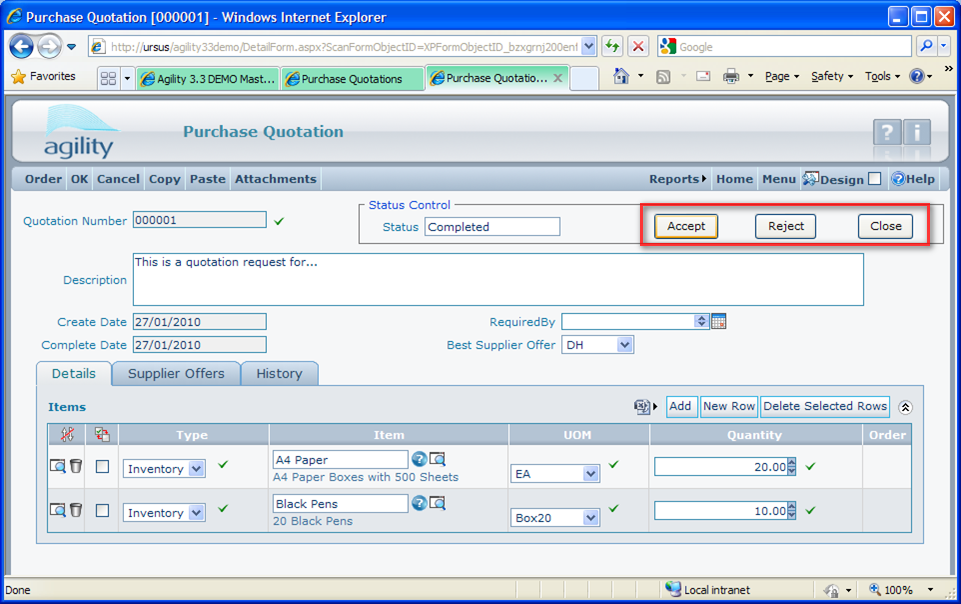
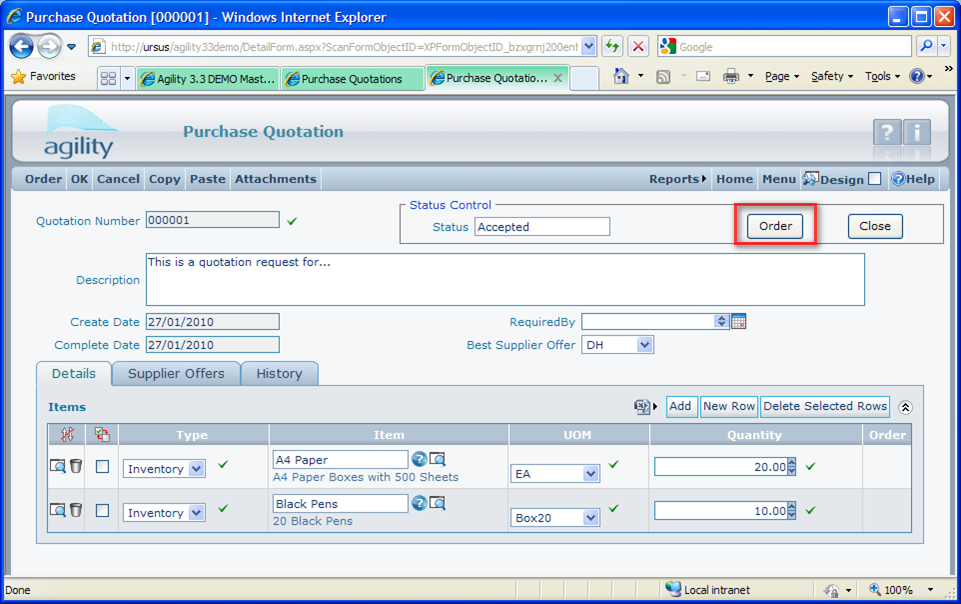
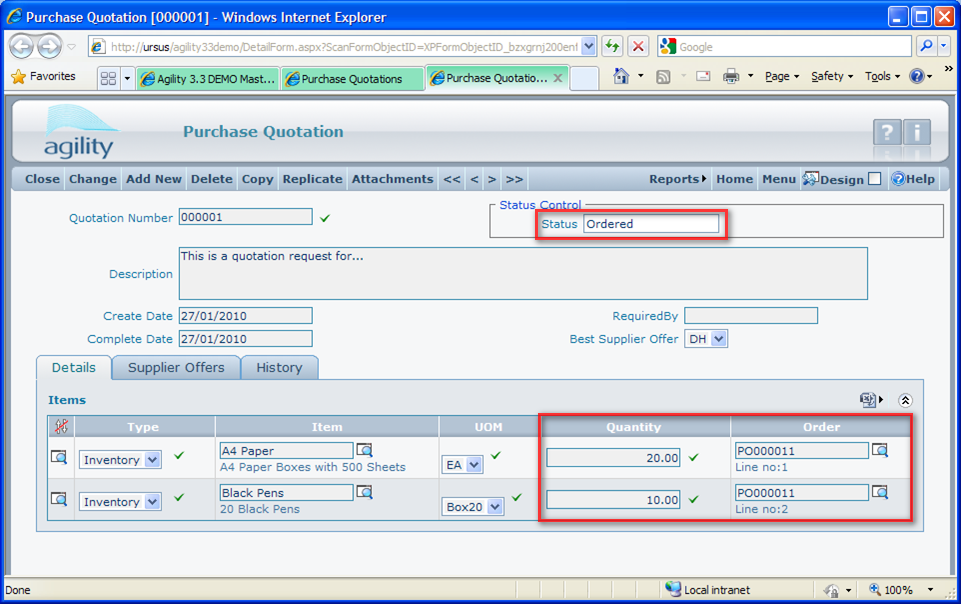
The process can be split between two responsibility groups of requestor and approver. All steps covered by the process are visualized on the diagram below. | The process can be split between two responsibility groups of requestor and approver. All steps covered by the process are visualized on the diagram below. | ||
| − | [[File:pq01_diagram.png| | + | [[File:pq01_diagram.png|900px]] |
| Line 3,142: | Line 3,140: | ||
There can be multiple PO’s related to one Invoice (Supplier consolidates orders to one invoice) One PO may be related to several invoices. | There can be multiple PO’s related to one Invoice (Supplier consolidates orders to one invoice) One PO may be related to several invoices. | ||
Invoice lines may relate to part PO lines. The cost code on invoice line came from the relevant PO line. | Invoice lines may relate to part PO lines. The cost code on invoice line came from the relevant PO line. | ||
| + | |||
| + | |||
Invoice lines are being added by entering a PO number and using a “Get Lines From PO”. The lines that are retrieved are editable to allow the | Invoice lines are being added by entering a PO number and using a “Get Lines From PO”. The lines that are retrieved are editable to allow the | ||
invoice quantity and invoice price to be entered on the invoice and compared to the values on the PO Line. | invoice quantity and invoice price to be entered on the invoice and compared to the values on the PO Line. | ||
| + | |||
| + | |||
The system calculates the Invoice Total based on the lines and update the invoice header showing the variance from the total entered by the user. | The system calculates the Invoice Total based on the lines and update the invoice header showing the variance from the total entered by the user. | ||
| + | |||
| + | |||
The Purchase Order Detail show all relevant invoice lines (on Relevant Invoices tab) to ensure duplicate invoices are not accepted. | The Purchase Order Detail show all relevant invoice lines (on Relevant Invoices tab) to ensure duplicate invoices are not accepted. | ||
| + | |||
| + | |||
Purchase order lines additionally displays quantity sum and value sum of all linked invoice lines (InvoiceQty and InvoicedVal columns) | Purchase order lines additionally displays quantity sum and value sum of all linked invoice lines (InvoiceQty and InvoicedVal columns) | ||
| + | |||
| + | == Repairable Spares == | ||
| + | === Asset Details === | ||
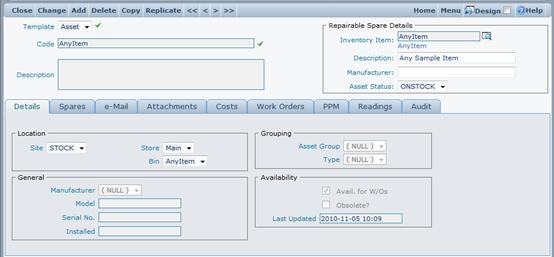
| + | Asset detail view is accessible by clicking a icon in the row of the asset that is to be displayed. | ||
| + | |||
| + | The contents of the Asset details view is explained below. | ||
| + | |||
| + | [[File:asset_details_.jpg|600px]] | ||
| + | |||
| + | |||
| + | The top box contains the information about the Model of the Asset including: | ||
| + | |||
| + | Manufacturer | ||
| + | |||
| + | Description | ||
| + | |||
| + | Inventory Item | ||
| + | |||
| + | Detail View link – this can be used to open the Model Details view of the model associated with the asset being viewed. | ||
| + | |||
| + | The part of the screen below the Model box contains basic information about the asset. | ||
| + | |||
| + | |||
| + | '''Details Tab''' | ||
| + | |||
| + | |||
| + | Details tab contains 3 group boxes: | ||
| + | |||
| + | Location – this box contains all the details about the current location of the asset. | ||
| + | |||
| + | Depending on the current asset status, different fields can be populated in this box. | ||
| + | |||
| + | When the asset status is “IN STOCK”, Store and Bin fields will be populated with the store | ||
| + | location and the bin where this asset is stored. | ||
| + | |||
| + | When the asset status is “Vendor Location”, Supplier and Supplier Unit fields will contain the details about the Vendor performing the repair. | ||
| + | |||
| + | Grouping – this box provides the means of additional grouping of the Asset catalogue into logical groups or types. Those criteria are provided to | ||
| + | simplify filtering when the number of assets in the catalogue is big. | ||
| + | |||
| + | Availability – this box contains the information about availability of the Asset. “Avail. For W/O’s” flag identifies if any Work Order can be raised against this Asset. | ||
| + | |||
| + | “Obsolete” flag denotes if this asset is obsolete. “Last Updated” field contains the date and time of the last update to the Asset information. | ||
| + | |||
| + | |||
| + | '''Work Orders Tab''' | ||
| + | |||
| + | Work Orders tab has been provided for a quick and easy way of scanning all current work orders which have been raised against the particular asset. | ||
| + | |||
| + | |||
| + | '''Audit Tab''' | ||
| + | |||
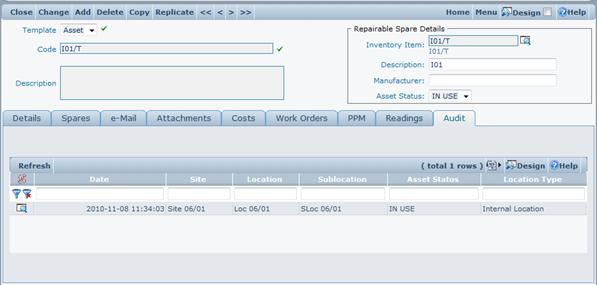
| + | Audit tab contains all history details linked to the asset being viewed sorted by the history date in descending order: | ||
| + | |||
| + | |||
| + | [[File:audit_tab_.jpg|650px]] | ||
| + | |||
| + | === Asset Structure === | ||
| + | The structure of the physical distribution of assets can be examined by using the Asset Structure view (Assets -> Asset Structure). | ||
| + | |||
| + | This is represented by the Tree View, where all the equipment is organized within departments, locations and sub locations: | ||
| + | |||
| + | |||
| + | '''Work Orders''' | ||
| + | |||
| + | Work Orders are provided to keep the track of all existing repairs within the system. | ||
| + | |||
| + | |||
| + | '''Adding a new Work Order''' | ||
| + | |||
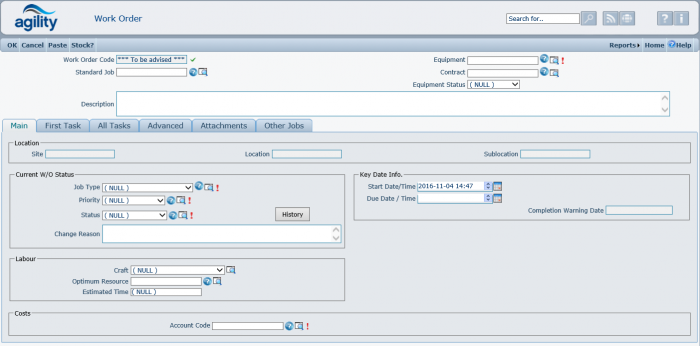
| + | To add a work order for a new repair, use Work Orders -> Add New Work Order menu action. The following form will appear on the screen: | ||
| + | |||
| + | |||
| + | [[File:Work_Order_AddNew.png|700px]] | ||
| + | |||
| + | |||
| + | Following fields that need to be populated on the form: | ||
| + | |||
| + | Asset – the asset that the Work Order is being raised against, | ||
| + | |||
| + | Description – description of the break down, damage details etc., | ||
| + | |||
| + | Priority – this drop-down list contains all priorities defined in the system, | ||
| + | |||
| + | Start Date – the date this work order should be started by. This date is always defaulted to the current date and time, | ||
| + | |||
| + | End Date – the date this work order should be completed by. This date is usually calculated automatically according to the selected priority. | ||
| + | |||
| + | If the priority is set to avoid automatic due date calculation, the due date will not be calculated automatically and it will have to be populated by the user. | ||
| + | |||
| + | |||
| + | '''Faults tab''' | ||
| + | |||
| + | If there is a requirement to register any faults against this work order, faults tab can be used. It provides a way of putting multiple | ||
| + | |||
| + | faults by filling up fault group and fault details in the faults grid: | ||
| + | |||
| + | |||
| + | [[File:Work_Order_Faults.png|600px]] | ||
| + | |||
| + | |||
| + | Once all required information is populated, the OK menu button can be used to save the new work order. When the Work Order is saved, | ||
| + | asset status changes to “Needs Repair” and the asset is moved into the “Raamp Area” as a repair process virtual starting point. | ||
| + | |||
| + | |||
| + | '''Work Order List''' | ||
| + | |||
| + | List of current Work Orders can be accessed by using Work Orders -> Work Order List menu action, which will cause the following form to | ||
| + | appear on the screen: | ||
| + | |||
| + | |||
| + | [[File:Work_Order_List.png|1000px]] | ||
| + | |||
| + | The list can be filtered by any available column including Barcode, Part Number, Location details, Work Order description and the Work Order status. | ||
| + | |||
| + | Once the desired Work Order has been found, the details can be viewed by clicking the file icon. | ||
| + | |||
| + | === Following the Work Order workflow === | ||
| + | The flow of the Work Order has been designed to mirror the physical process of the repair and to store the full repair history in the Asset History Log. | ||
| + | The first step in the workflow after the work order is created is to decide whether the Asset is going to be repaired outside or inside. | ||
| + | |||
| + | |||
| + | === Starting the repair process === | ||
| + | If the selected Work Order is in “Open” status, that means that the repair process has not yet been started and the asset still resides in the “Raamp Area”. | ||
| + | To start the repair process click “Change” in the menu at the top of the form. The section of the form used to follow the repair process is the Current W/O status group box: | ||
| + | |||
| + | |||
| + | [[File:Start_NewRepair.png|500px]] | ||
| + | |||
| + | |||
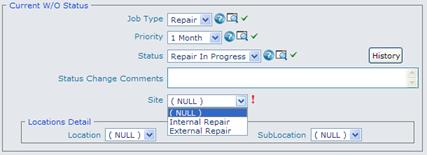
| + | To push the asset for repair, change the Status of the W/O to “Repair in Progress” by using the Status drop down. This action will cause the Site field to refresh | ||
| + | with following values: | ||
| + | |||
| + | |||
| + | [[File:Repair_process.jpg|500px]] | ||
| + | |||
| + | |||
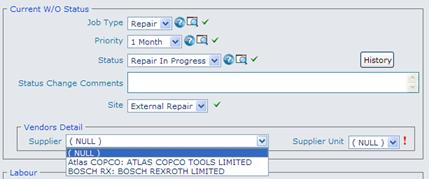
| + | Select one of the options to follow internal or external repair path of the process. If the “VENDOR LOCATION” option has been selected, the Location and Sublocation | ||
| + | lists will refresh with the list of vendors and vendor units: | ||
| + | |||
| + | |||
| + | [[File:Repair_process2.jpg|500px]] | ||
| + | |||
| + | |||
| + | Select the Vendor and the Vendor Unit and press “OK” to save the changes in the database. | ||
| + | |||
| + | === Completing the Repair === | ||
| + | Once the Asset has been returned by Vendor from repair, the Work Order needs to be updated to reflect the current repair status. First step is to change the | ||
| + | Work Order status to “Repair completed”: | ||
| + | |||
| + | |||
| + | [[File:New_Repair_Completed.png|500px]] | ||
| + | |||
| + | |||
| + | After the status has been changed, the “Site” field will be automatically populated to “Ramp area”. | ||
| + | |||
| + | === Closing the Repair === | ||
| + | This is the last step in the Repair workflow, where the Asset is moved into his final destination after the repair and the repair work order is completed. | ||
| + | |||
| + | To close the repair process, follow these steps: | ||
| + | |||
| + | Select the work order in “repair completed” status and click the details link | ||
| + | |||
| + | Click change menu button | ||
| + | |||
| + | Change the Work Order status to “Completed”: | ||
| + | |||
| + | |||
| + | [[File:Current_WO_status_Completed.png|700px]] | ||
| + | |||
| + | |||
| + | Changing the status to “Completed” will cause Site and Location fields to refresh will available final asset destination points: | ||
| + | |||
| + | |||
| + | [[File:Current_WO_status_Completed_Site.png|700px]] | ||
| + | |||
| + | |||
| + | |||
| + | Depending on the choice made for Site field, the Location and sublocation fields will refresh with | ||
| + | |||
| + | physical location and sublocation if the selected Site represents the usage point, | ||
| + | |||
| + | store location and bin location if the selected Site is “STOCK” | ||
| + | |||
| + | If the target destination for the Asset is “STOCK”, the Asset status will be changed to “IN STOCK”. | ||
| + | |||
| + | If the target destination for the Asset is any of the Usage Point, the Asset status will be changed to “IN USE”. | ||
| + | |||
| + | In both cases, the Work Order status will be changed to “Completed’, which closes the repair workflow. | ||
| + | |||
| + | === Repairable Spare Issue === | ||
| + | Once the item has been repaired and received into stock against the Purchase Order, it needs to be issued change its status to “IN Use”. | ||
| + | |||
| + | This can be achieved by “Repairable Spare Issue” Inventory Movement. | ||
| + | |||
| + | The information required to complete the operation: | ||
| + | |||
| + | |||
| + | * Input Store – the store location the Part is issued from, | ||
| + | * Output Store – the store location the Part is issued to, | ||
| + | * Input Bin – the bin location that the part issued from, | ||
| + | * Output Bin – the bin location that the part issued to. The bin location has the same name as asset code, | ||
| + | * Inventory Item – Model Part number | ||
| + | * Asset Code – this can either be an existing Asset or a non-existing Asset Code. In the case when non-existing barcode is entered, a new Asset will be created automatically. | ||
| + | * Status – the status that will be assigned to the asset when the part is issued, | ||
| + | * Site, Location, Sublocation – the details of the physical location of the Asset after it is issued. | ||
| + | * Item Price – the item price. | ||
Latest revision as of 13:57, 5 December 2016
Contents
- 1 Inventory
- 1.1 Suppliers
- 1.2 Inventory Items
- 1.3 Inventory Movements
- 1.4 Stock Counts
- 1.5 Purchasing
- 1.6 Purchase Quotations
- 1.6.1 Generating Purchase Quotations
- 1.6.2 Selecting Suppliers and Sending
- 1.6.3 Filling quotation Feedback data from suppliers
- 1.6.4 Completing the quotation
- 1.6.5 Accepting / rejecting the quotation
- 1.6.6 Raising the Purchase Order from Quotation
- 1.6.7 Closing quotations
- 1.6.8 Setup Purchase Quotations Supplier Email Notification
- 1.7 Invoices
- 1.8 Repairable Spares
Inventory
Suppliers
Enquiring on a supplier
Accessed from Inventory >> Suppliers
The Suppliers List shows all suppliers within the system, along with Branch location details for that supplier. If a Supplier has more than one branch defined within the system, there will be one row displayed in the scan form for each Branch. This can be seen above with the example of Acer.
Click on the Code to field within the Supplier Scan to view a record.
Adding a supplier
Code
This is free text, but must be unique and populated.
Obsolete
This is checkbox to set supplier as obsolete. When it is checked than obsolete date field appears near. Obsolete date is automatically set to actual date. Obsolete Supplier cannot be use to create any document except GRN and Invoice.
Name
The Name allows for a meaningful supplier name to be entered.
Web Site
The Web Site field allows for the supplier’s web site URL to be stored. The full URL address should be entered, for example: http://www.getagility.com
If a Web Site Address is recorded, a Web Site button will be displayed alongside the address to allow for immediate access to the Supplier’s Site
Default Branch
A supplier can have several Branch locations defined within Agility.
This drop-down list is used to select the default supplier branch that is used within the system.
If only one branch is defined, then that Branch is automatically set as the default.
Currency
Identifies the trading currency of the supplier, from a dropdown list of the recorded currencies.
Discount
Can be used to record a standard discount percentage, offered by the supplier.
Inventory Supplier & Service Supplier
Two tick boxes to indicate the type of Supplier. A Service Supplier would be one that is tied into the contract part of the system.
Branches
Click on Add within the Supplier Branch grid to create a Supplier Branch.
After that will disappear another window.
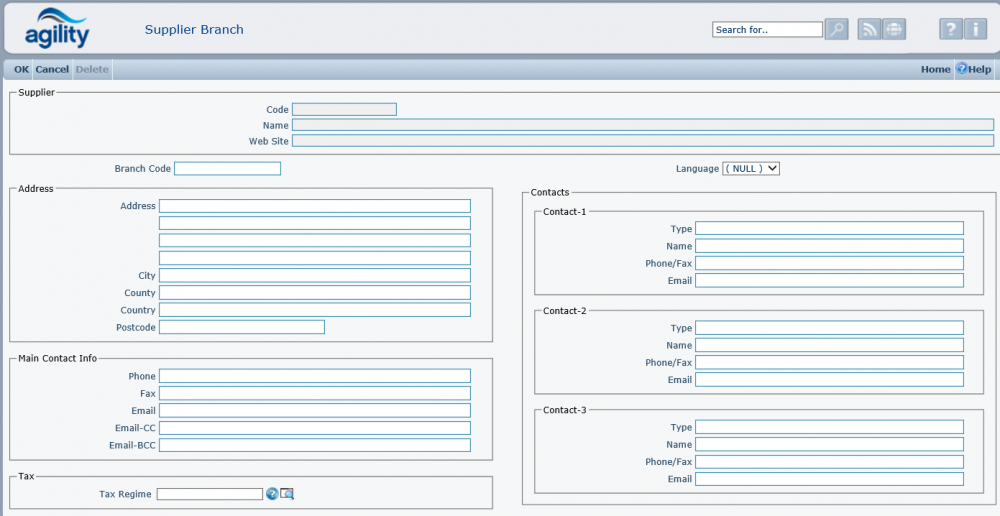
Branch Code
The Code field free text but must be populated. This represents an identifier for the Supplier Branch.
Language
Language field is provided to specify the language that the Supplier is using. Agility is using the language field to select appropriate language version of the Purchase Order printout when system parameter “Inventory\PurchaseOrders\UseSupplierLanguageForPOPrint” is set to True and specific language version exists for the Purchase Order report definition in Report Registry. Please refer to system parameters section.
Address
The address fields are used to record the Branch address.
Main Contact Details
Phone, Fax & Email details.
Contacts
Up to 3 lots of contact details for the Supplier Branch.
Parts Supplied
A scan form of all the parts supplied by this supplier; This is maintained either when adding an inventory item or by Add New.
Stores
Store Locations are defined to identify where inventory items will be located.
Accessed from Inventory >> Stores
Click Add New to add a Store Location.
After that will disappear another window.
Code
The Code is free text but must be unique and populated.
Description
The Description allows a meaningful description of the Store Location to be entered.
Suspend Movements & Suspend Orders
Tick boxes to indicate that Movements and/or Orders are suspended for this store
Store Items
The Store Items section shows all the inventory items that are held in the store. This scan form is normally maintained when adding Inventory items. Clicking Add New takes the system to the standard Add an Inventory Item functionality.
Inventory Items
Enquiring on inventory Items
Accessed from Inventory >> Inventory Items
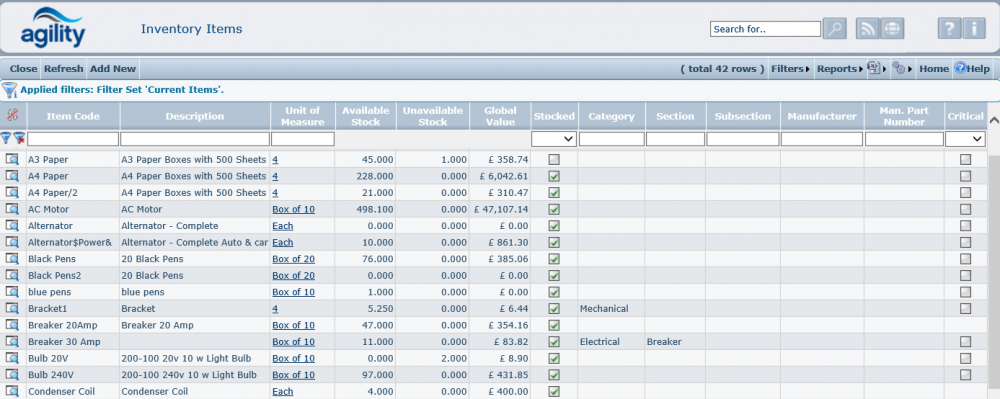
The details of an inventory item are entered through the Inventory Items detail form. Selecting ‘Inventory Items’ from the Inventory sub menu opens a scan
form detailing all the inventory items defined in the system.
This scan form contains several calculated fields. These are derived from the information entered within the Inventory Item record.
Available Stock
Available Stock is a calculated field of the sum of all stock in bins that are flagged as ‘issuable’
Unavailable Stock
Unavailable Stock is a calculated field of the sum of all stock in bins that are flagged as not ‘issuable’
Global Value
The Global Value is the combined value of stock across all store and bin locations.
Adding an inventory item
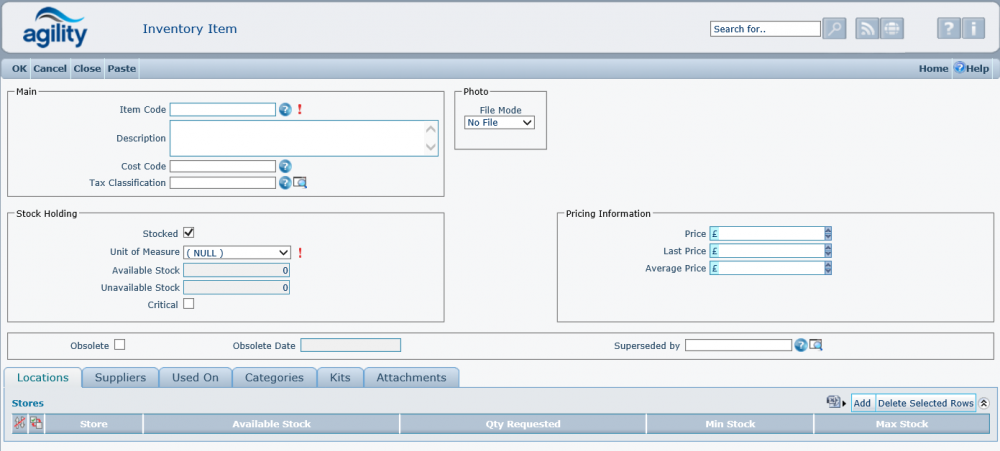
Click on Add New to add a new Inventory Item.
Item Code
The Item Code field is free text and is a unique identifier for the inventory item. This must be populated.
Description
This is a free text and records a meaningful description of the inventory item.
Cost Code.
If the system parameter “AccountCodeEnabled” has been activated then this field is mandatory, the contents can be chosen from a dropdown list of Cost (Account) Codes. These will have been set up through Standing Data >> System >> Account Codes
Stock Holding Box
Stocked
The Stocked field is a check box and signifies if the item is held in stock.
Unit of Measure
Select the Unit of Measure (UOM) from the drop-down list. Units of measure are defined within the Unit of Measure Standing Data file.
Available Stock
The Available Stock field is automatically calculated, in the same way as in the Inventory Items scan form.
Unavailable Stock
The Unavailable Stock field is automatically calculated, in the same way as in the Inventory Items scan form. This represents the amount of stock that, although it is in stock, is unavailable for issue.
Pricing Information Box
Price
The Price field is used to record the purchase price of the item.
Last Price
The Last Price field records the previous price of the inventory item. This is automatically populated when goods are received into stock.
Average Price
The Average Price field records the average price of the inventory item. This is automatically populated when goods are received into stock.
See:Average Price Calculation.
Obsolete
The Obsolete check box is used if the item is obsolete and no longer available for issue.
Obsolete Date
The Obsolete Date is automatically populated with the date when the ‘Obsolete’ box is checked.
Superseded By
The Superseded By field is a drop-down list of all inventory items. This is manually selected to record which existing Inventory Item supersedes this one.
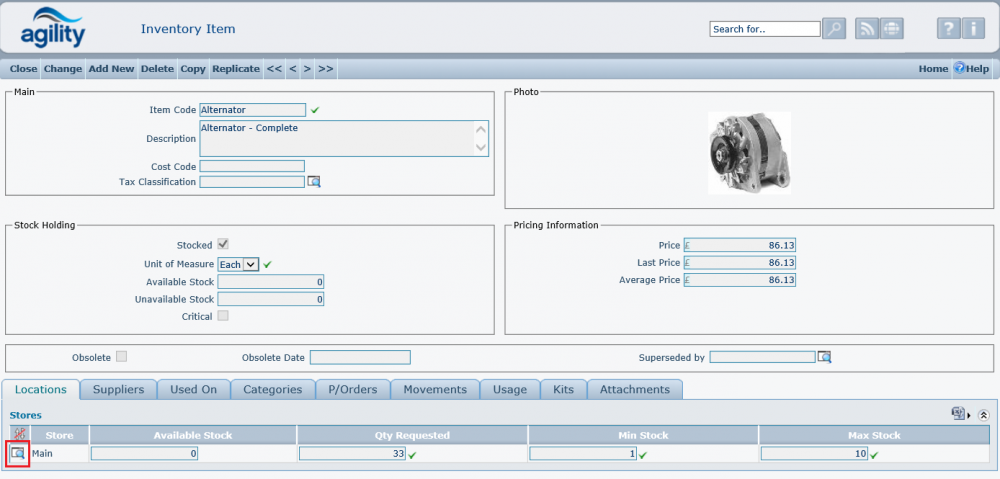
Locations
The Stores Grid shows the Store Locations, along with the available stock in that store, where the inventory item can be held.
Qty Requested
Information as to quantity of this item that can be attributed to Planned Maintenance Work Orders; This information is gathered from Kit Lists.
Click on Add within the Stores grid to enter a new store location for the inventory item:
Store
The Store field is a drop-down list of all store locations defined in the system. This allows the user to manually select the store location. This is mandatory.
Min Stock
The Min Stock field is used to manually record the minimum quantity of the inventory item that must be held in stock.
Max Stock
This field is used to manually record the maximum quantity of the inventory item that must be held in stock.
Stock Count Cycle Days
This field allows you to state an interval, in days, that must elapse between Stock Counts on which the item is to be included. (i.e. if this field read 10 and the Last Stock Count Date was 05/02/2009, a Stock Count run on the 09/02/2009 would not include the item).
Last Stock Count Date
This is a system maintained date indicating when this item was last included in a stock count.
Bins
Further to recording the store locations of the inventory item, it is also possible to record the bin location(s) of the items using the Bin grid.
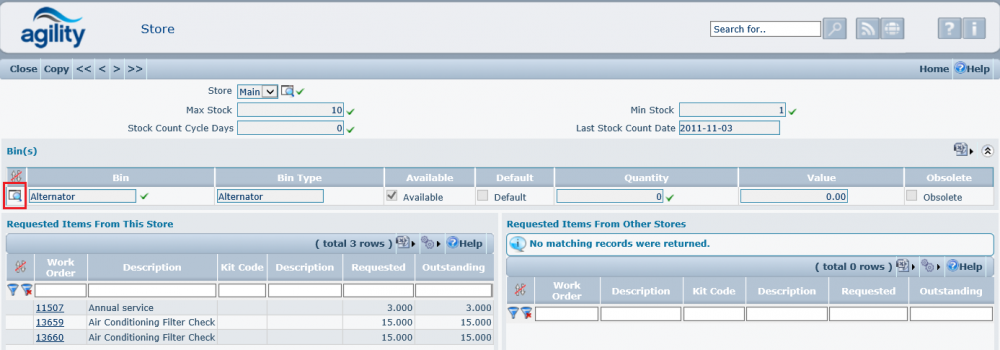
For example in inventory items we choose item called "Alternator".
After will disappear another window from Store.
Click on button next to "Alternator" text box to add/edit a bin location within the store.
Bin Name
This field is free text and is used to record the bin identifier within the store.
Available for Issues
The Available for Issues check box is used to identify if goods within this bin location can be issued.
Bin Type
The Bin Type field is free text and can be used to hold the description of the type of stock that is held in the bin, for instance ‘Standard stock’ or ‘Awaiting Inspection’.
Quantity
The Quantity records the current quantity of stock held in the bin. This value is maintained through Inventory Movements and cannot be changed in this screen.
Stock levels for inventory items are maintained through the creation of Inventory Movements.
Suppliers
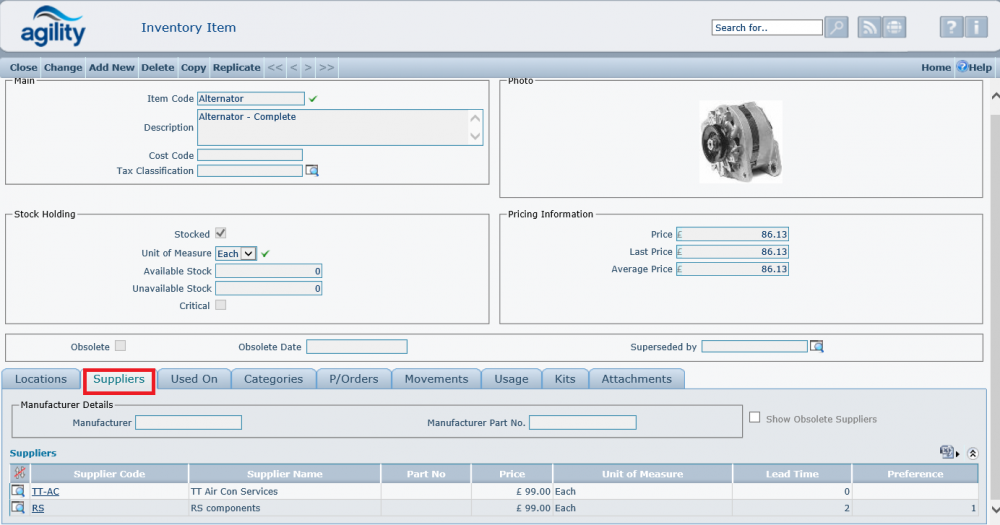
It is possible to record multiple suppliers for an inventory item using the Suppliers grid within the Suppliers Tab of an Inventory item detail form.
Manufacturer
This is a free text and records the manufacturer of the inventory item.
Manufacturer’s Part No.
This is a free text and records the manufacturer’s part number of the inventory item.
Click on Add to add a new supplier to the Inventory Item record.
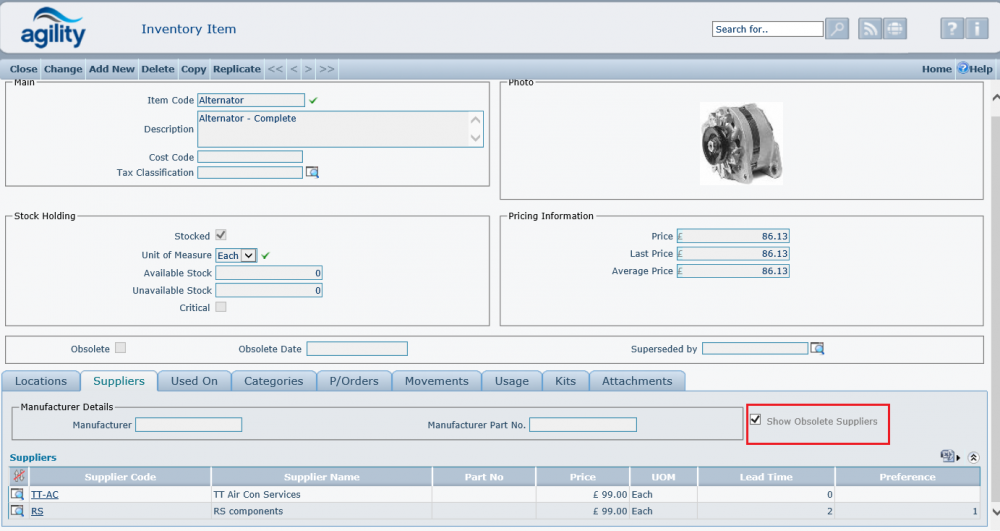
Show Obsolete Suppliers
This checkbox allows seeing in Suppliers Grid the Suppliers which was set as obsolete to show their price.
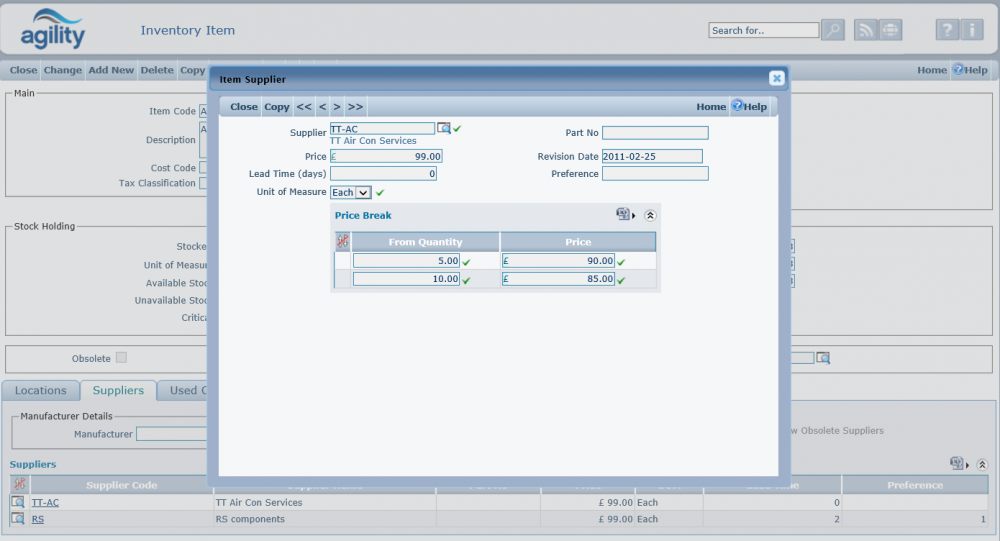
Supplier
The Supplier field is a drop-down list of all current suppliers within the system. This is used to select the supplier of the inventory item.
Part Code
The Part Code is a free text field and is used to record the supplier’s part code for the item. This may be different from the manufacturer’s part code.
Price
The Price field records the current price charged by the supplier
Lead Time
The Lead Time field is the number of days that the supplier takes to deliver the goods.
Preference
The Preference field records the most preferred supplier. The user can enter the preference manually. When many suppliers are attached to the Inventory Item records, it is possible to see a list of preferred suppliers in the Suppliers grid. Enter the value 1 for the most preferred supplier; the higher the number, the lower down the preference list.
Revision Date
Is the date when this Supplier detail record was last updated.
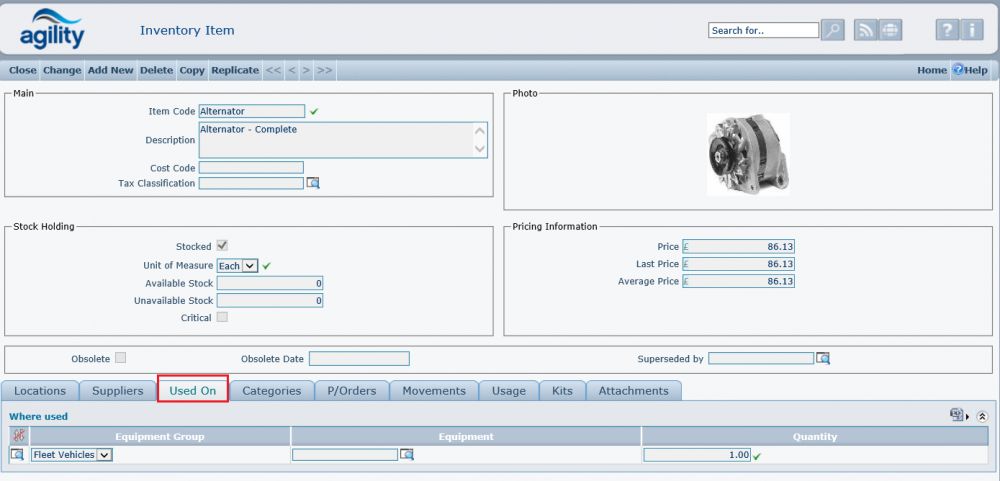
Used On
The ‘Where Used’ grid identifies the Equipment Items that utilise the Inventory Item:
To associate an Equipment Item with the Inventory Item, click on Add within the ‘Where Used’ grid:
This form allows you to record the Asset and optional Asset group of the associated asset.
Categories
The Category grid allows for the grouping of an inventory item.
The fields Category, Section and SubCategory allow for inventory items to be categorised.
These fields use the multi-dictionary list file INVCATEGORY to populate the drop-down lists.
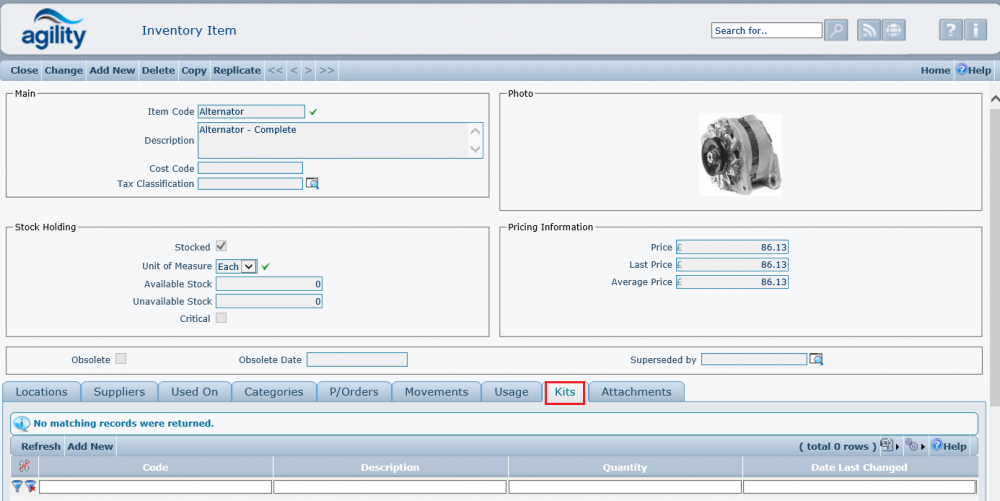
Kits
The Inventory Items can belong to different kits defined in system. (See: Standing Data: Inventory: Kits or Inventory -> Kit of Parts). The list of these kits is displayed on Kits tab;
This grid displays all the Kits that this item is part off. It is possible to add the item to a Kit that does not as yet exist.
Choose Add New to record that this item belongs to an as yet undefined Kit of Parts.
This action will display the standard Kit Addition form.
Once an Inventory Item has been added to the System other Tabs become available on the Inventory Item Form.
Purchase Orders
The Purchase Orders grid provides a list of all Purchase Orders raised for this inventory item:
Movements
The Movements tab page shows a Scan Form detailing all Inventory Movements for this Inventory Item:
Usage
The Track Usage tab page shows a Scan Form detailing all Stock Issues and Returns for this Inventory Item:
Inventory Movements
Inventory movements have been divided into several transaction types to perform different inventory tasks. Each transaction type is processed using a specialised form to accept only data relevant to this transaction type. All inventory movements are accessible via Inventory >> Inventory Movements menu:
This chapter describes all individual Inventory transactions in order as they appear on the Agility Menu.
Issue to Employee
This transaction is used for issuing items against an employee.
Move Date
The Move Date is the date of the Inventory Movement. Although this can be adjusted by the user, this defaults to the current date.
System Date
The System Date is the date that the Inventory Movement is entered into Agility.
This is automatically set to the current date and time and cannot be changed by the user.
Store
The Store field is a drop-down list of all stores defined within the system. This is used to record the Store that is issuing the item(s).
Labour
The Labour field records the Labour Resource (Employee) who requests / performs the inventory movement.
Notes
The Notes field is a free text field allowing for the recording of additional comments to regarding the movement.
Using Movement Lines is the same as in “Issue to W/O” described in the next section.
Issue to W/O
This transaction is used for issuing items against a Work Order
Move Date
The Move Date is the date of the Inventory Movement. Although this can be adjusted by the user, this defaults to the current date.
System Date
The System Date is the date that the Inventory Movement is entered into Agility.
This is automatically set to the current date and time and cannot be changed by the user.
Store
The Store field is a drop-down list of all stores defined within the system. This is used to record the Store that is issuing the item(s).
Work Order
The Work Order field stores the Work Order code against which the Inventory movement is associated.
Work Order Task
The Work Order Task is a drop-down list which allows you to select a Work Order Task (which is part of the Work Order selected in the previous field)
for which the inventory movement relates.
Labour
The Labour field records the Labour Resource (Employee) who requests / performs the inventory movement.
Notes
The Notes field is a free text field allowing for the recording of additional comments to regarding the movement.
The Movement Lines grid allows the details of the inventory movement to be entered:
Click on New Row to add a new Movement Line.
Item
The Item field is mandatory. Click on the help icon to display a list of inventory items. Click on the green tick to select the desired item.
Bin Location
The Bin Location records the main Bin details for this movement. Click on the help icon to display a list of Bin Locations that hold the inventory item within the selected Store.
If the user wishes to create a new Bin Location, simply type the new Bin description into the field.
This will automatically create the new Bin Location within the Store selected in the Inventory Movement form.
Quantity
The Quantity field signifies the quantity of stock moved in this movement.
Price
The Price is the price of a single unit of the inventory item. The value for this field defaults to the price specified in the inventory record.
However, this value can be manually adjusted for this movement only.
Line Value
The Line Value is automatically calculated based upon Quantity x Price, representing the total price for this movement.
Once the inventory Movement Line has been populated, click on ok to return to the Inventory Movement record.
The Movement is shown in the Movement Lines grid.
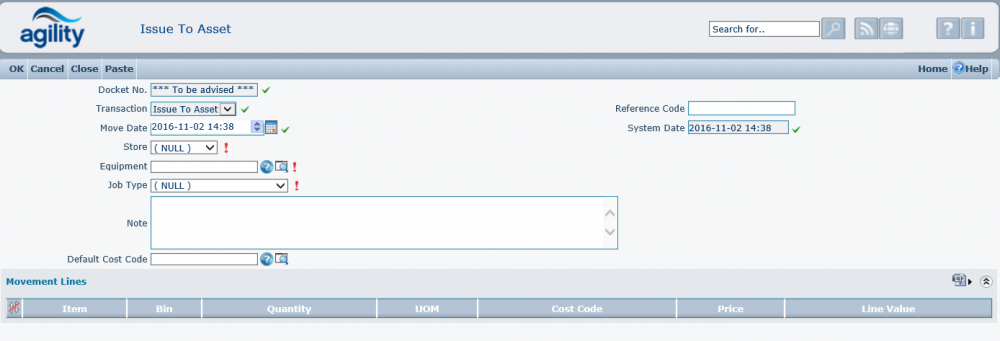
Issue to Asset
This transaction is used for issuing items against an Asset. Create of Movement against Asset updates Internal Material Costs.
This transaction works similar as other issues, but additionally user must fill:
Asset
The Asset field records asset against which the movement is created. System will not allow to use obsolete assets.
Job Type
Job type is required for proper calculation of asset costs (costs are grouped by Job Type)
Return to Stock from W/O
This transaction is used return items back into stock which have previously been issued against a Work Order but not used.
Move Date
The Move Date is the date of the Inventory Movement. Although this can be adjusted by the user, this defaults to the current date.
System Date
The System Date is the date that the Inventory Movement is entered into Agility.
This is automatically set to the current date and time and cannot be changed by the user.
Store
The Store field is a drop-down list of all stores defined within the system. This is used to record the Store that is receiving the Item.
Work Order
The Work Order field stores the Work Order code against which the Inventory movement is associated.
Work Order Task
The Work Order Task is a drop-down list which allows you to select a Work Order Task
(which is part of the Work Order selected in the previous field) for which the inventory movement relates.
Labour
The Labour field records the Labour Resource who requests / performs the inventory movement.
Notes
The Notes field is a free text field allowing for the recording of additional comments to regarding the movement.
The Movement Lines grid allows the details of the inventory movement to be entered:
Click on Add to add a new Movement Line.
Item
The Item field is mandatory. Click on the help icon to display a list of inventory items. Click on the green tick to select the desired item.
Bin Location
The Bin Location records the main Bin details for this movement.
Click on the help icon to display a list of Bin Locations that hold the inventory item within the selected Store.
If the user wishes to create a new Bin Location, simply type the new Bin description into the field.
This will automatically create the new Bin Location within the Store selected in the Inventory Movement form.
Quantity
The Quantity field signifies the quantity of stock moved in this movement.
Price
The Price is the price of a single unit of the inventory item.
The value for this field defaults to the price specified in the inventory record. However, this value can be manually adjusted for this movement only.
Line Value
The Line Value is automatically calculated based upon Quantity x Price, representing the total price for this movement.
Once the inventory Movement Line has been populated, click on ok to return to the Inventory Movement record.
The Movement is shown in the Movement Lines grid.
When the return is accepted, the stock quantity of all items returned will be updated and the Inventory Used costs on the Work Order
will be updated to reflect the goods which have been returned.
Return to Stock from Employee
This transaction is used return items back into stock which have previously been issued against an Employee but not used.
The only difference between this transaction and “Return to Stock from W/O” is the Work Order field, which is not present here.
When the return is accepted, the stock quantity of all items returned will be updated but there will be no change in material cost in any work order, as the assumption is that those goods were not issued against any Work Order.
Return to Stock from Asset
This transaction is used to return items back into stock which have previously been issued against an Asset but not used. Create of Movement against Asset updates Asset costs . Items costs are removed from Asset Internal Material Costs.
This transaction works similar as other returns, but additionally user must fill:
Asset
The Asset field records asset against which the movement is created. System will not allow to use obsolete assets.
Job Type
Job type is required for proper calculation of asset costs (costs are grouped by Job Type)
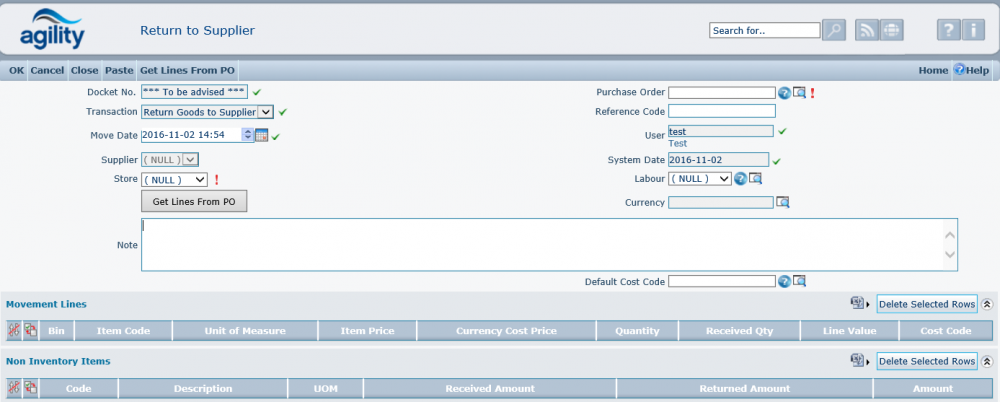
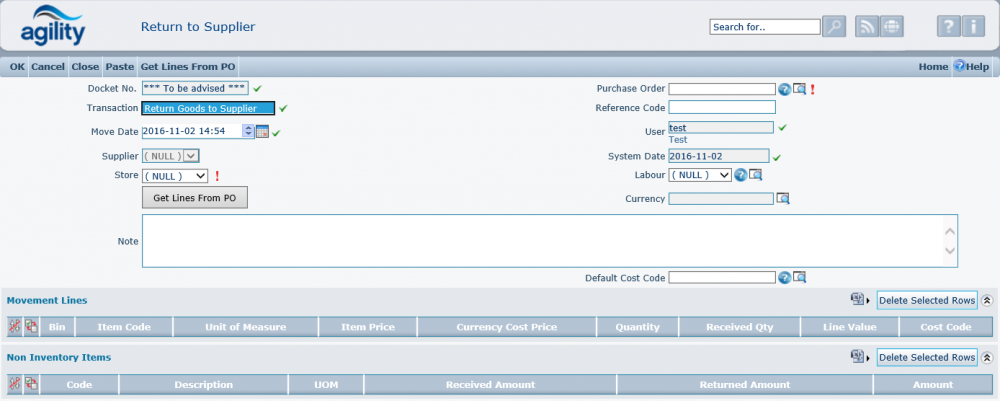
Return to Supplier
This function should be used to return stock items to a supplier and record this action in the stock control system element of Agility correctly affecting stock levels. It can be done with or without a purchase order.
Return to supplier (With Purchase Order Number)
Usage
By using the provided look up on the purchase order field locate the purchase order on which the goods were ordered.
When the purchase order has been selected this will pre-populate the majority of fields on the header section of the form.
*Note that the docket number will be created when the return has been saved to the system.
Details used to auto populate the form are taken from the purchase order header.
The next stage is to retrieve the purchase order lines by clicking on the ‘Get lines from PO’ button or the ‘Get lines from PO’ option in the menu bar if available.
This will retrieve the lines from the selected purchase order and auto populates the movement lines for both inventory items and non-stocked items with the relevant details.
For each item being returned the quantity being returned is entered into the ‘Quantity’ fields this will auto update the line value and remaining quantity fields.
If not all the items on a line or the order are being returned the quantity being returned should be entered.
Once all required item returns have been entered the transaction is committed and a returns docket number will be assigned. The format for the docket number is determined by the setting for ‘Move.Supplier Return’ in the system sequence definitions. (Please refer to the System Sequence & definitions section of this manual.)
Return to supplier (Without a Purchase Order Number)
The principal for returning goods to supplier without a purchase order number is very similar to using that when using a purchase order numbers,
the main difference being that all the values have to be entered manually.
Usage
Since no purchase order is available to retrieve order details from the header information needs to manually entered first.
The store which items are being returned from is mandatory and must be selected from the drop down list.
The reference code and supplier also need to be entered. Once the header details have been added, there is a field definitions list given below.
New lines can be added for each item being returned.
Each different item being return needs to be a separate movement line.
To add a new movement line, click the new row button on the movement lines section.
A new empty movement line will be created.
Enter the details of the item being returned onto the movement line.
Select the item code by using the look up or start typing the item code in and select from the list of options available.
Once the code has been selected some of the fields on the line will then be auto populated. Complete the remaining values ensuring the bin is selected.
Add additional movement lines as required. If any lines are added in error they can be deleted prior to committing the return by using either the delete
selected rows function or click on the delete icon for that row.
Once all lines have been added the transaction can be committed and a docket/returns number will be provided.
Field Definitions
Header record
Fields may or may not be enabled depending on if a purchase order is being used or not and/or if the purchase order has been associated with a work order or labour resource.
Docket Number
This number is auto generated when the transaction is committed; the format is based upon the sequence definition.
Transaction
This defines the type of transaction record that will be recorded. It is pre-determined by the action being performed.
Purchase Order
This is the purchase order number of the purchase order against which the goods are being returned.
Reference Code
The reference code is a free text field where any associated reference code can be added i.e. if the goods are being returned against a supplier provided returns number.
Move Date
The Move Date is the date of the Inventory Movement. Although this can be adjusted by the user, this defaults to the current date.
Supplier
The Supplier is a drop-down list of suppliers defined within the system; this is the supplier the items are being returned to. When returning against a purchase order this field is determined by the selected purchase order and cannot be changed.
User
This is the login ID of the user performing this transaction it cannot be changed using this form.
System Date
The System Date is the date that the Inventory Movement is entered into Agility. This is automatically set to the current date and time
and cannot be changed by the user.
Store
The Store field is a drop-down list of all stores defined within the system. This is the store from which the items are being returned.
Labour
The Labour field is used to record the labour resource that requests / performs the inventory movement.
Work Order
The Work Order field stores the Work Order code against which the Inventory movement is associated. If required.
Work Order Task
The Work Order Task is a drop-down list which allows you to select a Work Order Task (which is part of the Work Order selected in the previous field)
for which the inventory movement relates.
Notes
The Notes field is a free text field allowing for the recording of additional comments to regarding the movement.
Currency
This is the currency that the transaction is in, when returning against a purchase order this is derived from the selected purchase order and cannot be changed by the user. If the return is not against a purchase order then the currency is selected from the supplier record once the supplier has been selected.
Return against a purchase order
Movement Lines (these are pre-populated dependant on selected purchase order)
Bin
This is the bin location the item is stored in
Item Code
The inventory item code
Unit of Measure
The unit of measure as defined of on the inventory item.
Item Price
The price of the item displayed in system/purchase order currency.
Currency Cost price
The price per unit of the item in the supplier currency
Quantity
The Quantity field signifies the quantity the quantity to be returned
Remaining Quantity
This will display the remaining quantity of this particular item received against this particular purchase order line.
Line Value
The Line Value is automatically calculated based upon Quantity x Item Price, representing the total price for this movement.
Cost Code
This is the cost code which the transaction will be written against.
Non Inventory Items
Code
Non-stocked item code that was entered when the original purchase order was created.
Description
This is the description of the non-stocked item that was entered on the purchase order.
UOM
The unit of measure as defined of on the non-stocked inventory item.
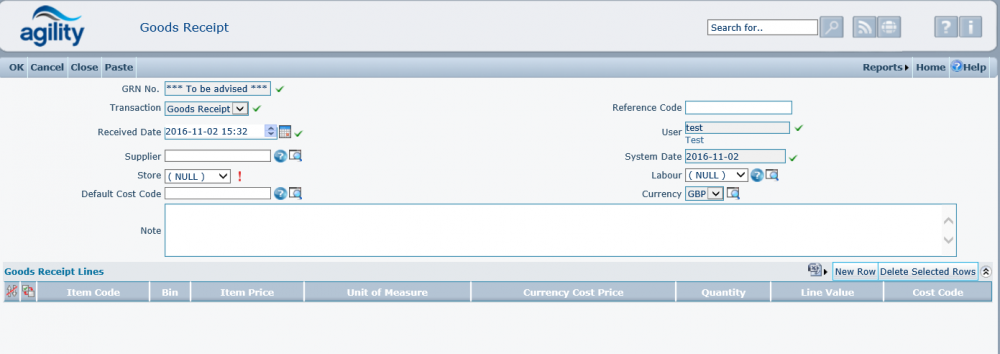
Goods Receipt
This transaction is used for receiving items which have not been ordered using the Purchase Order functionality within Agility.
Received Date
The Move Date is the date of the Inventory Movement. Although this can be adjusted by the user, this defaults to the current date.
User
This is the identifier of the person currently logged on to Agility.
System Date
The System Date is the date that the Inventory Movement is entered into Agility. This is automatically set to the current date and time
and cannot be changed by the user.
Supplier
The Supplier is a drop-down list of suppliers defined within the system.
Store
The Store field is a drop-down list of all stores defined within the system. This is used to record the Store that is receiving the goods.
Employee
The Work Order field stores the Work Order code against which the Inventory movement is associated.
Notes
The Notes field is a free text field allowing for the recording of additional comments to regarding the movement.
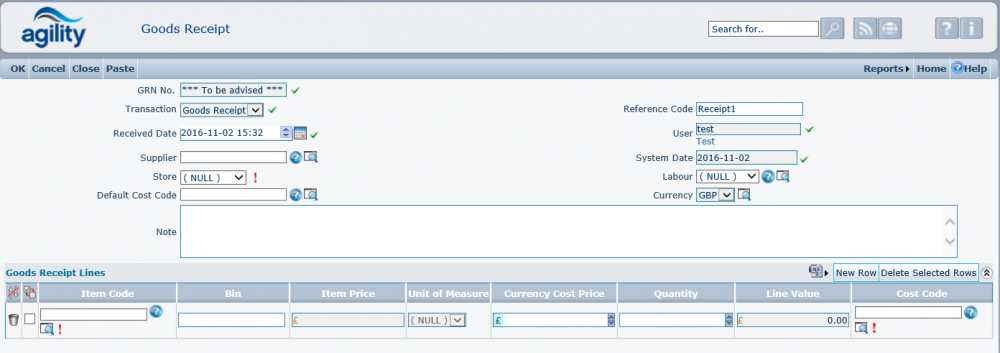
The Movement Lines grid allows the details of the inventory movement to be entered:
Click on Add to add a new Movement Line.
Item
The Item field is mandatory. Click on the help icon to display a list of inventory items. Click on the green tick to select the desired item.
Bin
The Bin Location records the main Bin details for this movement. Click on the help icon to display a list of Bin Locations that hold the inventory
item within the selected Store. If the user wishes to create a new Bin Location, simply type the new Bin description into the field.
This will automatically create the new Bin Location within the Store selected in the Inventory Movement form.
U.O.M.
The unit of measure for this item, select from the dropdown list of existing UOMs
Quantity
The Quantity field signifies the quantity of stock moved in this movement.
Item Price
The Price is the price of a single unit of the inventory item. The value for this field defaults to the price specified in the inventory record.
However, this value can be manually adjusted for this movement only.
Currency Price.
If the Supplier trades in a Currency other than the System Currency, this field shows the value in the Supplier Currency.
Line Value
The Line Value is automatically calculated based upon Quantity x Price, representing the total price for this movement.
Once the inventory Movement Line has been populated, click on ok to return to the Inventory Movement record. The Movement is shown in the Movement Lines grid.
Goods Receipt against a P/O
For receiving goods ordered with Agility Purchase Orders see section Goods Receipt
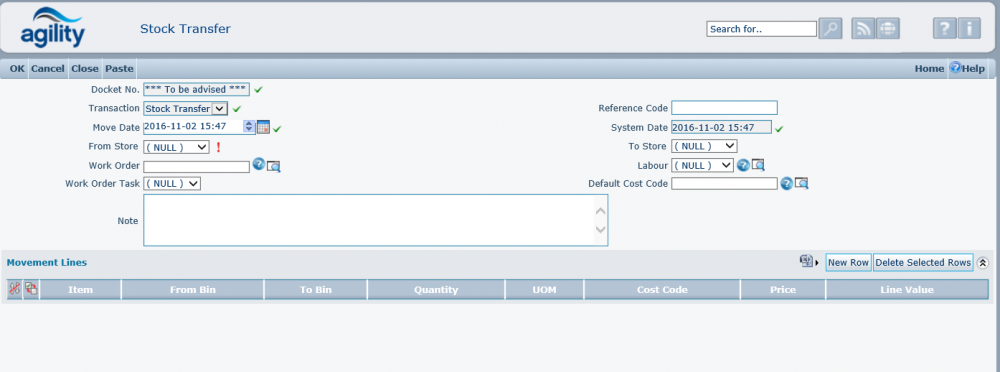
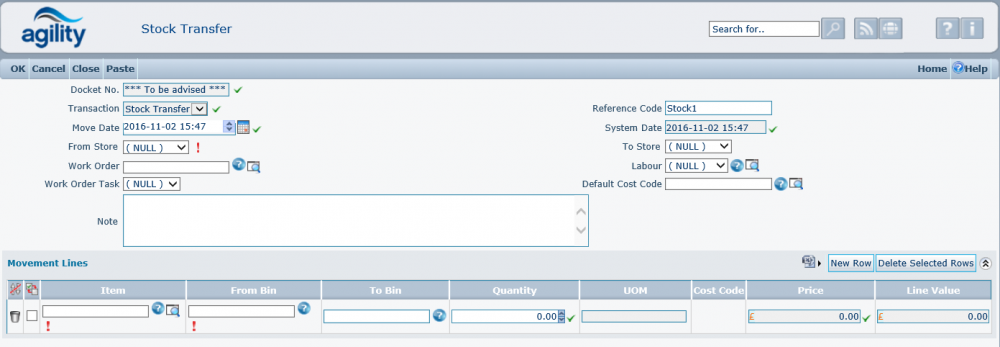
Stock Transfer
This movement is used for transferring stock between two stores and / or bins.
Move Date
The Move Date is the date of the Inventory Movement. Although this can be adjusted by the user, this defaults to the current date.
System Date
The System Date is the date that the Inventory Movement is entered into Agility.
This is automatically set to the current date and time and cannot be changed by the user.
From Store
The From Store field is a drop-down list of all stores defined within the system. This is used to record the Store that is issuing the item(s).
To Store
The To Store field is a drop-down list of all stores defined within the system. This is used to record the Store that is receiving the item(s).
Work Order
The Work Order field stores the Work Order code against which the Inventory movement is associated.
Work Order Task
The Work Order Task is a drop-down list which allows you to select a Work Order Task (which is part of the Work Order selected in the previous field)
for which the inventory movement relates.
Labour
The Labour field records the Labour Resource who requests / performs the inventory movement.
Notes
The Notes field is a free text field allowing for the recording of additional comments to regarding the movement.
The Movement Lines grid allows the details of the inventory movement to be entered:
Click on Add to add a new Movement Line.
Item
The Item field is mandatory. Click on the help icon to display a list of inventory items. Click on the green tick to select the desired item.
From Bin
The From Bin records the Bin from which the item is being transferred. Click on the help icon to display a list of Bin Locations
that hold the inventory item within the selected ‘From Store’.
To Bin
The To Bin records the Bin which is receiving the item. Click on the help icon to display a list of Bin Locations that hold the inventory item within the selected ‘To Store’.
If the user wishes to create a new Bin Location, simply type the new Bin description into the field. This will automatically create the new Bin Location
within the Store selected in the Inventory Movement form.
Quantity
The Quantity field signifies the quantity of stock moved in this movement.
Price
The Price is the price of a single unit of the inventory item. The value for this field defaults to the price specified in the inventory record.
However, this value can be manually adjusted for this movement only.
Line Value
The Line Value is automatically calculated based upon Quantity x Price, representing the total price for this movement.
Once the inventory Movement Line has been populated, click on ok to return to the Inventory Movement record. The Movement is shown in the Movement Lines grid.
Stock Adjustment
This transaction is used to adjust stock values of inventory items.
Move Date
The Move Date is the date of the Inventory Movement. Although this can be adjusted by the user, this defaults to the current date.
System Date
The System Date is the date that the Inventory Movement is entered into Agility. This is automatically set to the current date and time and cannot be changed by the user.
Store
The Store field is a drop-down list of all stores defined within the system. This is used to record the Store which is being adjusted.
Labour
The Labour field records the Labour Resource who requests / performs the inventory movement.
Notes
The Notes field is a free text field allowing for the recording of additional comments to regarding the movement.
The Movement Lines grid allows the details of the inventory movement to be entered:
Click on Add to add a new Movement Line.
Item
The Item field is mandatory. Click on the help icon to display a list of inventory items. Click on the green tick to select the desired item.
Bin
The Bin Location records the Bin which is being adjusted. Click on the help icon to display a list of Bin Locations that hold the inventory item within
the selected Store.
Quantity
The Quantity field signifies the quantity of stock which is being adjusted. This can be a positive or negative value
Price
The Price is the price of a single unit of the inventory item. The value for this field defaults to the price specified in the inventory record. However, this value can be manually adjusted for this movement only.
Line Value
The Line Value is automatically calculated based upon Quantity x Price, representing the total price for this movement.
Once the inventory Movement Line has been populated, click on ok to return to the Inventory Movement record. The Movement is shown in the Movement Lines grid.
Stock Counts
“Stock Counting” functionality has been provided to allow counting to take place on individual stores. The functionality covers the whole cycle, starting from generating the list of all the items in the store, through the stock count list printing and finally entering the counted quantities back into the system and processing the stock count document which generates the relevant adjustments required to bring the Computer Stock in-line with the Actual Stock.
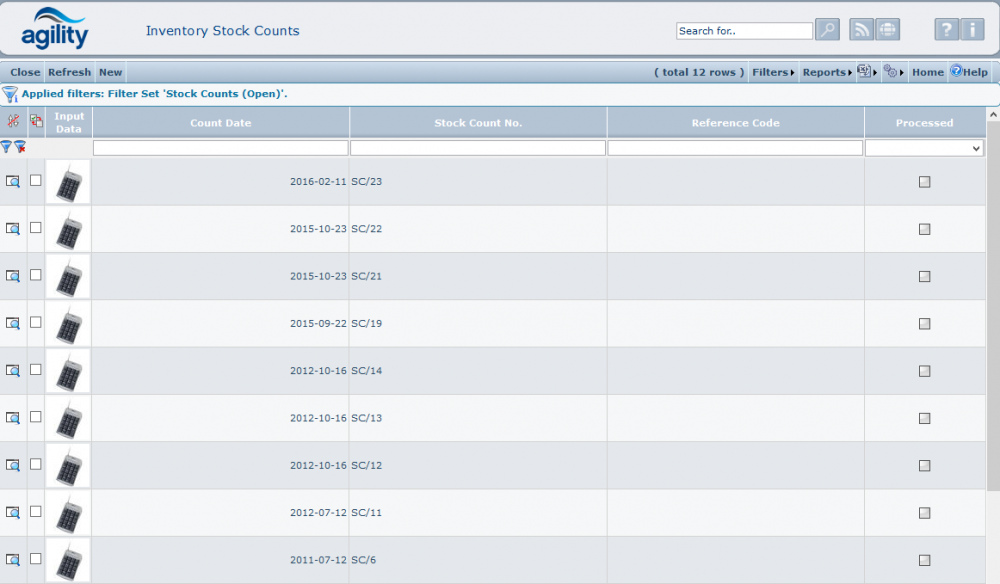
Accessed from Inventory >> Inventory Movements >> Stock Counts
The scan form initially opened after the Stock Counts menu item is clicked, shows all Stock Counts created so far. The information available in the list includes:
Count Date – the date the Stock Count document has been created at,
Stock Count No. – the Stock Count document number generated by the system
Reference Code – the free text reference code entered when the new document is created,
Store location – the code of the store location the Stock Count has been created against,
Processed – the flag denoting whether the particular Stock Count document has been already processed. The detailed meaning of the term “processed” in this context is explained later in the section.
Creating a new Stock Count
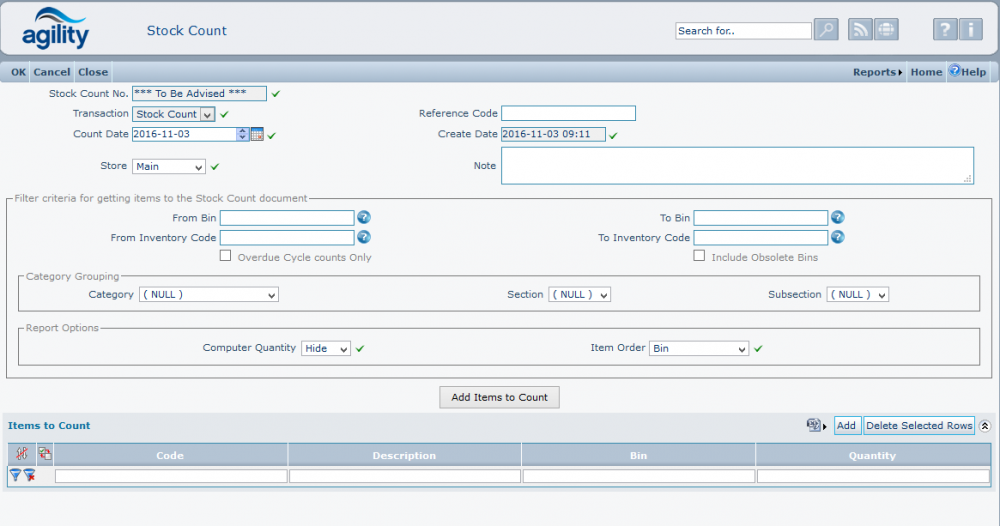
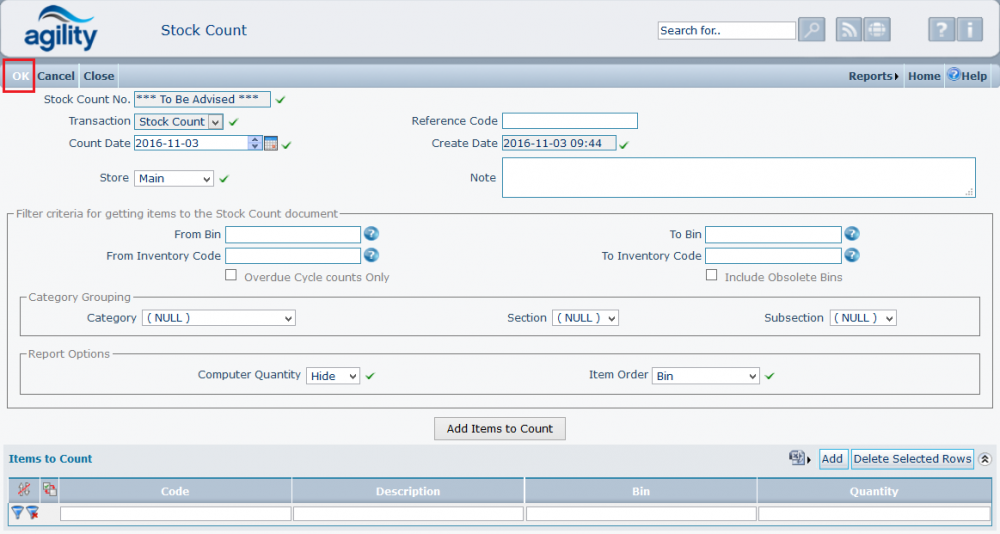
The first step in the process of performing a stock count on a particular store is creating a new Stock Count document. Click “New” menu button on the scan form to create a new document and display its details in a separate form:
Stock Count No.
This field is the number of the Stock Count which will be generated by the system at the time of accepting the document.
Reference Code
A free-text reference code used to recognise the document in the future
Count Date
The date of the Stock Count Document creation. It is defaulted to the current date by the system but it can be modified by the user.
Create Date
The date and time when the document has been created. This a read-only field.
Stock Count Date
The proposed date on which the Stock Count will take place
.
Store
The Store field is a drop-down list of all stores defined within the system. This is used to record the Store the stock count will be created against.
Notes
Free text
Filter Criteria Box.
Start Bin.
If specifying a range of Bins in the Store, previously referenced, this is the start point.
End Bin
If specifying a range of Bins in the Store, previously referenced, this is the end point.
Start Inventory Code.
If specifying a range of Inventory Items in the Store, previously referenced, this is the start point.
End Inventory Code.
If specifying a range of Inventory Items in the Store, previously referenced, this is the end point.
Category Grouping Box
This allows for the selection of Items, to be included in the Stock Count, by any combination of the 3 level Category.
Sort Order Report Criteria
Computer Quantity.
Indicates whether or not the actual Computer Quantity is shown on the Stock Count Printout.
Item Order.
Choose from the dropdown either Bin or Inventory Code.
Add Items to Count.
This button functions as a trigger for getting all the Inventory items into the document which is currently being created. After this action, the document is ready to be printed for the physical stock count to be performed:
If there are some inventory items, which should not be included in this count, they can be deleted from the document using the ![]() (bin) icon in the
Stock Count Lines grid. Multiple lines can be deleted in one go by selecting them and clicking on Delete Selected Rows button in the Lines grid menu.
(bin) icon in the
Stock Count Lines grid. Multiple lines can be deleted in one go by selecting them and clicking on Delete Selected Rows button in the Lines grid menu.
At this point, the Stock Count document can be saved by clicking “OK” button in the form menu.
Printing the Stock Count
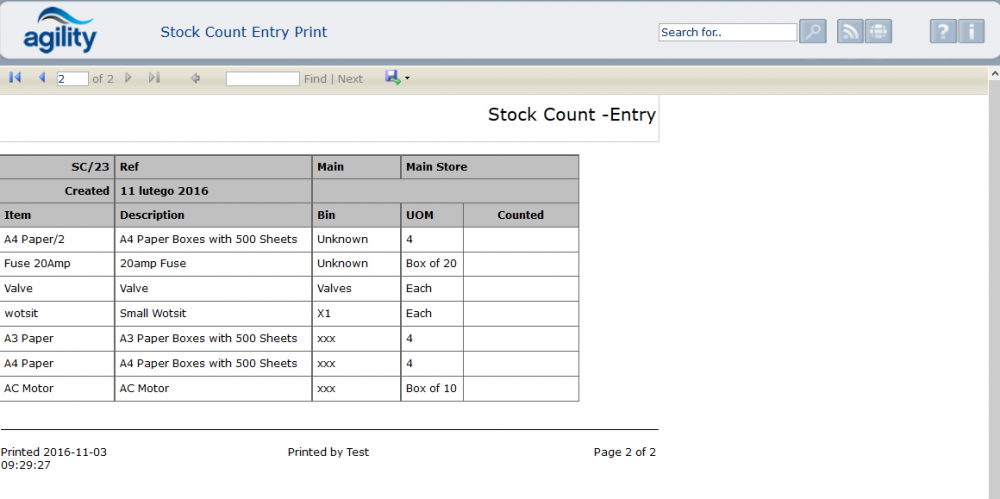
Once the document is saved, the form will change and the “Print” button will become available as in the example below:
Click the “Print” button to print the Stock Count report. The example printout is shown below:
Filling In Counted Quantities
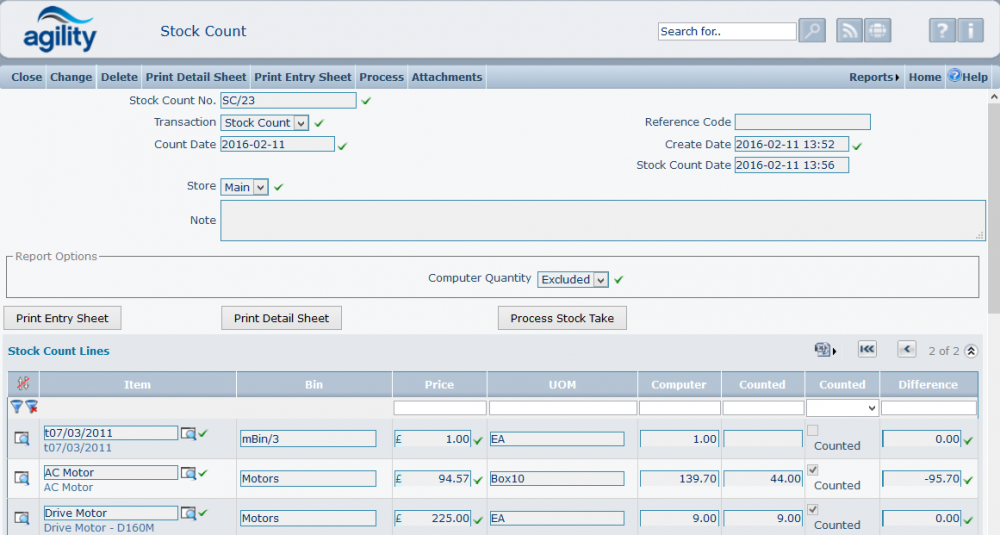
After actual count has taken place and the quantities have been noted on the report, the next exercise is to enter these quantities into the system. This can be achieved by going to the Stock Count scan form and clicking details icon in the line of the chosen Stock Count document.
After the detail form with the document is opened, click “Change” icon to switch the form into the “change” mode. Before the counted quantities can be entered
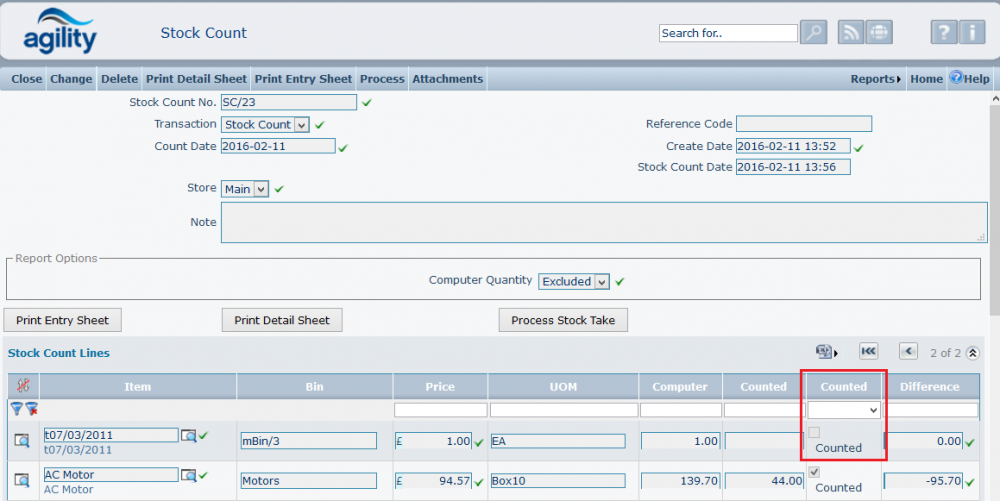
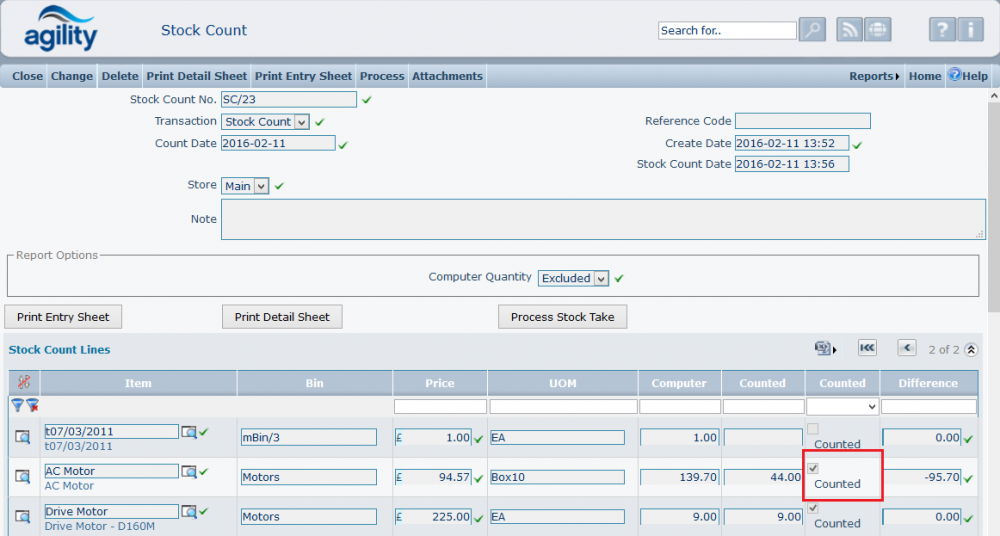
the Stock Count Date should be completed. As each figure is entered the “Counted” flag is selected, if a count is in “Dispute” then the “Counted” flag can be
manually unchecked. Only lines with “Counted” flag checked will be taken into account when the document is processed.
That gives the user an option of leaving some lines not counted and still processing the document:
As the counted figures are entered into the grid, the right hand column will indicate the number by which the Computer Total will be adjusted, either “+nn” or “-nn“
Processing the Stock Count
After all the counted quantities have been entered into the document, it is ready to be processed.
Processing the document generates adjustment movements for all the lines where the “Counted” flag has been checked and the counted quantity differs from the computer quantity.
After the document has been processed, it cannot be modified.
Press “Process” button to process the document.
Purchasing
The purchasing system provides a comprehensive and definable work flow for the manual and automatic generation and management of purchase orders.
Creating Purchase Orders
Purchase orders can either be manually added to the system and processed or created automatically, for details on automated purchase order creation please refer to the ‘Automated Purchase Order Generation’ section of this chapter.
Purchase order workflow
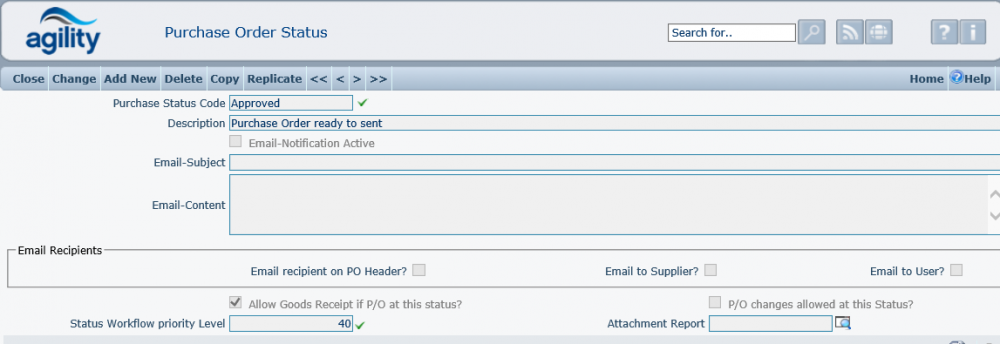
Purchase orders are subject to a work flow that can be defined by the system administrator within the system so that the method can be tailored to suit business needs.
Please refer to ‘Purchase Order Status’ section in standing data for more information on how to do this.
Purchasing help is based upon a simple workflow; creating purchase orders, approving purchase orders, sending purchase orders.
If a user defined purchase order status values exist there may be additional stages involved. You should speak to the agility administrator in this instance.
Creating purchase orders manually
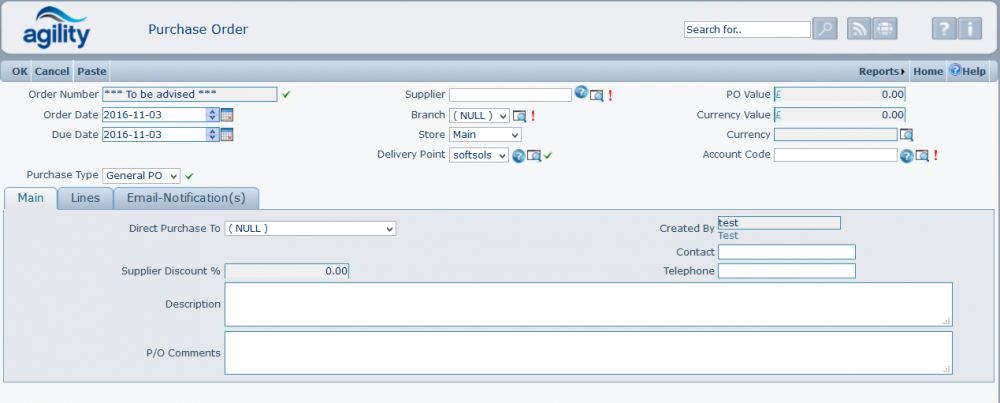
To begin run the ‘add a purchase’ order function.
Purchase Orders >> Add A New Purchase Order
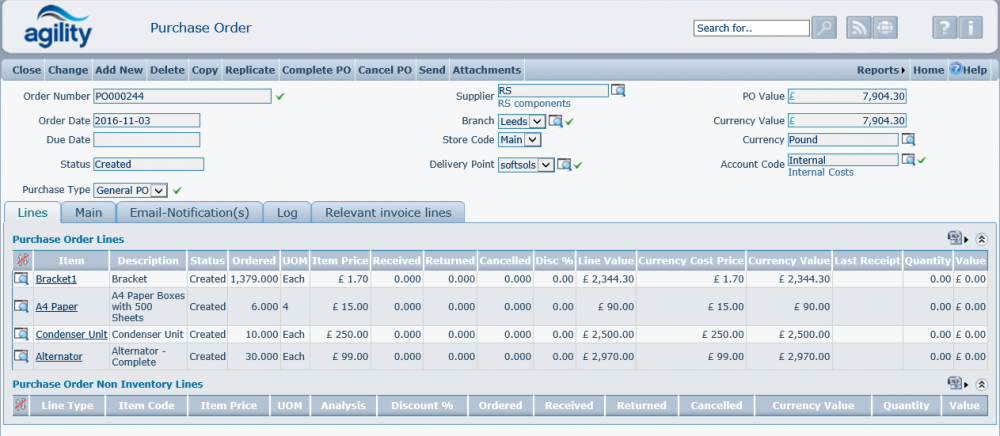
A purchase order is made up of a header and lines. The header contains information that is essentially global and applicable to all lines on the purchase order.
Line data is applicable to the individual items that are being ordered.
A purchase order can be made up on stocked (items defined in inventory) and non-stocked items.
The purchase order can also be defined as ‘direct’ which means that the purchase order is for a specific work order and if so defined the items from the order will be automatically issued to the work order upon receipt.
Purchase Order Header
It is not essential to enter all of the header information before entering the lines. For example, if you enter a line for a stocked part the header will
automatically update based upon information obtained from the item. But the header is a good place to start and the fields definitions are provided below.
Order Number
The Order Number field is automatically generated. This is a unique identifier for the Purchase Order. For instructions on how to define the format of this reference number, please refer to the Transaction Types Sequence Definition section.
Order Date
The Date represents the date that the Purchase Order is raised. The default value for this is the current date, although this can be adjusted manually.
Due Date
This date represent the date that the items are required to be received into stock by. This is particularly useful for reporting purposes and is the basis for identifying outstanding purchase orders.
Supplier
The system operates a one supplier per purchase order system. A supplier needs to be defined in the system in order to be selected. For more information on suppliers, please refer to the help section on suppliers.
Branch
The branch field records the supplier branch for this Purchase Order. This value will default to the default branch for the supplier once one has been selected. For more information on branches, please refer to the help section on suppliers.
PO Value
This value represents the overall order value of the purchase order. The field value is maintained by the system and will update when the purchase order is saved.
Currency
This is the currency for the supplier, which may differ from system base currency and will automatically be updated from the selected supplier.
Currency Value
This is the overall purchase order value in the currency of the supplier as defined by the above currency value.
Store
This is the store location that the items are to be received into. In the case of a direct purchase the items are still received into stock, into a store and then issued from that store.
Delivery Point
This value is selected from delivery addresses that have been defined in the system.
Approval Group
The field will only be enabled if purchase order authorisation is in use. (This is determined by a system parameter setting, which is discussed in the system parameters section.) This is where the required purchase order approval group is selected from the group or groups defined in the system. For more information on approval groups please see the section on purchase order approval. If purchase order authorisation is in use then this value is mandatory and must be completed before the purchase order can be committed.
Purchase Order Type
This option gives possibility to use way to generate new purchase order:
- General PO - this is a standard way to create new Purchase Order.
- Blanket PO - this is a way to create new Blanket Purchase Order. This function gives possibility to create only "Non Inventory Lines".
- Release PO - this is way to create new Release Purchase Order with associating Blanket Purchase Order.
Effective Date and Expiration Date
That fields are visible when we choose "New Blanket Order" on form. Both fields are required to create new record. After creating new blanket order, the fields are read only and we cannot change them.
The requirements for fields: Expiration Date have to greater than Effective Date
Blanket PO
This field is only visible when we choose option "Release PO" from control "Purchase Type". The field is dynamic lookup to find existing "BlanketPO". The filter looking for any purchase orders for that same supplier from "Release Order" and orders where the Effective Date is less than current date of "ReleasePO" and Expiration Date is greater than current date of "ReleasePO".
Current and Remaining Value
Current Value - the total amount spent so far on the related Release Purchase Orders. Remaining Value - how much is left within the Purchase Orders.
The PO Value field for "Release PO" cannot be greater than the remaining value of the associated Blanket Purchase Order.
Other form controls and tabs
The lower pane of the standard purchase order creation form contains multiple selections of tabs for performing different functions.
Main Tab
The main tab is an extension of the header information and contains the work order reference for direct purchases and some free text fields for additional useful data.
Direct Purchase to Work Order
If some or all of the items that are being purchased are to be issued directly to a work order task then the details of an existing work order needs to be defined here.
This enables an extra field on the purchase order line that stores the work order task to which the items on the line will be issued. Each line on a purchase order can be issued to a different work order task.
This field is hidden when change "Purchase Type" to "Blanket PO".
Above; Example from purchase order line
To save the user having to enter the same work order task details on each line, this field is used to provide a default value for the line which is editable
value and that is automatically applied to each purchase order line, stocked or non-stocked, that is added.
If the purchase order only contains some or all items that are to be issued to just one work order task. Then the number and task code (which is derived from the selected work order) need to be that of the required work order task. If the purchase order contains items that are to be issued to different work order tasks then any of the work order numbers task codes can be used, but since this is the default line value it is recommend that you enter the value for the work order task where the majority of items on the order are to be issued.
Entering a value here also enables purchase order lines for non-stocked parts to be added.
Created By
This is a system maintained field indicating the logged on user who is creating the P/O
Supplier Discount
This is a system maintained value that is taken from the discount value if present of the selected supplier and is always applied to purchase order lines for stocked items but is not applied to non-inventory lines.
Contact & Telephone
More details about the logged on person raising the purchase order
Comments
This is a free text box allowing for any additional and relevant comments to be added to the purchase order.
Lines
The lines tab is where the items to be order are added as purchase order lines. These are either stocked or non-stocked items. (These are sometimes referred to as
inventory or non-inventory and/or NSP’s (Non-stocked parts).
Purchase Order Lines are added through one of 2 grids under the tab. One is defined for stocked items and the other for non-stocked. Each grid contains slightly
different options that are relevant to the type of item being ordered.
The ‘Purchase Order Non Inventory Lines’ only becomes available when a work order value has been entered into the ‘Direct Purchase to Work Order’ field on the main
tab described above.
A purchase order needs at least one purchase order line.
Creating a purchase order line for a stocked item
Select the ‘new row’ option from the ‘Purchase order lines’ grid. This will create a new blank line.
Then fill in the line detail as described below.
Preferred Supplier
When selecting a stocked item, once the supplier has been defined on the header section the items available to be selected from the inventory catalogue will be only those that are marked as being supplied by the selected supplier. By selecting no for the value this allows this to be overridden and any item from the inventory catalogue to be selected.
Inventory Item
This is the inventory item to be ordered.
UOM
The UOM field displays the Unit of Measure for the selected inventory item. This cannot be changed by the user.
Quantity (QTY)
The Quantity field signifies the quantity of the item to be ordered.
Free of Charge
Usually the system will not allow a zero value purchase order line to be created, however if the free of charge flag is checked this will allow a zero value line to be created. This could be used for example, for items required for free replacement.
Purchase orders can be raised in currencies other than the system base currency, so that suppliers who operate in a different currency can be accommodated.
This is reflected on the purchase order line detail shown below. The currency is based upon the supplier record and needs to be defined in the system first with an exchange rate.
Please refer to the currency in the standing data section for information on how to do this. If supplier and base currency are the same then the currency and system price fields
will display the same values.
Currency Price
The currency price is the price of a single unit of the inventory item in the currency of the order based upon the supplier. This currency value is defined by the system in the purchase order header and is taken from the supplier record. The value is calculated using the most recent exchange rate stored in the system for the selected currency with a date that is before the purchase order creation date.
Currency Value
This value is the total value of the line in the selected supplier currency and is calculated using; quantity x currency cost price.
Price
The price is the cost of a single unit of the inventory item. The value for this field is defaulted from information specified in the inventory record and is in system base currency.
The default price is evaluated in the following order: -
If a “Supplier Price” record exists for the specified item, and the specified Supplier on the Purchase Order header, the supplier price is used as the default value,
taking account also of any Price Breaks which have been defined under the Supplier price record.
If a “Supplier Price” record does not exist for the specified item, and the specified Supplier on the Purchase Order header, the “Last Cost Price”
defined (and automatically maintained) on the Inventory Item is used as the default value
If the item has never been received before, and the “Last Cost Price” is not defined on the Inventory Item, the (Standard) Price defined on the Inventory
Item is used as the default.
However, the value can be manually adjusted for this specific purchase order line. The currency cannot be changed.
Line Value
This value is automatically calculated by the system using quantity x price and represents the value of the line in system base currency.
 Example PO line showing on a system where base currency is in GBP.
Cost Code
This field is to be populated if cost codes are enabled in the system. This determines the cost centre that each line will be posted against. Select from the values in the Cost Code Table.
Job & Task
This extra field only becomes available when a value has been entered into the direct purchase value on the main tab and specifies which work order task the item(s) on this line will be issued to upon goods receipt. The value will be automatically filled in from the value that is entered on the main tab. But the value can be changed by the user.
Creating a purchase order line for a non-stocked item
The method of adding a non-stocked part is the same as with a stocked part but the fields are slightly different.
To create a non-stocked line the order must be a direct purchase, this will enable the ‘Purchase order non-inventory lines’ grid. To create a new line either select
the ‘new row’ option from the ‘Purchase order non-inventory lines’ grid which will create a new blank line. Or select the add button from this grid which will open a new form.
In either case the majority of fields are common between the two.
Line Type
This is used to determine if the line is for a quantity of items or simply a value, such as a service. This will enable or disable the quantity and UOM fields on the line.
Item Code
Enter a short description of the item or service to be purchased here.
Description (Only accessible on the detailed view of the line or when add is selected)
Enter a detailed description of the item or service to be purchased here.
UOM
The unit of measure that the item is to be order in, this is selected from the pre-defined system UOM’s. This value is only used if the line type ‘Quantity’.
Quantity
This represents the quantity of the item in the specified UOM that is to be ordered. This value is only used if the line type is ‘quantity’
Since purchase orders can be raised in currencies other than the system base currency, so that suppliers who operate in a different currency can be accommodated.
This is reflected on the purchase order line detail shown below. The currency is based upon the supplier record and needs to be defined in the system first with an exchange rate. Please refer to the currency in the standing data section for information on how to do this. If supplier and base currency are the same then the currency and system price
fields will display the same values.
Currency Price
This price needs to be entered as the price is the price of a single unit of the item for quantity type lines or the total price of the item for value type lines,
in the currency of the order based upon the supplier. This currency value is defined by the system in the purchase order header and is taken from the supplier record.
Currency Value
This value is the total value of the line in the selected supplier currency and is calculated using; quantity x currency cost price for quantity type lines or currency cost price x 1 for value type lines.
Price
This price represents the cost of a single item for quantity type lines, or the cost of the live for value type lines, in system base currency. The value is automatically calculated using the exchange rate stored against the currency of the order.
Line Value
This value is automatically calculated by the system using quantity x price for quantity type lines or 1 x price for value type lines, it represents the total value of the line in system base currency.
Analysis
This provides a method of grouping no-stocked items together in a similar manner to inventory categories. It uses a multi-dictionary defined in the system where different analysis values can be entered.
Cost Code
This field is to be populated if cost codes are enabled in the system. This determines the cost centre that each line will be posted against. Select from the values in the Cost Code Table.
Job & Task
This value specifies which work order task the item(s) on this line will be issued to upon goods receipt. The value will be automatically filled in from the value that is entered on the main tab. But the value can be changed by the user.
Line Status (Only accessible on the detailed view of the line or when add is selected)
This is a system maintained identifier that shows the current status of the purchase order line.
Stock Box (Only accessible on the detailed view of the line or when add is selected)
These are additional system maintained fields that allow tracking of the non-stocked part in terms or quantities ordered, received or returned.
Release Purchase Orders
This scan shows the Release Orders which connected with current Blanket Purchase Orders. The scan is visible only mode to read only.
Email Notifications Tab
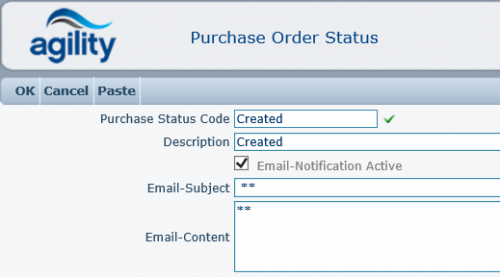
Individual purchase order statuses can be configured to trigger the sending of an email notification when the purchase order attains that status.
This is configured in the ‘purchase order status’ standing data. Please refer to the standing data chapter for more information on this.
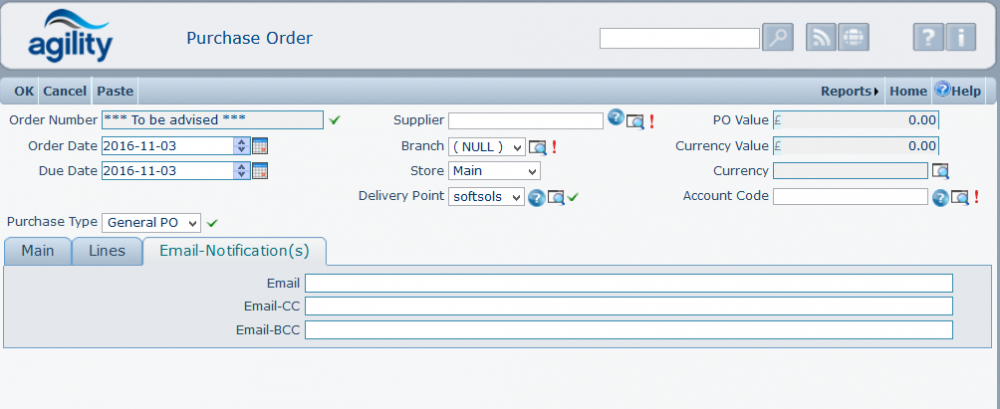
It is possible to nominate specific common mail recipients on the purchase order status. The email notifications tab allows additional mail
recipients to be added to individual purchase orders.
To add mail recipients add an individual email address or build up the semi-colon delimited list of recipient email addresses in the address boxes
dependant on the way in which you want them to receive the mail.
Email
This is the email address of the main recipient(s)
Email-CC
This is for any recipient(s) where a copy of the mail is to be sent.
Email-BCC
This is for any recipient(s) where a copy of the mail is to be sent but without the other recipients being aware of it.
Adding & committing a manual purchase order to the system
Build the purchase order up by entering the information required;
Complete the header information
Add any extra details under the main tab
If a direct purchase order is being created enter a work order task on the main tab
Open the lines tab and add the first item line either stocked and/or non-stocked
Click new row on the appropriate grid to add additional lines and repeat until all lines have been added
Enter any mail addresses
Finally click the ‘OK’ button on the menu bar to commit the order to the system. The status at which the purchase order will be depends on system configuration.
The order can be subsequently changed or cancelled but this is dependent on constraints enforced by the purchase order status. For example, if purchase order approval is in use and the purchase order has been approved then it will not be editable.
Automated Purchase Order Generation
It is possible to make the system automatically create purchase orders for stocked items based upon stock levels within the system. A minimum stock level can be stored against each inventory item which can then be used in conjunction with current stock level to determine if an item requires re-ordering. This is all done using stock replenishment.
Prior to running stock replenishment certain default values may need to be considered and set.
When an item is found that requires re-ordering the system tries to determine the preferred supplier for the item from the inventory item record.
If no preferred supplier is found then it will use the supplier, if set, in the system parameter value; “DefaultSupplierCode” (please refer to system parameters
section for more information on this).
Care should be taken when specifying this as any items where no preferred supplier is found will be potentially added to a purchase order for the default
supplier even if this supplier does not supply this item.
If purchase order approvals are in use then a default approval group must be set in the system parameter value; “ApprovalGroupForAutoPO”. The value needs to be the
code of the approval group that is to be used for authorising auto purchase orders. Please refer to purchase order approvals and system parameters for more information
on these aspects.
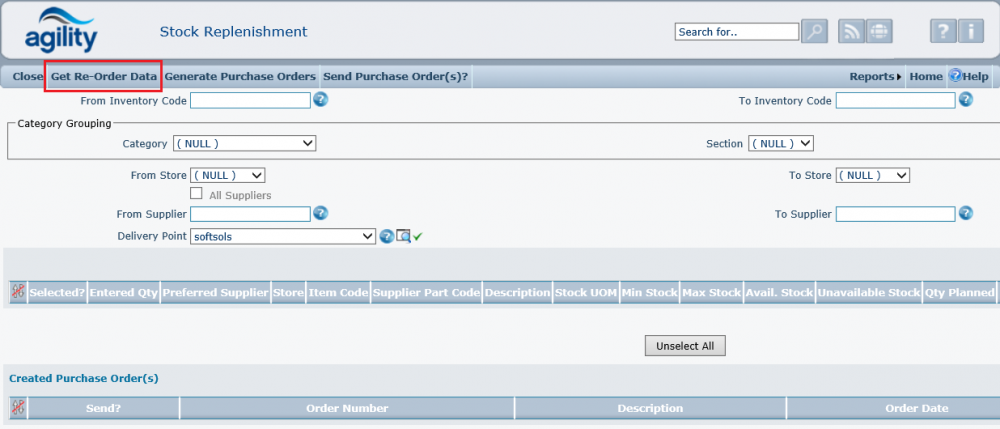
Stock Replenishment
Purchase Orders >> Inventory Replenishment
The Stock Replenishment functionality provides the user with a list of inventory items where the stock level is equals to or lower than that the minimum stock level.
Running the stock replenishment function opens a form containing some filter criteria, a grid that will display items that are considered as requiring re-order,
and a grid that will display generated purchase orders based upon the stock items selected by the user.
Stock replenishment is done in stages.
Applying filter criteria
The top pane of the form contains a selection of filter criteria allowing stock level analysis to made on specific ranges of inventory items; for example a specific category of inventory items, such as consumables. Or just for certain suppliers. Filter criteria, if required, as defined below should be set prior to carrying out the next stages.
Filters
Inventory code
This allows a range of inventory items to be selected. Leave both these values blank for all items meeting any other specified filter criteria.
Category Grouping
The category grouping filters allow specific categories of items to be selected.
Category
From this drop down list any individual inventory category can be selected. This will return only items that have the selected category specified on the inventory record and that meet any other specified filter criteria.
Section
The options available in this drop down list are determined by the category selected above. This value is used in conjunction with the category filter to apply a category section filter. Only sections that exist under the selected category can be selected. If no category is selected then no options will be available. If selected this will only return items where the selected section is specified on the inventory record and that meet any other filter criteria.
Sub-Section
The options available in this drop down list are determined by the section selected above. This value is used in conjunction with the category and section filter to apply to narrow down the category filter to a specific sub-section. Only sub-sections that exist under the selected section can be selected. If no section is selected then no options will be available. If selected this will only return items where the selected sub-section is specified on the inventory record and that meet any other filter criteria.
Store
Where more than one store is in use this allows a range of stores to be selected. Leave both these values blank for all stores to be analysed or put the same value in both to select a single store.
All Suppliers
If this check box is selected then all stock levels for all items for all suppliers will be examined. If the box is unchecked then 2 extra fields will appear.
The fields allow a range of suppliers to be entered. If a range is entered then only inventory items that can be obtain from suppliers in the selected range
will be returned that also meet any other defined filter criteria.
Leaving both values as null will select all suppliers.
Once the filter criteria, if required have been set the next stage is analyse and return items, meeting any specified filter criteria that require re-order.
The next step is then to run the get re-order data function.
Get Re-Order Data
The get re-order data function makes analysis of the stock levels for all items meeting any selected filter criteria and then returns a grid comprising a list of all items that have reached re-order point.
To run the re-order routine click the ‘’Get Re-Order Data’ option at the top of the form;
Dependant on the quantity of items within the selected filter criteria this could take a little while to run. Once complete the re-order data grid will become available.
An item is determined as reaching re-order point when the following is true;
Quantity Available + Quantity On Order <= Minimum Stock Value
This data is used to produce purchase orders and all selected items in the grid will be added to a purchase order.
The grid contains a column where the user can de-selected any items that they do not wish to re-order at this time.
Any items that are de-selected will re-appear the next time the ‘get re-order data’ function is run providing that they still at re-order
point and meet any selected filter criteria.
For each item the grid also displays the amount that will be ordered. The quantity that needs to be ordered is calculated on this basis;
(Maximum stock – Quantity Available) + Quantity Planned
This provides the re-order quantity in the stock UOM, if the supplier UOM is different to the stock UOM then this is taken into account and
the re-order quantity is adjusted accordingly.
I.e. if the stock UOM is single units and the supplier UOM is packs of 4. If 20 single items are required the re-order quantity would be 5.
The fields in the grid are defined below;
Selected
This check box is used to select or de-select the item from being added to a purchase order. De-selecting the item will prevent it from being ordered in this run.
Entered quantity
The quantity that will be ordered on the created purchase order, this will default to the calculated re-order quantity but can be modified by the user if required.
Preferred Supplier
The system will create a purchase order for each different supplier. Items will be added to the purchase order for the supplier that has been marked as the preferred supplier on the inventory item. If no preferred supplier exists then the default supplier for the item will be used. If no default supplier exists for the item either then the item, even if selected will not be added to a purchase order.
The preferred supplier is determined in the following manner;
It will use the supplier that has the lowest available preference number, null is the lowest, where the revision date on the supplier record is before the current date and the supplier has not been marked as obsolete. In the event that there is more than one supplier record with the same preference value, that is not obsolete and has revision dates are below current dates; then the first supplier record in the list will be used. If no suppliers meet these criteria or none of the suppliers have a preference value then the default supplier specified in the system parameter “DefaultSupplierCode” will be used. If no default supplier code is set then the system will display ‘No Preferred Supplier’. Items that have no preferred supplier will be excluded from automated purchase order generation.
Store
This is the store location for the item and where the goods will be received into. This value is hyperlinked and clicking on it will display the store detail record.
Item Code
The inventory item code which is hyperlinked and clicking on this will display the detail record for the item
Supplier Part Code
The supplier part code, if available, taken from the stock item for the selected supplier
Description
Description of the stock item
Stock UOM
The unit of measure that the item is stock/issued in
Min Stock
The minimum stock level as defined on the item record
Max Stock
The maximum stock level as defined on the item record
Avail. Stock
The quantity of available stock, this represents the quantity of stock currently available this value takes into account any allocated or unavailable stock.
Unavailable Stock
This value denotes items that may be in stock but have already been allocated to a task. I.e. there may be 10 items in stock but 4 have been allocated to a task so the actual stock level is 6.
Qty. Planned
This value indicates the quantity of items required for issue to any existing planned tasks.
Supplier UOM
The unit of measure that the item is supplied in by the item supplier taken from the item record
Re-Order Qty.
The quantity that needs to be ordered to take the stock level back to the specified maximum stock level and meet any anticipated demand (see Qty. Planned), the value is displayed is based upon the supplier UOM
Price
The price per UOM for the item which is taken from the last price value of the item
Processing re-order data
The user should examine the grid contents, de-select any items that they do not wish to order at this time and/or adjust any order quantities. Once that is
complete then purchase orders can be automatically generated from the re-order data.
Generate Purchase Orders
This function will generate purchase orders in the system using the data from the re-order data grid. Purchase orders will be created for any items in
the re-order data grid where the selected check box is ticked and the order quantity is greater than 0 and the supplier value for the line is not marked as ‘no preferred supplier’.
To launch the function click the ‘Generate Purchase Orders’ option at the top of the form.
Once the option has been selected the system will automatically generate purchase orders for the relevant suppliers. When the process is complete these will be displayed in the purchase orders grid.
The purchase orders can be examined in detail by click on the purchase order number hyperlink which will open the purchase order detail form.
Dependant on if purchase order approval is in use then it is possible to send the purchase orders from the purchase order grid.
If purchase order approval is in use the order will need to be approved by member(s) of the approval group assign to the purchase order.
In the case of auto-generated purchase orders this will be the approval group that has been specified in the “ApprovalGroupForAutoPO” system parameter.
Sending Auto Generated Purchase Orders (Optional)
For more information on the function action and resultant status of sending purchase orders please refer to the send purchase order section.
This element, which is not required to be performed from stock replenishment, deals with how to send purchase orders, ‘en masse’, from the stock replenishment form.
The purchase order grid shows a list of all the generated purchase orders. The user should observer for any messages at the top of the form that
may detail any items that have been excluded. Clicking on the message will display a list of items.
Each line in the grid represents a different purchase order. To send one or more purchase orders place a tick in the checkbox for that order in the ‘send’ column.
Once the required purchase orders have been selected clicking the ‘Send’ option at the top of the form will attempt to send all selected purchase orders.
When purchase orders have been sent then the status on the order will be updated and the grid will reflect this.
You should note that if purchase order approval is in use then the system will prohibit the sending of any purchase orders that have not been approved. In this scenario the purchase order will exist in the system at a status of ‘Awaiting Approval’.
Approving Purchase Orders (Optional)
Dependant on system configuration the next stage is approval of purchase orders. For more information on the approval process, please refer to the sections, ‘Purchase order approvals’ and ‘Purchase order approval process’ in this chapter.
Sending Purchase Orders
Once purchase orders have been created, and approved if in use, they can be ‘sent’. For more information on sending purchase orders please refer to the ‘Send Purchase Orders’ section.
Enquiring on Purchase Orders
To view and or change purchase order details and perform certain other functions with purchase orders scan and detail forms have been included and will be discussed in this section
Purchase Order Scan
The purchase order scan provides a searchable, sortable, filter controlled view of purchase orders in the system.
Accessed from Purchase Orders >> Purchase Order Scan
The scan shows a line for each purchase order meeting any specified form filter criteria. Form this form it is possible to drill into the detail of any individual purchase order and perform bulk printing or sending using the selection check boxes.
To send purchase orders, select one or more required purchase orders by clicking the checkbox on the order line and click the ‘send’ option at the top of the form.
Only purchase orders that are at a status where sending is allowed can be sent. If any selected purchase orders cannot be sent then a detail message will be
displayed at the top of the form. If the message is expanded by clicking on the three dots (…) then details of which purchase orders could not be sent will be shown.
For more information on sending purchase orders please refer to the ‘Sending Purchase Orders’ section.
Selecting purchase orders to print is performed in the same manner, by clicking the checkbox on the order line. Then click the ‘Reports’ menu and use the print purchase orders option.
Print output is first displayed in a preview form, where the output can be sent to different media, printers, PDF, Word, Excel etc.
Column Definitions
The columns used in the grid are defined below.
Order Number
This is the purchase order number.
Order Date
The date that the order was created
Status
The current status of the purchase order taken from the purchase order header
Supplier
The supplier the purchase order is for
Branch
The above supplier’s branch
Telephone
The above supplier’s telephone number
Purchase Order Line Scan
The purchase order scan provides a searchable, sortable, filter controlled view of all purchase order lines in the system.
Accessed from Purchase Orders >> Purchase Order Lines Scan
This scan form will show a row for each Line within a Purchase Order. Therefore, if a Purchase Order consists of three Purchase Order Lines,
there will be three entries within the Purchase Order Line Scan. The benefit of this display is that a user can quickly determine how many items for
each Purchase Order Line have been received.
Example showing order with 2 lines
This scan form also contains a ‘send’ function allowing for the bulk sending of purchase orders. Only purchase orders that are at a status where sending is allowed can be sent.
To send purchase orders, select one or more required purchase orders by clicking the checkbox on the order line and click the ‘send’ option at the top of the form.
If the purchase order has multiple lines, if any one line from the order is selected then the purchase order is at a status where it can be sent then the whole purchase order will be sent. Sending of individual purchase order lines is not possible.
So in the screen shot below the complete purchase order number P0000062 would be sent.
Clicking the detail icon on the line will drill into and show the whole purchase order detail.
The scan form also contains a print function. As with bulk sending from this form, selecting anyone line from a multiple line purchase order will mean that the whole
purchase order is printed. (If this is performed by using the print purchase order function)
Column Definitions
The columns used in the grid are defined below.
Order Number
The purchase order number
Line No.
The line number of this particular line in the purchase order
Order Date
The date the purchase order was created
PO Status
The current purchase order status taken from the purchase order header
Supplier
The supplier the purchase order is for
Currency
The currency of the purchase order, taken from the supplier
Branch
The above supplier’s branch
Telephone
The above supplier’s telephone number
Inventory Code
The item code of the item if it is a stocked part
NSP Code
The item code for the item if this line is for a non-stocked part
Description
Short description of the item
Stocked?
Indicates if this is a stocked item
PO line status
The status of the purchase order line
Qty Ordered
The quantity of the item order on this line
UOM
The unit of measure that the item has been order in
Qty Received
The quantity of items received against this particular purchase order line
Qty Cancelled
The quantity of items cancelled against this particular purchase order line
WO Code
If this is a direct purchase this is the work order number to which the direct purchase has been made.
Awaiting Approval
This scan form provides the logged on user with a searchable, sortable, filter controlled view which is
Pre-filtered for purchase orders that are at a status of awaiting approval or in approvement and where the logged on user is a member of the approval group assigned to the purchase order.
In other words, if you are an approver, this will show you a list of purchase orders that you need to approve.
Accessed from Purchase Orders >> Awaiting Approval
Clicking the detail icon on the line will drill into and show the whole purchase order detail, from where the order can be approved.
Column Definitions
The columns used in the grid are defined below.
Order Number
The purchase order number
Order Date
The date the purchase order was created
Raised by
The name of the logged on Agility user that created the order
Status
The current purchase order status taken from the purchase order header
Purchase Order Detail
Purchase order detail is either accessed from the detail icon on a scan form or by drilling through to it using a hyperlink.
It is a form that provides a detailed view of the order, ability to change the order and perform other functions, such as approve, send, cancel etc.
For more information of these functions please refer to the relevant ‘Additional purchase order functions’ section in this chapter.
At the top of the for the purchase order header information is displayed. Below a series of tabs contains further purchase order detail.
The menu bar contains various actions that can be performed with the purchase order currently being displayed.
These options are enabled or disabled dependant on the current status of the purchase order. So for example if purchase order approvals is in use,
then if the purchase order is at a status of ‘Awaiting Approval’ then the ‘send’ function will be disabled. These functions are discussed under a
separate topic in this chapter.
Column Definitions
For all the header fields and content of the Lines, Main and Email Notification(s) tabs please refer to the ‘Creating purchase orders manually’
section of the ‘Creating purchase orders’ as all the fields are defined in that area under, Purchase Order Header, Purchase Order Lines and Email Notifications tab.
Log
The log tab visible in the purchase order detail form displays a grid with filter options showing an audit trail of activities for the currently
viewed purchase order.
Purchase Order Approvals
The purchase order approval stage is optional but allows for an additional level or layer of control. If purchase approval is in use then one or more nominated users, based upon a financial limit, have to approve purchase orders in the system prior to the order progressing within the defined workflow.
Purchase orders that are at a status of ‘Awaiting Approval’ cannot be ‘sent’ or progressed. Dependant on status further subsequent editing of purchase orders that have
been approved can be prohibited.
In order to use purchase approvals some additional system configuration needs to take place. This should be done by the Agility system administrator.
Activating Purchase Approvals
The following system parameters need to be set to set approvals.
Navigate to the system parameters section;
System Configuration >> System Data >> System Parameters
Click the detail for the ‘Inventory’ parameters.
Then click the detail icon for the ‘PO Authorisation’ subfolder.
Then set the parameters as follows;
| Parameter | Value |
|---|---|
| Enabled | True |
| ApprovedPOStatus | Approved |
| AwaitingApprovalPOStatus | Awaiting Approval |
| InApprovementPOStatus | InApprovement |
| RejectedPOStatus | Rejected |
The ‘enabled’ parameter is the one that actives purchase approvals. The remaining four parameters are used to determine which purchase orders status defined in
Agility is used when the purchase order is at that point in the workflow. The value relates to the purchase order status code.
Purchase order statuses can be accessed from;
Standing Data >> Inventory >> Purchase Order Statuses
Please refer to the standing data chapter for more information on this.
The choice of purchase orders status here is important as workflow behaviour is determined by the purchase orders status configuration.
For example the purchase order status of approved does not allow changes to the purchase order. The above are provided as guidelines based upon pre-defined system status values.
Above shows example purchase order status record for ‘Approved’ status
Definition of status parameters;
ApprovedPOStatus
Status to be used following purchase order being successfully approved
AwaitingApprovalPOStatus
Status to be used following creation of the purchase order prior to approval
InApprovementPOStatus
Where more than one member of the approval group needs to approve an order this is the status of a part approved order
RejectedPOStatus
The status to be used when an order has been through the approval process but has been rejected by one or more members of the approval group
A status value needs to be set for each parameter, which must be pre-defined in the system purchase orders statuses.
Approval Groups
An approval group is a collection of one or more members that can approve purchase orders, usually structured with differing financial limits.
Whilst it is common to have one approver group, multiple groups can be created allowing for departmental or divisional structure.
Within the group different limits can be set for each member and one or more members in the group can be marked as mandatory.
The group is defined and then members are added to it.
To define a new group open the approval groups scan form and click the ‘add new’ function.
Purchase Orders >> Approval Groups
Enter a short code and long description to identify the group.
Next approval group members are added to the ‘Approver(s)’ grid. The group must contain at least one member. A member must be a pre-defined Agility user.
Approval Group Members
To add a new approval group member click the add function at the top of the ‘Approver(s)’ grid. This will open the add form.
Select the user from the drop down list of Agility users; this is the user log in that is to be used as an approver. I.e. under this log in, dependant on limits, this user will be able to approve purchase orders.
Order
This is used by the email notification process to determine the order of mail recipients when sending notifications. When a purchase order is raised and at a status of ‘awaiting approval’ the system will send an email to the approver with the lowest order number on that purchase order. Once that approver has approved the order, if the purchase order is not at a status of approved, meaning that the list contains mandatory approvers then the system will send a notification to the next approver with the lowest order number. The notification process will continue in this way until the order is at a status of approved.
Value limit
This is the value for which this approver can approve purchase orders up to and including. It is based upon the overall value of a single purchase order. I.e. if this limit is set to 100 then the approver could only approve purchase orders where the overall value of the purchase order was equal to or less than 100. This is used in conjunction with the ‘Skip If Exceeded’ option.
Skip If Exceeded
This flag is used by the system to determine which approval group members from the approval group on the order need to be added to the list of approvers on a purchase order.
If this option is checked and the overall purchase order value exceeds the approval group member’s limit then they are not added to the purchase order as an approver.
Once an approver has been added to a purchase order they can approve the order even if the overall purchase order value exceeds the approver’s limit.
I.e. if this option is not enabled then an approver can be added to a purchase order where the overall purchase order value exceeds the approver’s limit.
If the list of approvers on the order contains no mandatory members then this approver would be able to approve the order.
Mandatory Approver
If this option is enabled then this approver must approve any purchase order where they are on the list of approvers for that order. If the list of approvers on a purchase order contains one or more mandatory members then the purchase order cannot become approved until all mandatory members have approved the order. If no mandatory members exist in the list of approvers then any one member of the list of approvers can approve the purchase order.
Can Approve own PO
If this option is enabled then the approver can approve purchase orders they raised themselves.
Substitution
This allows for a different user to act on behalf of this approver to cover periods of absence. To add a substitution entry simply select the user from the drop down list and enter the dates for when the substitution is to start and end.
Once the approval group has been set up, click the OK option at the top of the form to add the approval group and its members.
Email Notifications (Approval Process)
The system will automatically send an email to a member of the approval group on the purchase order,
when the purchase order has been added and reaches awaiting approval status.
The way in which the order of mail recipients is selected is detailed in the flow diagram below.
A mail will only be sent if the flag within their user profile (localized in “Agility User” menu) is set to receive e-mails relating to Purchase orders.
This process is automatically triggered by the system and is not subject to email controls on the PO status or the email notifications tab on a purchase order.
Purchase Order Approval Process
This stage is only applicable if purchase order approvals are in use. Please refer to the purchase order approvals section for more information on configuration and set up of this function. This section deals with the action of approving orders.
Purchase order approval is done from the approvals tab on the purchase order detail form. The purchase order detail form can be accessed from any purchase order enquiry form but the ‘Awaiting Approvals’ form is specifically designed to return a pre-filtered scan form of orders awaiting approval.
Please refer to the ‘Enquiring on purchase orders’ section of this chapter for more detail on this.
Shown above; purchase order detail form extract
The approver grid will list all the relevant members of the approval group assign to the purchase order that can approve the order based upon setting.
Dependant on the approval group configuration either any one member can approve the order, or more than one member will need to approve the order.
To approve, when logged in as a user who is a member of the approval group, click the approve button to approve the order.
Note it is not necessary to click the change option first.
To reject the order, when logged in as a user who is a member of the approval group, click the reject button. Note it is not necessary to click the change option first.
If the configuration of the approval group requires only any one member to approve the order then upon approval the purchase order will be approved and moved to the
next status in the purchase order workflow. The approver grid will also be updated to reflect the change. The ‘info’ value will be populated with the name of the
approver who approved the order and a date/time stamp will be applied.
If more than one approval group member needs to approve the order then only the information for that approver will be updated.
The purchase order status will still change to and remain at ‘In Approvement’ until all required approvers have approved the order.
If the order has been rejected then this will also be reflected on the approver grid status. It is not possible to reject individual lines only the whole order.
It is also possible in situations where more than one approver needs to approve an order for one member to approve the order and another to reject it.
When rejecting the order comments relating to why the purchase order has been rejected can be added in the reason box, prior to clicking the reject button.
When a purchase order has been rejected, the purchase order status is changed to ‘Purchase order is rejected’.
When the purchase order is at this status, the order can be changed and re-submitted for approval or cancelled.
If modifications have been made the purchase order is re-submitted for approval by clicking the ‘Restart approval Process’ button on the approvals tab.
When this button is clicked the purchase order status is set back to ‘Awaiting Approval’ and the purchase order must go through the complete approval process again.
Once a Purchase order has been approved it is locked and cannot be changed.
Additional Purchase Order Functions
This section deals with the additional functions that are available from the purchase order scan abd detail forms.
Changing Purchase Orders
Purchase orders details can be changed from the purchase order details form by clicking on the change option at the top of the form.
The availability of the change function is controlled by the purchase order status. The purchase order status record contains an option that if enabled
allows the purchase order to be changed at that status.
Sample of purchase order status record
For more information on purchase order statuses please refer to the standing data chapter.
All aspects of a purchase order can be changed with the exception of the supplier. If the supplier on the order has been entered incorrectly then the
order should be cancelled and a new purchase order should be raised.
Cancelling a Purchase Order
A purchase order can be cancelled without affecting costing, stock levels or creating stock movements by clicking the ‘Cancel PO’ option from the
purchase order detail form. A purchase order can be cancelled at any stage or status. Once a purchase order has been cancelled no further action can be taken with the order.
Sending Purchase Orders
The action of ‘sending’ a purchase order is the way of identifying that the purchase order has been sent to the supplier within the system and prohibits further changes to the order. The action also triggers the printing of the purchase order to a physical or PDF printer. Additionally as with other, purchase order status values, it is possible
to email one or more recipients with the order details, this includes the supplier on the purchase order, if the supplier record has an email address configured.
An individual purchase order can be sent from the purchase order detail screen or multiple purchase orders can be sent from the purchase order scan form.
Once a purchase order has been created or if approval is in use, approved, then it can be sent.
To perform a multiple bulk send from the purchase order scan form, simply select the required purchase orders from using the select boxes by ticking them.
Then click the send option to send the orders.
Following sending, information messages will be displayed at the top of the form.
Purchase Quotations
Purchase Quotation module has been provided to support the full process of managing quotations for Inventory items. The process assumes following steps:
- quotation document is raised to be deployed to one or more suppliers,
- the quotation is emailed to all suppliers selected,
- quotation details from suppliers are fed back to the quotation document and the preferred supplier offer is selected,
- the quotation is then rejected or accepted for order,
- once the quotation has been accepted, the purchase order can be created based on the details from the quotation,
- the quotation is closed.
The process can be split between two responsibility groups of requestor and approver. All steps covered by the process are visualized on the diagram below.
Generating Purchase Quotations
Initial purchase quotations are created in status “New”. In that status, all parts of the quotation can be modified.
To finalise the step of creating the quotation, the status of the quotation should be changed to “Ready”. Status change is possible when the quotation is in change mode by using buttons in Status Control group on the right top part of the form.
After this step status of quotation is changed to “Ready” which means that the creation step has been completed.
Selecting Suppliers and Sending
The next step in the process is selecting suppliers to which the quotations is addressed and sending the quotation to those suppliers
This step should be performed for any quotations which are in status “Ready”.
That quotation has two lines for Inventory Items.
The step starts with selecting suppliers that the quotation will be sent to. To do this Supplier Offers tab should be used.
New suppliers are added by clicking on “Add” button in the Offers grid;
Each Supplier record contains all the lines of quotation with three additional fields;
Available – check for availability of item from supplier
Currency Price – price of item in supplier currency
Lead Days – lead time of item supply in days
These fields are initially empty and should be filled back when the quotation is received from the supplier.
The next step for is sending quotation to selected suppliers. By default email notification is disabled. To enable email notification please follow instructions from chapter: Setup Purchase Quotations Supplier Email Notification.
Sending is performed by using send button on status control group. Quotations are automatically emailed to suppliers using internal email system and email addresses in supplier records.
Filling quotation Feedback data from suppliers
When all suppliers responded to quotations with their offers, the information needs to be entered back into the quotation document.
Completing the quotation
After this step is finished, there should be enough information in the quotation to be able to select the best offer and pass the quotation for acceptance. This can be done by clicking “Complete” button in the status control section of the form:
Accepting / rejecting the quotation
Completed quotation can either be accepted for order or rejected by using one of the buttons in the status control section of the quotation form:
Raising the Purchase Order from Quotation
Final step of the process assuming that the quotation has been accepted is raising a purchase order. This again can be done by using the “Order” button on the Status control section of the quotation screen:
Order function opens new Purchase Order form with fields populated from quotation. When the purchase order is saved, the corresponding quotation
will be updated with order information and its status will be changed to “Ordered”:
Closing quotations
To complete the process flow of the Quotation, all rejected or ordered quotations need to be closed. Closing operation can be performed from the list of quotation screen by simply selecting the quotations which need to be closed and using “Close Quotations” menu option:
This action changes all the selected quotation statuses to “Closed” which completes the process.
Setup Purchase Quotations Supplier Email Notification
To enable supplier email notification for purchase quotation process, please replicate appropriate notification sample first. Navigate to: System Configuration -> System Data -> Notification.
Open notification with code: SAMPLE_PURCHASE_QUOTATION_SUPPLIER_NOTIFICATION. Replicate record, customize Code and check Automatic option.
From now on during send action all suppliers from Supplier Offers tab will retrieve email with attached quotation. It is possible to create
additional offers after Send action, but email is sent only to newly created offer (with status Created).
Invoices
The system record details of all invoices received from suppliers so that they can be checked and approved for payment.
Invoice Details include;
- Type (Invoice / Credit)
- Invoice Reg No (system sequence pinvHeader.InvoiceRegNo)
- Invoice No
- Supplier
- Status (defined through Standing Data -> Inventory ->Invoice Statuses)
- Total Goods Value
- Total Vat Value
- Notes
- Inventory Invoice lines
- Non -Inventory Invoice lines
- Vat lines
The invoice is linked to the relevant PO lines so that it is easy to see which PO lines have already been invoiced and avoid approving duplicate invoices. There can be multiple PO’s related to one Invoice (Supplier consolidates orders to one invoice) One PO may be related to several invoices. Invoice lines may relate to part PO lines. The cost code on invoice line came from the relevant PO line.
Invoice lines are being added by entering a PO number and using a “Get Lines From PO”. The lines that are retrieved are editable to allow the
invoice quantity and invoice price to be entered on the invoice and compared to the values on the PO Line.
The system calculates the Invoice Total based on the lines and update the invoice header showing the variance from the total entered by the user.
The Purchase Order Detail show all relevant invoice lines (on Relevant Invoices tab) to ensure duplicate invoices are not accepted.
Purchase order lines additionally displays quantity sum and value sum of all linked invoice lines (InvoiceQty and InvoicedVal columns)
Repairable Spares
Asset Details
Asset detail view is accessible by clicking a icon in the row of the asset that is to be displayed.
The contents of the Asset details view is explained below.
The top box contains the information about the Model of the Asset including:
Manufacturer
Description
Inventory Item
Detail View link – this can be used to open the Model Details view of the model associated with the asset being viewed.
The part of the screen below the Model box contains basic information about the asset.
Details Tab
Details tab contains 3 group boxes:
Location – this box contains all the details about the current location of the asset.
Depending on the current asset status, different fields can be populated in this box.
When the asset status is “IN STOCK”, Store and Bin fields will be populated with the store location and the bin where this asset is stored.
When the asset status is “Vendor Location”, Supplier and Supplier Unit fields will contain the details about the Vendor performing the repair.
Grouping – this box provides the means of additional grouping of the Asset catalogue into logical groups or types. Those criteria are provided to simplify filtering when the number of assets in the catalogue is big.
Availability – this box contains the information about availability of the Asset. “Avail. For W/O’s” flag identifies if any Work Order can be raised against this Asset.
“Obsolete” flag denotes if this asset is obsolete. “Last Updated” field contains the date and time of the last update to the Asset information.
Work Orders Tab
Work Orders tab has been provided for a quick and easy way of scanning all current work orders which have been raised against the particular asset.
Audit Tab
Audit tab contains all history details linked to the asset being viewed sorted by the history date in descending order:
Asset Structure
The structure of the physical distribution of assets can be examined by using the Asset Structure view (Assets -> Asset Structure).
This is represented by the Tree View, where all the equipment is organized within departments, locations and sub locations:
Work Orders
Work Orders are provided to keep the track of all existing repairs within the system.
Adding a new Work Order
To add a work order for a new repair, use Work Orders -> Add New Work Order menu action. The following form will appear on the screen:
Following fields that need to be populated on the form:
Asset – the asset that the Work Order is being raised against,
Description – description of the break down, damage details etc.,
Priority – this drop-down list contains all priorities defined in the system,
Start Date – the date this work order should be started by. This date is always defaulted to the current date and time,
End Date – the date this work order should be completed by. This date is usually calculated automatically according to the selected priority.
If the priority is set to avoid automatic due date calculation, the due date will not be calculated automatically and it will have to be populated by the user.
Faults tab
If there is a requirement to register any faults against this work order, faults tab can be used. It provides a way of putting multiple
faults by filling up fault group and fault details in the faults grid:
Once all required information is populated, the OK menu button can be used to save the new work order. When the Work Order is saved,
asset status changes to “Needs Repair” and the asset is moved into the “Raamp Area” as a repair process virtual starting point.
Work Order List
List of current Work Orders can be accessed by using Work Orders -> Work Order List menu action, which will cause the following form to appear on the screen:
The list can be filtered by any available column including Barcode, Part Number, Location details, Work Order description and the Work Order status.
Once the desired Work Order has been found, the details can be viewed by clicking the file icon.
Following the Work Order workflow
The flow of the Work Order has been designed to mirror the physical process of the repair and to store the full repair history in the Asset History Log. The first step in the workflow after the work order is created is to decide whether the Asset is going to be repaired outside or inside.
Starting the repair process
If the selected Work Order is in “Open” status, that means that the repair process has not yet been started and the asset still resides in the “Raamp Area”.
To start the repair process click “Change” in the menu at the top of the form. The section of the form used to follow the repair process is the Current W/O status group box:
To push the asset for repair, change the Status of the W/O to “Repair in Progress” by using the Status drop down. This action will cause the Site field to refresh
with following values:
Select one of the options to follow internal or external repair path of the process. If the “VENDOR LOCATION” option has been selected, the Location and Sublocation
lists will refresh with the list of vendors and vendor units:
Select the Vendor and the Vendor Unit and press “OK” to save the changes in the database.
Completing the Repair
Once the Asset has been returned by Vendor from repair, the Work Order needs to be updated to reflect the current repair status. First step is to change the Work Order status to “Repair completed”:
After the status has been changed, the “Site” field will be automatically populated to “Ramp area”.
Closing the Repair
This is the last step in the Repair workflow, where the Asset is moved into his final destination after the repair and the repair work order is completed.
To close the repair process, follow these steps:
Select the work order in “repair completed” status and click the details link
Click change menu button
Change the Work Order status to “Completed”:
Changing the status to “Completed” will cause Site and Location fields to refresh will available final asset destination points:
Depending on the choice made for Site field, the Location and sublocation fields will refresh with
physical location and sublocation if the selected Site represents the usage point,
store location and bin location if the selected Site is “STOCK”
If the target destination for the Asset is “STOCK”, the Asset status will be changed to “IN STOCK”.
If the target destination for the Asset is any of the Usage Point, the Asset status will be changed to “IN USE”.
In both cases, the Work Order status will be changed to “Completed’, which closes the repair workflow.
Repairable Spare Issue
Once the item has been repaired and received into stock against the Purchase Order, it needs to be issued change its status to “IN Use”.
This can be achieved by “Repairable Spare Issue” Inventory Movement.
The information required to complete the operation:
- Input Store – the store location the Part is issued from,
- Output Store – the store location the Part is issued to,
- Input Bin – the bin location that the part issued from,
- Output Bin – the bin location that the part issued to. The bin location has the same name as asset code,
- Inventory Item – Model Part number
- Asset Code – this can either be an existing Asset or a non-existing Asset Code. In the case when non-existing barcode is entered, a new Asset will be created automatically.
- Status – the status that will be assigned to the asset when the part is issued,
- Site, Location, Sublocation – the details of the physical location of the Asset after it is issued.
- Item Price – the item price.


