Difference between revisions of "System Configuration"
(→System Parameters) |
(→Mobile Lite Parameters) |
||
| (40 intermediate revisions by 6 users not shown) | |||
| Line 26: | Line 26: | ||
| − | + | [[File:User_Accounts.png|900px]] | |
| − | + | ||
| − | + | ||
| − | + | ||
===Adding a User=== | ===Adding a User=== | ||
| Line 38: | Line 35: | ||
| + | [[File:User_Accounts_add.png|900px]] | ||
| − | |||
| − | |||
| − | |||
| Line 98: | Line 93: | ||
| − | + | [[File:User_Accounts_Add_photo.png|300px]] | |
| − | [[ | + | |
| − | + | ||
| − | + | ||
===Themes=== | ===Themes=== | ||
| Line 182: | Line 174: | ||
| − | + | [[File:KPIs.png|900px]] | |
| − | + | ||
Each user can be granted a view of one or more KPI Graphs. These are chosen via this grid. Leaving this grid blank means that the user will not see any KPI Graphs | Each user can be granted a view of one or more KPI Graphs. These are chosen via this grid. Leaving this grid blank means that the user will not see any KPI Graphs | ||
| − | |||
| − | |||
===Permissions Tab=== | ===Permissions Tab=== | ||
| − | + | [[File:Permissions Tab.png|900px]] | |
| − | + | ||
| − | + | ||
| − | + | ||
===Group Membership=== | ===Group Membership=== | ||
| Line 217: | Line 203: | ||
| − | [[ | + | [[File:Group_Membership.png|900px]] |
| Line 224: | Line 210: | ||
| + | [[File:Group_Membership_New.png|900px]] | ||
| − | |||
| Line 234: | Line 220: | ||
Receipt tolerance % - the percentage specifying the percentage that the value on the Goods Receipt can be greater from the value of the Purchase Order being received. | Receipt tolerance % - the percentage specifying the percentage that the value on the Goods Receipt can be greater from the value of the Purchase Order being received. | ||
| − | |||
| − | |||
===User Menus=== | ===User Menus=== | ||
| Line 241: | Line 225: | ||
| − | + | [[File:User_Menus.png|900px]] | |
| Line 260: | Line 244: | ||
| + | [[File:User_Menus_New.png|900px]] | ||
| − | |||
| Line 300: | Line 284: | ||
| − | + | [[File:Sub_menu.png|900px]] | |
| − | + | ||
| Line 340: | Line 323: | ||
The Menu Lines grid allows you to set up further menu options within the current menu level. | The Menu Lines grid allows you to set up further menu options within the current menu level. | ||
| − | |||
| − | |||
| − | |||
| − | |||
| − | |||
| − | |||
===User Groups=== | ===User Groups=== | ||
| − | + | [[File:User_Groups.png|900px]] | |
| − | [[ | + | |
| Line 367: | Line 343: | ||
| − | + | [[File:User_Group_new.png|900px]] | |
| Line 394: | Line 370: | ||
| + | [[File:User_security.png|600px]] | ||
| − | |||
| Line 418: | Line 394: | ||
| − | + | [[File:User_security_filter.png|600px]] | |
| − | + | ||
| − | + | ||
| Line 444: | Line 418: | ||
Select this option to define extended filter in Extended Filter Expression. | Select this option to define extended filter in Extended Filter Expression. | ||
| − | |||
| − | |||
==Charts and Reports== | ==Charts and Reports== | ||
| Line 460: | Line 432: | ||
| + | [[File:Chart_Registry.png|900px]] | ||
| − | |||
| Line 468: | Line 440: | ||
| − | + | [[File:Chart_Registry_New.png|900px]] | |
| − | + | ||
| − | + | ||
| − | + | ||
| − | + | ||
| Line 483: | Line 451: | ||
| − | {| class=" | + | {| class="wikitable" |
|- | |- | ||
| | | | ||
| Line 614: | Line 582: | ||
| + | [[File:Chart_Details.png|900px]] | ||
| − | |||
| − | {| class=" | + | |
| + | {| class="wikitable" | ||
|- | |- | ||
| | | | ||
| Line 700: | Line 669: | ||
| − | + | [[File:Chart_Designer.png|900px]] | |
| − | + | ||
| − | + | ||
| − | + | ||
| − | + | ||
| − | + | ||
==System Health Monitor== | ==System Health Monitor== | ||
| Line 719: | Line 683: | ||
| − | [[ | + | [[File:jeden.jpg|250px]] [[File:dwa.png|250px]] |
Displays when system condition Display when system condition is bad | Displays when system condition Display when system condition is bad | ||
| Line 730: | Line 694: | ||
| + | [[File:Status_Monitors.png|900px]] | ||
| − | |||
| Line 738: | Line 702: | ||
| + | [[File:Status_Monitors_New.png|900px]] | ||
| − | |||
| Line 748: | Line 712: | ||
| − | + | [[File:Status_Monitors_Item_New.png|900px]] | |
| − | [[ | + | |
| Line 770: | Line 733: | ||
| − | + | [[File:Status_Monitors_Item_New3.png|900px]] | |
| − | [[ | + | |
| − | + | ||
| − | + | ||
==System Data== | ==System Data== | ||
| Line 786: | Line 746: | ||
| − | + | [[File:Sequence_definitions.png|900px]] | |
| − | [[ | + | |
| Line 798: | Line 757: | ||
| − | + | [[File:Sequence_definitions_Change.png|700px]] | |
| − | + | ||
| Line 858: | Line 816: | ||
| − | + | [[File:Sequence_definitions_Change2.png|700px]] | |
| − | + | ||
| Line 926: | Line 883: | ||
| − | + | [[File:Sequence_definitions_Change4.png|700px]] | |
| − | [[ | + | |
| − | + | ||
| − | + | ||
===Transaction Type Sequence Definitions=== | ===Transaction Type Sequence Definitions=== | ||
| Line 938: | Line 892: | ||
| − | + | [[File:Sequence_definitions2.png|500px]] | |
| − | [[ | + | |
| Line 1,002: | Line 955: | ||
The format field is defined in much the same way for the work order code sequence defined above. In the example above, all Issue movements will have a document reference beginning with the letter ‘I’, to signify ‘Issue’. | The format field is defined in much the same way for the work order code sequence defined above. In the example above, all Issue movements will have a document reference beginning with the letter ‘I’, to signify ‘Issue’. | ||
| − | |||
| − | |||
===System Parameters=== | ===System Parameters=== | ||
| Line 1,017: | Line 968: | ||
| − | + | [[File:System_Parameters.png|900px]] | |
| Line 1,031: | Line 982: | ||
| − | {| class=" | + | {| class="wikitable" |
|- | |- | ||
| | | | ||
| Line 1,280: | Line 1,231: | ||
| | | | ||
Set this value to true to get the warning message about scheduling when work order has optimum resource selected. | Set this value to true to get the warning message about scheduling when work order has optimum resource selected. | ||
| + | |||
| + | |- | ||
| + | | | ||
| + | ProcessMngt | ||
| + | |||
| + | | | ||
| + | System | ||
| + | |||
| + | | | ||
| + | ProcessMngt\Job | ||
| + | |||
| + | | | ||
| + | UseAutoResponseTime | ||
| + | |||
| + | | | ||
| + | bool | ||
| + | |||
| + | | | ||
| + | This parameter determines if auto populating/updating of Response Time is in use. Set to TRUE if auto response time is required. If blank or parameter is missing then this acts as FALSE. | ||
|- | |- | ||
| Line 1,356: | Line 1,326: | ||
| | | | ||
Determine this value if you want to use account codes. | Determine this value if you want to use account codes. | ||
| + | |||
| + | |- | ||
| + | | | ||
| + | ProcessMngt | ||
| + | |||
| + | | | ||
| + | System | ||
| + | |||
| + | | | ||
| + | ProcessMngt\ | ||
| + | |||
| + | | | ||
| + | BulkUpdateAppendCompletionComments | ||
| + | |||
| + | | | ||
| + | bool | ||
| + | |||
| + | | | ||
| + | Determine this value if you want to append Status Change Reason to Completion Comments on Bulk Update form. | ||
|- | |- | ||
| Line 3,301: | Line 3,290: | ||
The FirstWeekOfYear can have one of the following settings: 'System' - First week of year specified in system settings ; 'Jan1' - Week in which January 1 occurs; 'FirstFourDays' - Week that has at least four days in the new year (complies with ISO standard 8601, section 3.17); 'FirstFullWeek' - First full week in new year. | The FirstWeekOfYear can have one of the following settings: 'System' - First week of year specified in system settings ; 'Jan1' - Week in which January 1 occurs; 'FirstFourDays' - Week that has at least four days in the new year (complies with ISO standard 8601, section 3.17); 'FirstFullWeek' - First full week in new year. | ||
| + | |} | ||
| + | |||
| + | ==== Mobile Lite Parameters ==== | ||
| + | |||
| + | {| class="wikitable" | ||
|- | |- | ||
| + | | | ||
| + | '''Module''' | ||
| + | |||
| + | | | ||
| + | '''User''' | ||
| + | |||
| + | | | ||
| + | '''Parameter Path''' | ||
| + | |||
| + | | | ||
| + | '''Parameter Name''' | ||
| + | |||
| + | | | ||
| + | '''Parameter Type''' | ||
| + | |||
| + | | | ||
| + | |||
| + | |||
| + | '''Description''' | ||
| + | |||
| + | |- | ||
| + | |||
| | | | ||
MobileLite | MobileLite | ||
| | | | ||
| − | + | System | |
| | | | ||
| − | + | MobileLite\ExportToMobileFilters | |
| | | | ||
| + | woJob | ||
| | | | ||
| Line 3,322: | Line 3,339: | ||
woJob.DueDate != woJob.DueDate& or woJob.StartDate != woJob.StartDate& or woJob.ResponseTargetDate != woJob.ResponseTargetDate& or woJob.PriorityID != woJob.PriorityID& or woJob.FullDescription != woJob.FullDescription& or woJob.AssetID != woJob.AssetID& | woJob.DueDate != woJob.DueDate& or woJob.StartDate != woJob.StartDate& or woJob.ResponseTargetDate != woJob.ResponseTargetDate& or woJob.PriorityID != woJob.PriorityID& or woJob.FullDescription != woJob.FullDescription& or woJob.AssetID != woJob.AssetID& | ||
| + | |- | ||
| + | |||
| + | | | ||
| + | MobileLite | ||
| + | |||
| + | | | ||
| + | System | ||
| + | |||
| + | | | ||
| + | MobileLite\ExportToMobileFilters | ||
| + | |||
| + | | | ||
| + | woJobTask | ||
| + | |||
| + | | | ||
| + | String | ||
| + | |||
| + | | | ||
| + | String expression which filters when jobtask update is sent to Alite | ||
| + | |||
| + | Default value filters only jobs which have changed task job status and description: | ||
| + | |||
| + | woJobTask.Description != woJobTask.Description& or woJobTask.JobStatusID != woJobTask.JobStatusID& | ||
| + | | | ||
| + | |- | ||
| + | |||
| + | | | ||
| + | MobileLite | ||
| + | |||
| + | | | ||
| + | System | ||
| + | |||
| + | | | ||
| + | MobileLite\ExportToMobileFilters | ||
| + | |||
| + | | | ||
| + | woSchedule | ||
| + | |||
| + | | | ||
| + | String | ||
| + | |||
| + | | | ||
| + | String expression which filters when jobtask update is sent to Alite | ||
| + | |||
| + | Default value filters only jobs which have changed schedule status : | ||
| + | |||
| + | String expression which filters when schedule update is sent to Alite | ||
| + | |- | ||
| + | |||
| + | | | ||
| + | MobileLite | ||
| + | |||
| + | | | ||
| + | System | ||
| + | |||
| + | | | ||
| + | MobileLite\AgilityForAndroid\ | ||
| + | |||
| + | | | ||
| + | HideResponseTimerStatus | ||
| + | |||
| + | | | ||
| + | String | ||
| + | |||
| + | | | ||
| + | This parameter define for which job status (on Agility for Android) the second timer should be turned off. Entered string should be a mobile status code after translation i.e. "ArrivedOnSite". Note: This status in Agility have to have 'SetRespondedAt' flag set to true. | ||
| + | |- | ||
| + | |||
| + | | | ||
| + | MobileLite | ||
| + | |||
| + | | | ||
| + | System | ||
| + | |||
| + | | | ||
| + | MobileLite\AgilityForAndroid\ | ||
| + | |||
| + | | | ||
| + | SecondAlarmDate | ||
| + | |||
| + | | | ||
| + | String | ||
| + | |||
| + | | | ||
| + | Parameter contains string expression to calculate Second Timer Alarm Date to display Alarm in MobileLite | ||
| + | |- | ||
| + | |||
| + | | | ||
| + | MobileLite | ||
| + | |||
| + | | | ||
| + | System | ||
| + | |||
| + | | | ||
| + | MobileLite\AgilityForAndroid\ | ||
| + | |||
| + | | | ||
| + | SecondTimerClockDate | ||
| + | |||
| + | | | ||
| + | String | ||
| + | |||
| + | | | ||
| + | Parameter contains string expression to calculate Second Timer Clock Date to display Alarm in MobileLite | ||
| + | |- | ||
| + | |||
| + | | | ||
| + | MobileLite | ||
| + | |||
| + | | | ||
| + | System | ||
| + | |||
| + | | | ||
| + | MobileLite\AgilityForAndroid\ | ||
| + | |||
| + | | | ||
| + | SecondWarningDate | ||
| + | |||
| + | | | ||
| + | String | ||
| + | |||
| + | | | ||
| + | Parameter contains string expression to calculate Second Timer Warning Date to display Warning in MobileLite | ||
| + | |- | ||
| + | |||
| + | | | ||
| + | MobileLite | ||
| + | |||
| + | | | ||
| + | System | ||
| + | |||
| + | | | ||
| + | MobileLite\ | ||
| + | |||
| + | | | ||
| + | HtmlListDetails | ||
| + | |||
| + | | | ||
| + | String | ||
| + | |||
| + | | | ||
| + | Parameter contains string expression to calculate Job Short Description displayed in Android Lite. | ||
| + | |- | ||
| + | |||
| + | | | ||
| + | MobileLite | ||
| + | |||
| + | | | ||
| + | System | ||
| + | |||
| + | | | ||
| + | MobileLite\ | ||
| + | |||
| + | | | ||
| + | HtmlNewJobDialog | ||
| + | |||
| + | | | ||
| + | String | ||
| + | |||
| + | | | ||
| + | Parameter contains string expression to calculate Job Short New Job Dialog displayed in Android Lite. It is in fact no HTML, because Alite not display it as HTML but as normal text so no HTML encoding could be used. Default value is pmAsset.Description + ": " + woJob.FullDescription | ||
| + | |- | ||
| + | | | ||
| + | MobileLite | ||
| + | |||
| + | | | ||
| + | System | ||
| + | |||
| + | | | ||
| + | MobileLite\ | ||
| + | |||
| + | | | ||
| + | ClockDate | ||
| + | |||
| + | | | ||
| + | String | ||
| + | |||
| + | | | ||
| + | Parameter contains string expression to calculate Clock Date to display Alarm in MobileLite. Default value is woJob.DueDate | ||
| + | |- | ||
| + | | | ||
| + | MobileLite | ||
| + | |||
| + | | | ||
| + | System | ||
| + | |||
| + | | | ||
| + | MobileLite\ | ||
| + | |||
| + | | | ||
| + | WarningDate | ||
| + | |||
| + | | | ||
| + | String | ||
| + | |||
| + | | | ||
| + | Parameter contains string expression to calculate Warning Date to display Warning in MobileLite. Default value is DATEADD(woJob.DueDate,"Minute",-4) | ||
| + | |- | ||
| + | | | ||
| + | MobileLite | ||
| + | |||
| + | | | ||
| + | System | ||
| + | |||
| + | | | ||
| + | MobileLite\ | ||
| + | |||
| + | | | ||
| + | AlarmDate | ||
| + | |||
| + | | | ||
| + | String | ||
| + | |||
| + | | | ||
| + | Parameter contains string expression to calculate Alarm Date to display Alarm in MobileLite. Default value is DATEADD(woJob.DueDate,"Minute",-2) | ||
| + | |- | ||
| + | | | ||
| + | MobileLite | ||
| + | |||
| + | | | ||
| + | System | ||
| + | |||
| + | | | ||
| + | MobileLite\ | ||
| + | |||
| + | | | ||
| + | ShowLastXCompleted | ||
| + | |||
| + | | | ||
| + | int | ||
| + | |||
| + | | | ||
| + | View details of (XX) work orders on alite Asset Enquiry form. Default value is 10. | ||
| + | |- | ||
| + | | | ||
| + | MobileLite | ||
| + | |||
| + | | | ||
| + | System | ||
| + | |||
| + | | | ||
| + | MobileLite\ | ||
| + | |||
| + | | | ||
| + | AppendStatusCommentsToCompletionComments | ||
| + | |||
| + | | | ||
| + | bool | ||
| + | |||
| + | | | ||
| + | This parameter will control whether the status comments will be added to the Task and Job Completion comments or not. If the value is to TRUE, status comments will be added to Job & Task completion comments as well as to woJobLog table. If the value is set to false the status comments will be added to woJobLog only. Should save data format like “Feedback functionality". | ||
|} | |} | ||
| + | |||
| + | === Using System Parameters === | ||
| + | |||
| + | [[System_Parameters|System Parameters]] | ||
==Cascading Style Sheets== | ==Cascading Style Sheets== | ||
| Line 3,340: | Line 3,612: | ||
| − | + | [[File:Style_sheets.png|800px]] | |
| Line 3,353: | Line 3,625: | ||
| − | + | [[File:Style_sheets2.png|800px]] | |
| − | + | ||
| Line 3,365: | Line 3,636: | ||
| + | [[File:Style_sheets3.png|800px]] | ||
| − | |||
| Line 3,377: | Line 3,648: | ||
| − | + | [[File:Style_sheets4.png|800px]] | |
| − | + | ||
| Line 3,389: | Line 3,659: | ||
| + | [[File:Style_sheets5.png|800px]] | ||
| − | |||
| Line 3,403: | Line 3,673: | ||
For additional information on style sheets, please refer to the Agility Customisation Guide. | For additional information on style sheets, please refer to the Agility Customisation Guide. | ||
| − | |||
| − | |||
===Import / Export Style Sheet=== | ===Import / Export Style Sheet=== | ||
| − | + | [[File:Import_Css_From_File.png|700px]] | |
| − | + | ||
| − | + | ||
| Line 3,431: | Line 3,697: | ||
| − | + | [[File:Import_Css_From_File_2.png|280px]] | |
| − | [[ | + | |
| Line 3,440: | Line 3,705: | ||
| − | Another method to export Style sheets is via the Style Sheet List form detailed above. | + | Another method to export Style sheets is via the Style Sheet List form detailed above. |
| − | + | ||
| − | + | ||
==Audit Trail== | ==Audit Trail== | ||
| Line 3,454: | Line 3,717: | ||
''Accessed from System Configuration >> Audit Trail >> Audit Trail Control'' | ''Accessed from System Configuration >> Audit Trail >> Audit Trail Control'' | ||
| − | + | [[File:Audit_trail.png|900px]] | |
| − | + | ||
| − | + | ||
| Line 3,463: | Line 3,724: | ||
| − | + | [[File:Audit_trail_New.png|550px]] | |
| − | + | ||
| Line 3,527: | Line 3,787: | ||
| − | + | [[File:Audit_trail_1.png|800px]] | |
| − | + | ||
| − | + | ||
| − | [[ | + | |
| − | + | ||
| Line 3,539: | Line 3,795: | ||
| + | [[File:Audit_trail_new2.png|800px]] | ||
| − | + | ==Status Translations== | |
| − | + | ||
| − | + | ||
| − | + | ||
| − | == | + | |
| − | ===Mobile Expert | + | === Mobile Expert === |
| Line 3,560: | Line 3,813: | ||
| − | + | [[File:Status_Translations.png|900px]] | |
| Line 3,568: | Line 3,821: | ||
| − | + | [[File:Status_Translations_new.png|700px]] | |
| Line 3,588: | Line 3,841: | ||
To define a Status Translation, select the relevant Agility status from the Agility Status Code field. Then select the equivalent Mobile Expert Transaction Code. | To define a Status Translation, select the relevant Agility status from the Agility Status Code field. Then select the equivalent Mobile Expert Transaction Code. | ||
| + | === Agility for Android === | ||
| + | Similar to [[#Mobile_Expert|Mobile Expert Status Translation]] | ||
| + | Work Order and Task Statuses are user-defined within Agility. To enable this functionality when the software is being used with Mobile Engineer, it is necessary to maintain a list of Status Translations. This relates Statuses within Agility to those defined within Agility for Android. | ||
| + | |||
| + | [[File:Status Translation.PNG|1500px]] | ||
| + | |||
| + | Click on Add to define a new Status Translation: | ||
| + | |||
| + | [[File:Status Translation Add.PNG|1200px]] | ||
| + | |||
| + | *'''Mobile Status''' - This is new status code. | ||
| + | *'''Mobile Description''' - This is how status will be displayed on Agility for Android | ||
| + | *'''Agility Status''' - This is a list of Agility statuses. | ||
| + | |||
| + | |||
| + | [[File:StstusTranslation IsSystem.PNG|1200px]] | ||
| + | |||
| + | Predefined statuses have 'IsSystem?' flag set to TRUE. These statuses cannot be deleted, their 'Mobile Status' cannot be changed. When replicating or copying current 'System' status, SYSTEM flag will be reset to FALSE. | ||
==Document Registry== | ==Document Registry== | ||
| Line 3,601: | Line 3,872: | ||
| − | + | [[File:Document_Registry.png|900px]] | |
| − | + | ||
| Line 3,609: | Line 3,879: | ||
| − | + | [[File:Document_Registry_new.png|700px]] | |
| − | + | ||
| − | + | ||
| Line 3,647: | Line 3,915: | ||
| − | + | [[File:Local_File_add.png|550px]] | |
| − | [[ | + | |
| − | + | ||
Click the Browse button and select the file. When the file has been selected the path will be displayed on the form. Click on Update to load the document into the registry. | Click the Browse button and select the file. When the file has been selected the path will be displayed on the form. Click on Update to load the document into the registry. | ||
| − | |||
| − | |||
===Shared File=== | ===Shared File=== | ||
| Line 3,663: | Line 3,927: | ||
| − | + | [[File:Shared_File_add.png|550px]] | |
| − | [[ | + | |
Latest revision as of 10:49, 26 January 2017
Contents
System Configuration
This chapter deals with the various aspects of configuring the system using the configuration options and settings available. The options allow the behaviour of key features and functions to be tailored to business requirements.
Users
User Accounts
Any user who needs to be able to login into Agility needs to be assigned a user account. Each user must belong to at least one user Group to control their access rights. Users have rights to access all features unless they are specifically denied access.
Accessed from System Configuration >> Users >> User Accounts
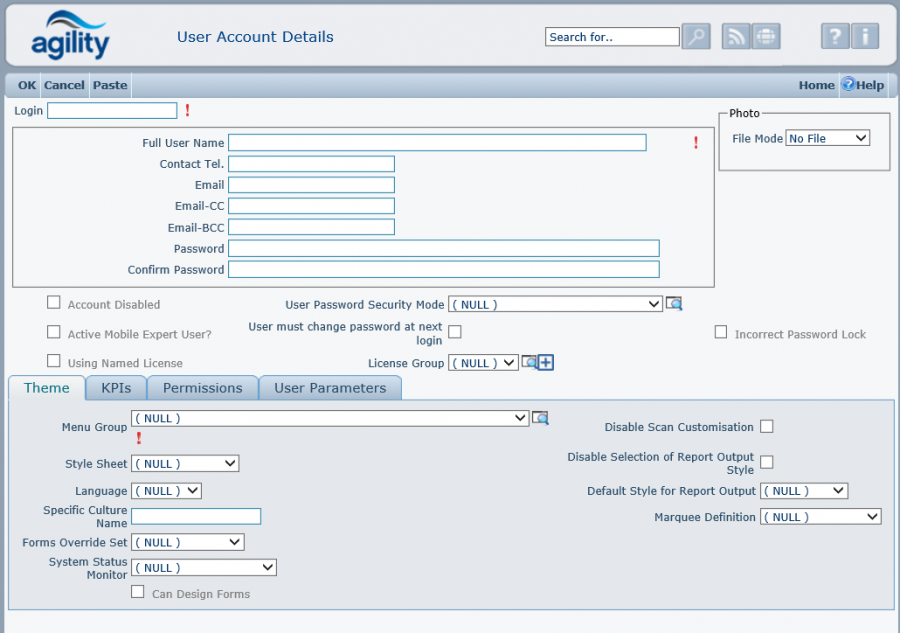
Adding a User
Select Add New to create a new system user account;
Login
The Login field should be used to store the user name that will be assigned to the user. This is mandatory.
Full User Name
The Full User Name field is mandatory and records the full descriptive name of the user associated with the account.
Contact Tel.
Contact Telephone number for the user. This can be used to pre-populate fields on Agility forms.
E-Mail;
Contact E-Mail Address for the user. This can be used to pre-populate fields on Agility forms.
E-Mail CC / E-Mail BCC
Other contact E-Mail addresses for the user. This can be used to pre-populate fields on Agility forms.
Password / Confirm Password.
Password for the user, it is used in conjunction with the Login when accessing Agility from the Login Screen. The password should also be entered into the Confirm Password box.
Photo
It is possible to attach an optional picture of the user to the user account details. Attach a picture using the same methodology as for other attachments within the system using the picture attachment options:
Themes
Menu Group
The Menu Group drop down list is used to determine which menu set the user will be presented with after logging into the system. This is mandatory.
Style Sheet
The Style Sheet drop-down determines which style sheet will be applied to the user’s session within Agility. This is mandatory. Although a user can only have one style sheet applied, there is no limit to the number of different stylesheets that can exist within the system. By default, this should be set to the ‘Agility’ stylesheet.
Language
The Language drop-down determines which language will be applied to the user’s session within Agility.
Forms Override Set
The Forms Override Set drop-down determines which Forms and / or Reports will be applied to the user’s session within Agility to override the standard ones
Can Change Forms
Users can be granted permission to design forms by checking the Can Change Forms check box. This functionality will only take effect if the system is licensed to allow form design. Please contact SoftSols Group Ltd for further information regarding Agility licensing.
System Health Monitor
This is where the notification monitor located to at the bottom of the menu is defined. Different notification monitors can be defined. Please refer to system monitor for further information.
Disable Scan Customisation
When this option is checked the user cannot customise scan forms. Please see customisation under scan forms for further information.
Disable selection of report style output
When this checkbox is checked this prohibits the user from being able to change the report style output on all report forms in which case the report style detailed below is used.
Default style of report output
When the user ability to change report style is disabled this is where the users’ default report style is specified.
KPIs Tab
Each user can be granted a view of one or more KPI Graphs. These are chosen via this grid. Leaving this grid blank means that the user will not see any KPI Graphs
Permissions Tab
Group Membership
Group membership determines the security group(s) to which the user is a member. A user can be a member of one or many user groups.
User Options (Agility)
Accessed from System Configuration >> Users >> User Options (Agility)
User options are utilised to specify business specific options for individual Agility users.
All currently available options are used in conjunction with Purchase order Authorisation. The detailed description of each individual setting is described below:
Can Create Purchase Orders – If checked, the selected user can create new Purchase Orders
Receive E-mails – if checked, selected user will receive emails with information about any purchase orders pending for user’s approval.
Receipt tolerance % - the percentage specifying the percentage that the value on the Goods Receipt can be greater from the value of the Purchase Order being received.
User Menus
The menu system within Agility is designed to allow unlimited menu structures to be defined. Each user is then assigned to a menu structure which is used to control the elements of the system they can access.
Control of what functions they can perform within those elements e.g. read only / update / delete is controlled by allocating the user to a user group.
The menu structure is a tree structure and may be up to 4 levels of deep.
Click on Add New to create a new Menu:
The Name field is used to store a unique name for the menu. This is mandatory.
The Description field is free text and records a meaningful description of the menu.
The Menu Lines grid shows the top level menu options. Click on ‘Add’ to add a new menu line:
Initial Form To Open
Declare which form will be opened when user log in.
Popup Initial Form
If set then initial form will be opened in new window, otherwise it will be opened in parent window.
Disable help
The help submenu is included in every menu by default. All users have access to the help documentation by clicking on Help >> Documentation.
If this option is checked then the will not be available in the submenu.
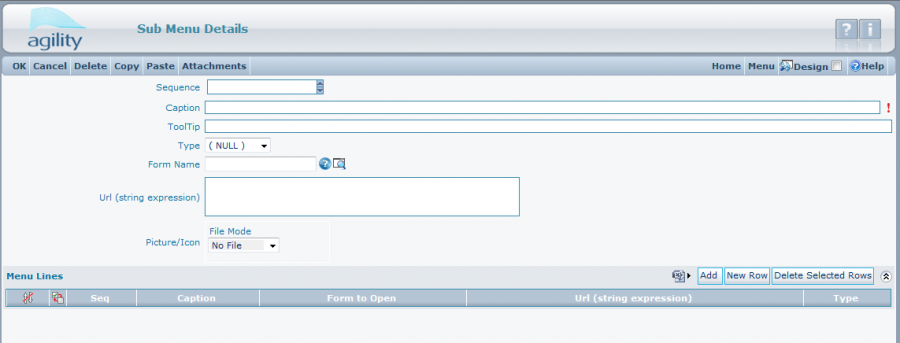
The Sub Menu Details form allows you to specify sub menu levels and the forms that are opened when a menu option is selected.
The Sequence field is an optional value allowing you to specify the sequence location in the menu tree. For instance, 1 will be the first item in the menu, 2 would be the second, and so on.
The Caption field is mandatory and records the menu caption that will be displayed in the menu tree.
The Tool Tip field is an optional value that records a descriptive tool tip message that is displayed when the mouse pointer hovers over the menu item.
Type defines if the menu item will use Form Name field or Url (string expression) field when user click on that item. To disable any on click action set the Separator value. Please note that the main menu items are not using the type, form name, url fields. Only their submenus items are using them.
The Form Name field records the Agility form that will be displayed when the menu item is selected. Click on the help icon to display a list of all forms within the system.
For additional information on Agility forms, please refer to the Agility Customisation Guide.
The Url (string expression) field allows to put url address that will be evaluated from the string expression.
Agility supports the displaying of icons against each menu option. To attach a picture or icon, set this in the Picture / icon field.
The Menu Lines grid allows you to set up further menu options within the current menu level.
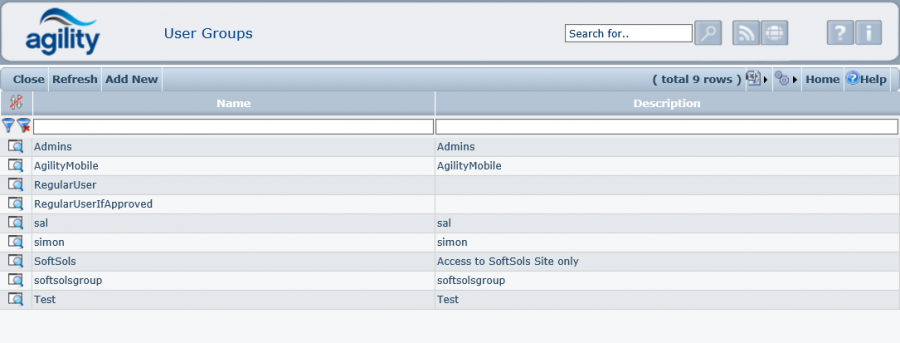
User Groups
User groups are used within Agility to access security to data within the system. Defined against each user can be a “security” query which defines the record which they are allowed to access. This cannot be removed by the user and also applies to data being supplied by the Business Objects for use by Crystal Reports and Microsoft Reporting Services. Consequently, the same report can produce varying amounts of detail depending upon the user’s level of access in the system.
Individual users may belong to many User Groups, but must be a member of at least one. Permission to access data always defaults to the “securest” option. i.e. once a group removes a permission it may not be reinstated by another user group.
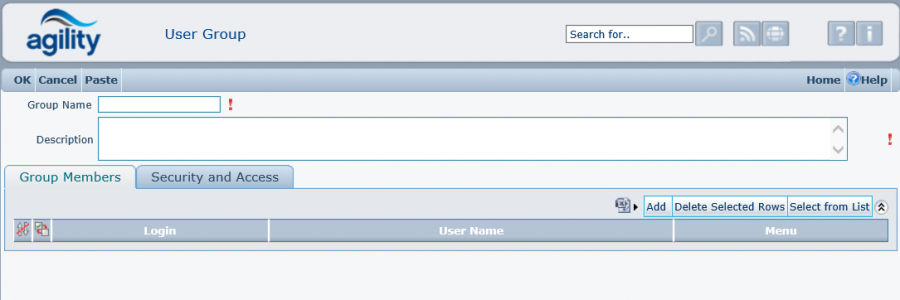
Click on Add New to create a new User Group:
Group Name, Description
User defined text.
Group Members
Specified which users belong to this group.
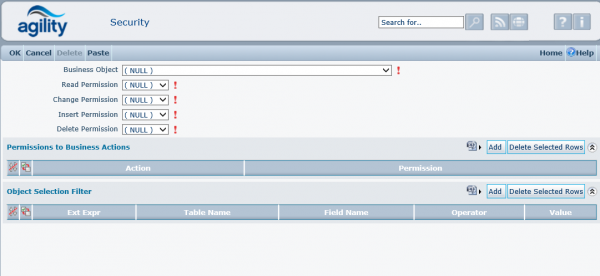
Security and Access
It is used to set permissions to business objects.
To add Security and Access click Add
Read, Change, Insert, Delete Permission
Used to define if Read, Change, Insert, Delete is allowed or denied
Permissions to Business Actions
Specify which business actions (for selected business object) are allowed or denied
Object Selection Filter
Click Add to create new Security Filter.
Table Name
Select table from drop-down list to declare expression for it.
Field Name
Field from selected table, select using drop-down list
Expression Operator, Expression Value
They are used for make simple expression e.g. if table name is syJobStatus, field name is Code, expression operator is “Equal” and expression value is “Completed” then all records with status code “Completed” will have set permissions selected on previous form.
Use Extended Filter
Select this option to define extended filter in Extended Filter Expression.
Charts and Reports
Key Performance Indicators (KPIs)
A user of the system can select to have several Key Performance Indicators (KPIs) placed on their main menu screen. These KPIs are driven from data supplied by a Business Object and the user can define the format of the graphical display, its location and size on their screen.
Accessed from System Configuration >> Charts & Reports >> Chart Registry
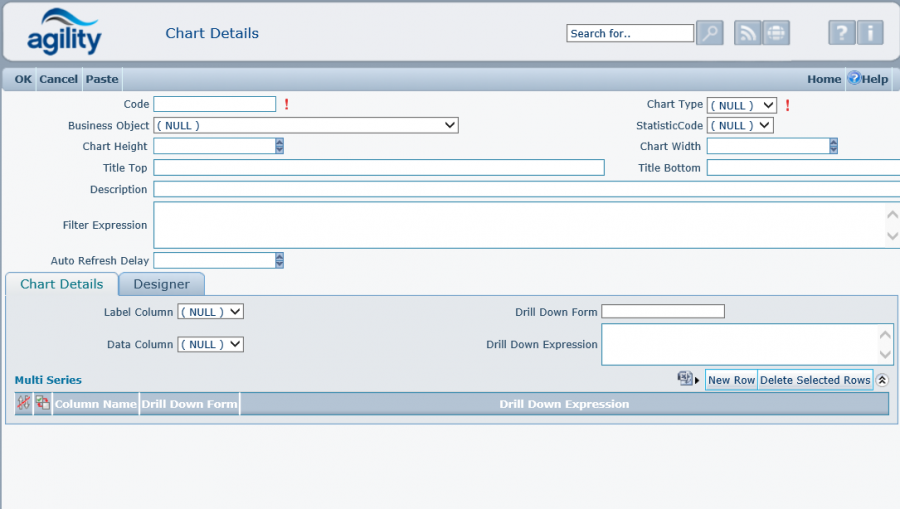
Click on Add New to create a new KPI:
KPI Details
Header fields
|
field |
Mandatory |
Description | |
|
Code |
Yes |
The unique code of the KPI being defined – free text. | |
|
Chart Type |
Yes |
The type of the KPI chart being defined. Standard – the data for the statistic is retrieved from the function published by the Business Object, SQL – the data for the statistic is retrieved by executing the SQL statement defined within the KPI on the SQL Details Tab | |
|
Business Object Name |
Yes |
For Standard chart type it represents the name of the Business Object supplying the data for the Chart, for SQL chart type it specifies the business object, which will be taken as a source of the security rules added to the SQL statement before it’s executed . | |
|
Statistics Code |
Yes |
The name of the data source for the Chart from within the Business object. Once a Business object is selected this drop down field will be populated. This is relevant only for Standard type of the KPI. | |
|
Chart Height |
Yes |
The height of the Chart, in pixels, as it will appear on the users menu. | |
|
Chart Width |
Yes |
The width of the Chart, in pixels, as it will appear on the users menu. | |
|
Title Top |
No |
Text to appear on the top of the Chart. | |
|
Title Bottom |
No |
Text to appear on the bottom of the Chart. | |
|
Description |
No |
A description of the Chart. This does not display alongside the Chart. | |
|
Filter Expression |
No |
An optional Filter Expression. This SQL like expression controls which records are included in the KPI. How the records which are included are analysed is predefined within the KPI and cannot be changed by the user. See the section on “Filter Expressions” for details of the syntax. This field is relevant only for Standard type of the KPI. | |
|
Auto-refresh delay |
No |
The number of seconds after which the Chart will refresh automatically. Auto-refresh function will be disabled if this value is not populated or set to 0. | |
Chart Details Tab
The information in the Chart Details tab allow to define the additional details of the KPI like data source column names displayed as labels and details of the drill-down function.
|
field |
Mandatory |
Description |
|
Label Column |
No |
The name of the data source column used for data point labels. First column form the data source will be used if this field is left as null. |
|
Data Column |
No |
The name of the data source column to be used as value for data points. Second column of the data source will be used if this field is left as null. |
|
Drill Down Form |
No |
The name of the form used as a drill-down form when a particular data segment is clicked on the chart. The drill-down functionality will be disabled if this field is left as blank. |
|
Drill Down Expression |
No |
Filter expression passed to the Drill-down form when the particular data segment is clicked on the chart. Data values can be included by using a # (hash) sign appended by the data column name. |
|
Multi Series |
No |
This grid has been provided to allow definition of multiple data series within a single KPI. 3 fields Column Name, Drill Down Form and Drill Down expression can be specified for each data series. |
SQL Details tab
This tab is only visible when SQL Chart Type has been selected in the KPI header. The contents of the field should be a valid string expression, which evaluates to the valid SQL statement. The example contents of the SQL Details field is shown on the screenshot below.
The Colour List field can be populated with the comma-separated list of valid colour names if the chart should have a predefined colours for its data segments.
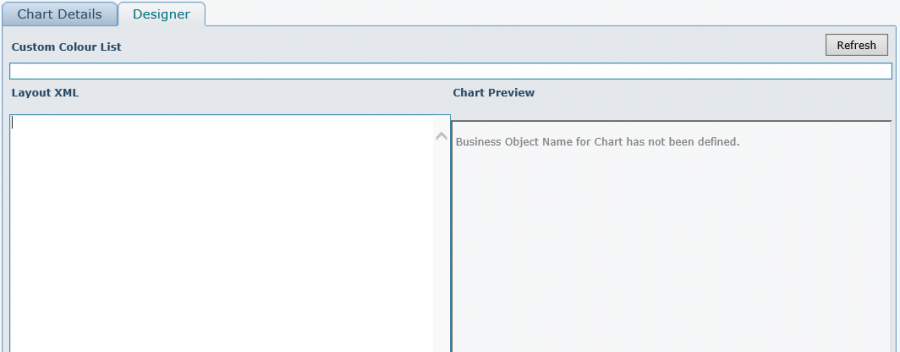
Designer tab
The designer tab allows to specify the details of the graphical layout of the Chart in the form of the well formatted xml file. The Chart Preview area shows the Chart image according to the current settings for the data source, drill down definition and the layout defined. The syntax and possible options within the Layout XML field should only be altered by advanced users after a separate training and the details are out of the scope of this Manual.
System Health Monitor
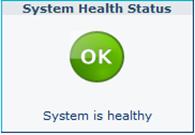
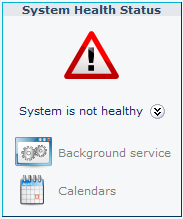
Health monitor is used to notify user that something is wrong with system. The particular items that are failed are fully configurable and are user defined by using strings expressions. See the pictures below that shows example health items and system condition.
The system condition is presented on the main screen below the menu.
Displays when system condition Display when system condition is bad
is well (all health items are ok) (when one or more health items are failed)
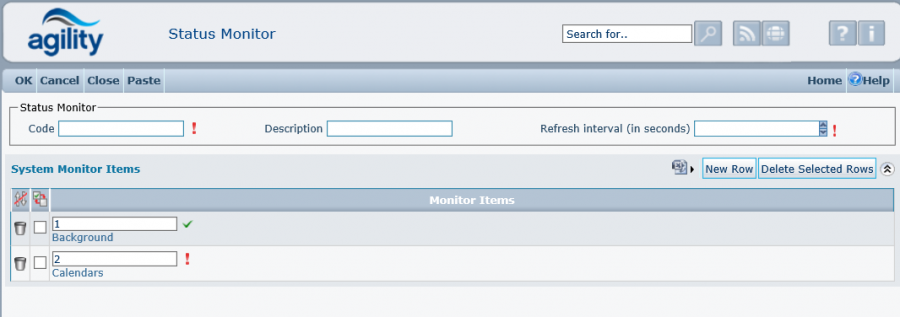
Click on Add to create a new monitor definition
To define monitor you have to enter the code, refresh interval that says how often the monitor will refresh (checks all heath items), and put health items that will be checked during using the monitor.
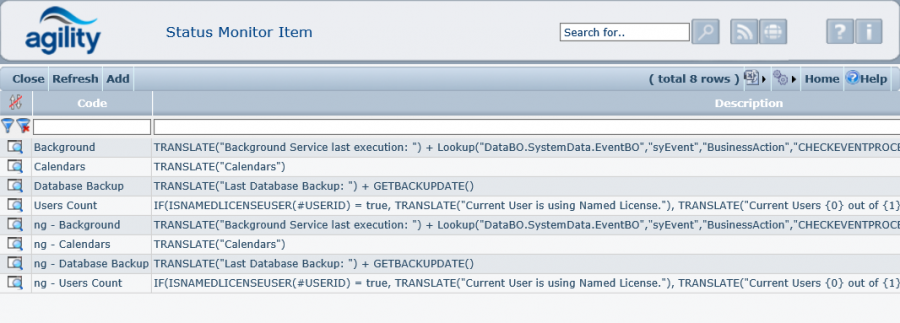
Click on Add button to create new health item
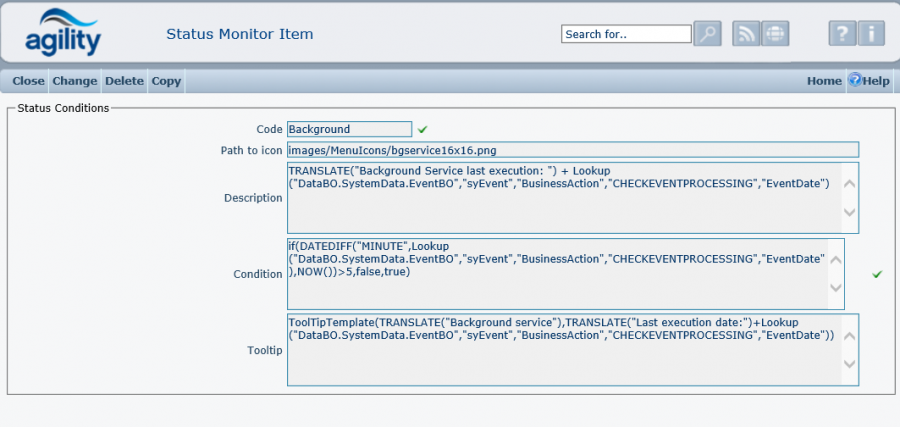
Definition of health items contains following fields:
Code (required)
Description (optional) – it is displayed on monitor panel if the health items has failed.
Path to the file with image (optional) – each health item can contain image that can suggest which part of the system is not working properly.
Condition (required) – a string expression to evaluate. This string must result only logical values (true or false). If it results false then it will be displayed on monitor panel as “failed ”.
Tooltip (optional) – defines the tooltip box that will be displayed on monitor is the mouse cursor is over the health item that is failed.
System Data
System Sequence Definitions & Formatting
Sequence Definitions are used to define the sequence and format of automatically generated sequence numbers within Agility, e.g. work order numbers, or invoice numbers.
'Accessed from System Configuration >> System Data >> Sequence Definition
Following initial installation each sequence used in the system will have a default value, which will also be the sequence starting point. System administrators should give a lot of consideration to how these are initially configured as it is not recommend that any sequence is changed following the system being used, often referred to as ‘going live’
If a sequence is to be changed select a value, click on the detail icon which will launch the detail form, from where the change mode can be enabled and the sequence definition edited.
Function of fields;
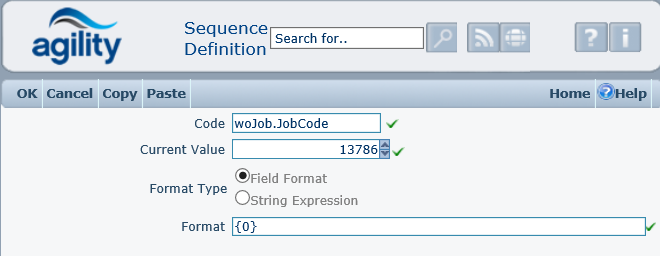
Code
This is the table and field name within the database that contains the automatically generated sequence. E.g. the work order number is stored in the ‘woJob’ table in the ‘JobCode’ field.
Current Value
This field displays the current value of the sequence. If the system has just been initially installed this will represent the starting point of the sequence, if the system has already gone live this will represent the current sequence value.
Format Type
The sequence can either be field format or a string. The option selected here will determine the syntax of the expression that needs to be configured. This is detailed below.
Format
Field Format
The format is made up from string values and optionally 4 parameters.
The string values can are free text and can be used for example as alpha numeric prefixes, i.e. ‘WO/’
The format syntax is built up by making a statement from string content and parameters.
For example;
WO/{0}
Would make a work order number sequence from the characters ‘WO/’ and the current work order number i.e.
WO/1058
Parameters
The parameters should be contained in curly brackets {}.
{0:format} This represents the field ‘current value’, its format can be specified.
{1:format} This displays the current date; its format can be specified.
{2} this parameter is for special use by the business object. It provides different data depending on the business object. For example in the case of a work order it would automatically input the department field into the sequence.
{3:format} This generates control digits.
So an alternative example of a ‘woJob.JobCode’ format would be:
123{0:000000}-{3}/{2}/{1:MMMM}
Prefix with ‘123’, use work order number and fixed to six digits with control digit, insert department field and add the current date formatted as just a four character month.
This sequence will create a work order of 1230014160/June.
123 001416 0 / blank / June
String Expression
The format field in this type is String Expression (refer to FastNet documentation). This expression is evaluated in the context of a calling business object. In the below example, which describes a sequence for Purchase Orders, the string expression will be evaluated in the context of a Purchase Order which is created so any unambiguously related data could be used in that expression. In that case the inStoreLoc.StoreCode is used to include store code in sequence text. Additionally the expression must always contain the variable #CurrentValue for actual value of sequence counter.
format(“PO/{0}/{1:000000}”,inStoreLoc.StoreCode,#CurrentValue
Transaction Type Sequence Definitions
Certain transaction activities in Agility create an associated transaction document. For example when an inventory movement is performed, an ‘Inventory Movement Document’ is created, containing a unique Document Number record. The format of this reference code can be defined within Sequence Definitions. Once again all the required Definitions and their default values will be created at installation time.
Code
The code has different significance for these types of sequence as they determine where and how the sequence is used.
Move
If the sequence code is defined as ‘Move’ then this sequence definition will then be used for all types of stock movement for all store locations;
By the addition of different suffixes the format of the sequence will be used against
[StoreCode]
If the Sequence Code is defined as Move.[StoreCode] then this sequence will be used for all type of movements for the store with this StoreCode. For example if there is a store with the store code ‘General’ and the sequence is defined as Move.General then this particular sequence will be used for all movements affecting the store ‘General’
[TransactionCode]
If the Sequence Code is defined as Move.[TransactionCode], then this sequence will be used for movements for the Transaction Type with this TransactionCode for all stores. For example if the sequence was defined as Move.Issue then this sequence would be used for all issues from all stores.
The sequence codes can be built from combinations of these formats to assign specific sequences for specific movement types on specific stores.
If the Sequence Code is defined as “Move.[StoreCode].[TransactionCode]”, (e.g. Move.General.Issue), then this sequence would be used only for movements for issues from the general store.
When the system generates a sequence for a movement it examines the format syntax in the following order to determine the correct sequence.
Move.[StoreCode].[TransactionCode]
Move.[StoreCode]
Move.[TransactionCode]
Move
The current value field represents the current record number in for the sequence. Typically, this should not be adjusted.
The format field is defined in much the same way for the work order code sequence defined above. In the example above, all Issue movements will have a document reference beginning with the letter ‘I’, to signify ‘Issue’.
System Parameters
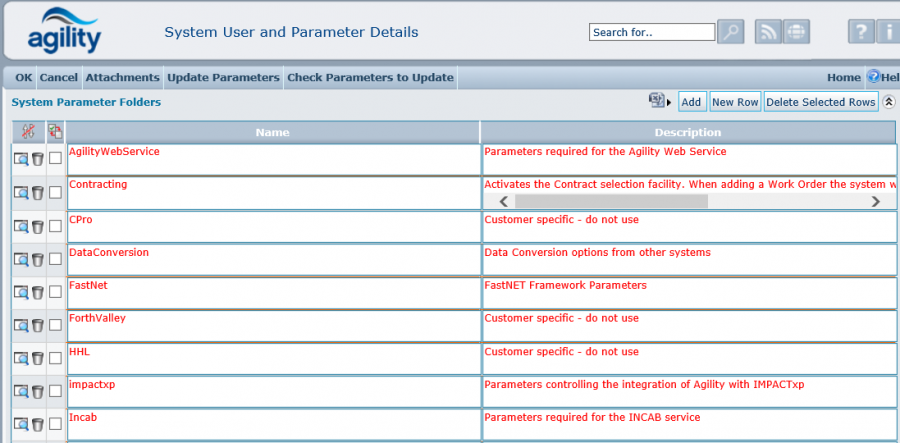
Agility requires several system parameters to be defined within the system, which are defined within the system user account:
Accessed from System Configuration >> System Data >> System Parameters
The table below contains detailed information about all system parameters utilised by Agility.
|
Module |
User |
Parameter Path |
Parameter Name |
Parameter Type |
|
|
Labour |
System |
Labour\ |
NonWorkingHoursRateNum |
int |
Rate Number to be taken as non working hours rate for calculating labour cost, when shift doesn’t contain information about employee’s non working time. |
|
Labour |
System |
Labour\ |
NonWorkingHoursTravelRateNum |
int |
Rate Number to be taken as non working hours rate for calculating travel cost, when shift doesn’t contain information about employee’s non working time. |
|
Labour |
System |
Labour\ |
NonWorkingHoursLostRateNum |
int |
Rate Number to be taken as non working hours rate for calculating lost time cost, when shift doesn’t contain information about employee’s non working time. |
|
Labour |
System |
Labour\ |
UseSimpleCostCalculation |
bool |
If set to yes, first rate for each labour, lost and travel is taken to calculate costs. Shifts are not analyzed. Full shift analysis is used otherwise. |
|
ProcessMngt |
System |
ProcessMngt\ |
OccurenceLogLimit |
int |
This value is used to determine how many records should be populated in asset standard job history |
|
ProcessMngt |
System |
ProcessMngt\ |
AssetCalendarCode |
string |
The code of the calendar used to collate asset costs. |
|
ProcessMngt |
System |
ProcessMngt\ |
MinRuntimeJobInterval |
int |
Parameter holds minimum runtime job interval value in minutes. Default value is one day (1440 minutes). If (current date + MinRuntimeJobInterval < next event date) then set next event date to (current date + MinRuntimeJobInterval minutes). Eg: if MinRunTimeJobInterval is set to 1440... If (current date + 1440 < next event date) then the Next Event Date is set to (current date + 1440 minutes). |
|
ProcessMngt |
System |
ProcessMngt\ |
EMailNotification |
Bool |
Controls automatic email notification mechanism for Work Order status changes. If set to true, emails will be sent to appropriate recipients according to the settings in the Work Order status record. |
|
ProcessMngt |
System |
ProcessMngt\ |
StatusResReq |
bool |
This parameter controls the validation of the Status Change Reason field on the Job screen. If set to yes, the value is required. |
|
ProcessMngt |
System |
ProcessMngt\ |
ScheduleUsingOptimumResource |
bool |
If set to true then after fill Optimum Resource field in Work Order, system will schedule this work order for the labour you have declared in Optimum Resource. |
|
ProcessMngt |
System |
ProcessMngt |
LogAssetMovements |
bool |
This setting determine if any changing of site, location, sublication in assets should be note in system logs. |
|
ProcessMngt |
System |
ProcessMngt\Job |
warmAutoSchedule |
bool |
Set this value to true to get the warning message about scheduling when work order has optimum resource selected. |
|
ProcessMngt |
System |
ProcessMngt\Job |
UseAutoResponseTime |
bool |
This parameter determines if auto populating/updating of Response Time is in use. Set to TRUE if auto response time is required. If blank or parameter is missing then this acts as FALSE. |
|
ProcessMngt |
System |
ProcessMngt\Job |
DefaultStdTime |
int |
Set this value to determine default value for standard time |
|
ProcessMngt |
System |
ProcessMngt\Job |
IsStdTimeMandatory |
bool |
This value is used to determine if standard time is mandatory |
|
ProcessMngt |
System |
ProcessMngt\Job |
IsOnLineDateRequired |
bool |
This value is used to determine if break down date is mandatory |
|
ProcessMngt |
System |
ProcessMngt\ |
AccountCodeEnabled |
bool |
Determine this value if you want to use account codes. |
|
ProcessMngt |
System |
ProcessMngt\ |
BulkUpdateAppendCompletionComments |
bool |
Determine this value if you want to append Status Change Reason to Completion Comments on Bulk Update form. |
|
ProcessMngt |
System |
ProcessMngt\Job |
AutoEscalateStatus |
bool |
Set this value to yes if you wish the Job status to be automatically escalated from the task status based on the status level value. The task with the lowest status level will be used. The same applies to the task status which will be escalated from the Schedule record status. |
|
ProcessMngt |
System |
ProcessMngt\Job |
InitialStasusesList |
String |
Comma-separated list of job status codes which are available in a drop-down list for newly created jobs. |
|
ProcessMngt |
System |
ProcessMngt\Helpdesk |
JobType |
System Lookup |
Set code of job type to use as default value for new helpdesk. This value will be converted by System Lookup. See FastNET documentation for further information about System Lookup parameter definition. |
|
ProcessMngt |
System |
ProcessMngt\Helpdesk |
CraftCode |
System Lookup |
Set code of Craft Code to use as default value for new helpdesk. This value will be converted by System Lookup. See FastNET documentation for further information about System Lookup parameter definition. |
|
ProcessMngt |
System |
ProcessMngt\Helpdesk |
StatusCode |
System Lookup |
Set code of Status Code to use as default value for new helpdesk. This value will be converted by System Lookup. See FastNET documentation for further information about System Lookup parameter definition. |
|
ProcessMngt |
System |
ProcessMngt\Helpdesk |
PriorityCode |
System Lookup |
Set code of Priority Code to use as default value for new helpdesk. This value will be converted by System Lookup. See FastNET documentation for further information about System Lookup parameter definition. |
|
ProcessMngt |
System |
ProcessMngt\Helpdesk |
Duration |
integer |
Set value of minutes to use as default value of Standard Time in new helpdesk. |
|
ProcessMngt |
System |
ProcessMngt\CompletedWorkOrder |
JobType |
System Lookup |
Set code of job type to use as default value for new Completed Work Order. This value will be converted by System Lookup. See FastNET documentation for further information about System Lookup parameter definition. |
|
ProcessMngt |
System |
ProcessMngt\CompletedWorkOrder |
CraftCode |
System Lookup |
Set code of Craft Code to use as default value for new Completed Work Order. This value will be converted by System Lookup. See FastNET documentation for further information about System Lookup parameter definition. |
|
ProcessMngt |
System |
ProcessMngt\CompletedWorkOrder |
StatusCode |
System Lookup |
Set code of Status Code to use as default value for new Completed Work Order. This value will be converted by System Lookup. See FastNET documentation for further information about System Lookup parameter definition. |
|
ProcessMngt |
System |
ProcessMngt\CompletedWorkOrder |
PriorityCode |
System Lookup |
Set code of Priority Code to use as default value for new Completed Work Order. This value will be converted by System Lookup. See FastNET documentation for further information about System Lookup parameter definition. |
|
ProcessMngt |
System |
ProcessMngt\CompletedWorkOrder |
Duration |
integer |
Set value of minutes to use as default value of Standard Time in new Completed Work Order. |
|
ProcessMngt |
System |
ProcessMngt\RouteSheet\ |
LabourCostCalcType |
string |
Controls the calculation of the Labour cost for route sheet items. The allowed values are: "basedonproportionall", "nosplit", "allocatedtoeach", "evenlyallocated" |
|
ProcessMngt |
System |
ProcessMngt\RouteSheet\ |
MaterialCostCalcType |
string |
Controls the calculation of the material cost for route sheet items. The allowed values are: "basedonproportionall", "nosplit", "allocatedtoeach", "evenlyallocated" |
|
ProcessMngt |
System |
ProcessMngt\RouteSheet\ |
OtherCostCalcType |
string |
Controls the calculation of other costs for route sheet items. The allowed values are: "basedonproportionall", "nosplit", "allocatedtoeach", "evenlyallocated" |
|
ProcessMngt |
System |
ProcessMngt\RouteSheet\ |
CompCommReq |
bool |
Set this value to yes if completion comments are required on the task. |
|
ProcessMngt |
System |
ProcessMngt\RouteSheet\ |
AllowWOCompWithNotCompletedRS |
bool |
Set this value to yes if W/O completion is allowed despite of not all rout sheet items being completed. |
|
ProcessMngt |
System |
ProcessMngt\StatusCodes |
ACCEPTED |
String |
The code of the W/O status assigned to the Work Order when Mobile Lite User accepted received job |
|
ProcessMngt |
System |
ProcessMngt\StatusCodes |
ARRIVED |
String |
The code of the W/O status assigned to the Work Order when Mobile Lite User arrived to place where job should be done |
|
ProcessMngt |
System |
ProcessMngt\StatusCodes |
DEPARTED |
String |
The code of the W/O status assigned to the Work Order when Mobile Lite User started received job. |
|
ProcessMngt |
System |
ProcessMngt\StatusCodes |
REJECTED |
String |
The code of the W/O status assigned to the Work Order when Mobile Lite User rejected received job |
|
ProcessMngt |
System |
ProcessMngt\StatusCodes |
SCHEDULED |
string |
Status code to be used for scheduled jobs. |
|
ProcessMngt |
System |
ProcessMngt\StatusCodes |
UNSCHEDULED |
string |
Status code to be used for unscheduled jobs. |
|
ProcessMngt |
System |
ProcessMngt\StatusCodes |
CANCELLED |
string |
Status code to be used for job cancellation. |
|
ProcessMngt |
System |
ProcessMngt\StatusCodes |
COMPLETED |
string |
Status code to be used for job completion. |
|
ProcessMngt |
System |
ProcessMngt\StatusCodes |
SUSPENDED |
string |
Status code to be used for suspending a job. |
|
ProcessMngt |
System |
ProcessMngt\StatusCodes |
HELPDESK |
string |
status code to be used for helpdesk job |
|
ProcessMngt |
System |
ProcessMngt\StatusCodes |
COMPLETIONFAILED |
string |
Status code to be used when Mobile Expert application cannot complete work order task |
|
ProcessMngt |
System |
ProcessMngt\StatusCodes |
LOGON |
string |
status code to be used when labour is logged to work order task |
|
ProcessMngt |
System |
ProcessMngt\StatusCodes |
LOGOFF |
string |
status code to be used when labour is logged off from work order task |
|
ProcessMngt |
System |
ProcessMngt\StatusCodes |
REOPEN |
string |
Reopen Completed Job. |
|
ProcessMngt |
System |
ProcessMngt\StatusCodes |
DELIVERED |
string |
The code of the W/O status assigned to the Work Order when it's delivered to INCAB Device. |
|
ProcessMngt |
System |
ProcessMngt\StatusCodes |
INPROCESS |
string |
The code of the W/O status assigned when the Work Order is \"In Process\" - Rockwell Only. |
|
ProcessMngt |
System |
ProcessMngt\StatusCodes |
OPEN |
string |
The code of the W/O status assigned to the Follow-On work Order. |
|
ProcessMngt |
System |
ProcessMngt\StatusCodes |
SENT |
string |
The code of the W/O status assigned to the Work Order when it's sent to INCAB Device. |
|
ProcessMngt |
System |
ProcessMngt\Inventory\ |
IssueTransCode |
string |
Inventory Transaction code to be used when goods are issued on the Work Order form. |
|
ProcessMngt |
System |
ProcessMngt\Inventory\ |
UnIssueTransCode |
string |
Inventory Transaction code to be used when goods are returned on the Work Order form. |
|
ProcessMngt |
System |
ProcessMngt |
MandatoryFaultOnWOCompletion |
Bool |
Controls whether the Fault Code needs to be specified on the Work Order when it’s being completed. |
|
ProcessMngt |
System |
ProcessMngt |
ScheduleUpdateStatus |
Bool |
Setting this option to false will prevent changing work order status after auto-scheduling when Optimum Resource has changed. |
|
ProcessMngt |
System |
ProcessMngt\RAAMP |
RAAMPMode |
bool |
This parameter controls whether the Repairable Spares Module is active |
|
ProcessMngt |
System |
ProcessMngt\RAAMP |
ExternalRepairSite |
string |
External repair area code. |
|
ProcessMngt |
System |
ProcessMngt\RAAMP |
OnStockStatus |
string |
Stocked asset code. |
|
ProcessMngt |
System |
ProcessMngt\RAAMP |
ScrappedCode |
string |
Scrapped asset code. |
|
ProcessMngt |
System |
ProcessMngt\RAAMP |
StockSite |
string |
Stocked site code. |
|
ProcessMngt |
System |
ProcessMngt\RAAMP |
InitialAssetStatus |
string |
Default asset status on creation from issuable spears. |
|
ProcessMngt |
System |
ProcessMngt\RAAMP |
InitialTempCode |
string |
Initial TempCode on asset creation from issuable spears. |
|
ProcessMngt |
System |
ProcessMngt\RAAMP |
IsAvailable |
bool |
Initial IsAvailable field value on asset creation from issuable spears. |
|
ProcessMngt |
System |
ProcessMngt\RAAMP |
ReturnTransaction |
string |
Return transaction code. |
|
ProcessMngt |
System |
ProcessMngt\RAAMP |
IssueTransaction |
string |
Issue transaction code. |
|
ProcessMngt |
System |
ProcessMngt\RAAMP |
InUseStore |
string |
In Use store code. |
|
ProcessMngt |
System |
ProcessMngt\RAAMP |
StagecoachRAAMPMode |
string |
Set this option to true if you wish to enable specific customer Repairable Spares functionality. |
|
Inventory |
System |
Inventory |
AllowNegativeStock |
bool |
Set this value to yes to allow negative stock values (over-issue). |
|
Inventory |
System |
Inventory |
AutomaticItemsIssue |
bool |
Controls if during Goods Receive for Direct Purchase Orders , the items received will be automatically issued to Work Order defined on Direct Purchase Order. |
|
Inventory |
System |
Inventory |
AutoUnitsCreation |
bool |
This parameter controls the behaviour of the Purchase Order form when ordering in the bulk unit of measure. When it’s set to true, the size of the bulk unit of measure can be specified manually and the unit of measure representing the specified size will be automatically created. |
|
Inventory |
System |
Inventory |
PrefixOfUOMConversionCode |
string |
Defines the prefix to be used for automatic UOM creation. Used in conjunction with the above option |
|
Inventory |
System |
Inventory |
DefaultStoreCode |
string |
This value is used to determine default code of store, if user didn’t put any value. |
|
Inventory |
System |
Inventory |
DefaultSupplierCode |
string |
This value is used to determine default supplier code, if user didn’t put any value. |
|
Inventory |
System |
Inventory\Movement |
ProcessingPriceCode |
string |
Available values are: StandardPrice, AveragePrice, LastPrice. This parameter controls which price from inventory item is used when issuing goods or returning goods to stock. |
|
Inventory |
System |
Inventory\Movement |
CostCodesOnInventoryMovements |
Bool |
Indicates whether cost codes are mandatory on all inventory movements. |
|
Inventory |
System |
Inventory |
AverageCalculationMode |
string |
Controls how AveragePrice is calculated. If empty, calculates on all receipts and returns. Format of that parameter is [AlsoReturns] <unsgined integer> m|months|y|years|w|weeks|d|days . For example \"AlsoReturns 5 m\" means calculate AveragePrice basing on Goods Receipts and Return To Supplier in last 5 monts |
|
Inventory |
System |
Inventory\Movement\TransCode |
Receipt |
string |
Code for transaction Goods Receipt (GRN) |
|
Inventory |
System |
Inventory\Movement\TransCode |
ReturnToSupplier |
string |
Return to Supplier Transaction code |
|
Inventory |
System |
Inventory\Movement\TransCode |
StockCount |
string |
Code for transaction Stock Count |
|
Inventory |
System |
Inventory\Movement\TransCode |
QuantityAdjustment |
string |
Code for transaction Quantity Adjustment |
|
Inventory |
System |
Inventory\PurchaseOrders |
UseSupplierLanguageForPOPrint |
Bool |
P/O printout will be produced in a language specified in the Supplier branch record if this parameter is set to True |
|
Inventory |
System |
Inventory\POStatus |
Created |
string |
Status code to be used for created PO |
|
Inventory |
System |
Inventory\POStatus |
Sent |
string |
Status code to be used for sent PO |
|
Inventory |
System |
Inventory\POStatus |
Completed |
string |
Status code to be used for completed PO |
|
Inventory |
System |
Inventory\POStatus |
Cancelled |
string |
Status code to be used for cancelled PO |
|
Inventory |
System |
Inventory\POStatus |
Open |
string |
Status code to be used for open PO |
|
Inventory |
System |
Inventory\POStatus |
Partially Received |
String |
The Code which will be used for Partially Received Purchase Orders |
|
Inventory |
System |
Inventory\Currency |
BaseCurrency |
String |
Code of native currency |
|
Inventory |
System |
Inventory\Currency |
ExchgRateUpdate |
Bool |
Determines should be value recalculated for current exchange rate during receipt goods or should be used rate from creation PO. |
|
MobileExpert |
System |
MobileExpert |
TransactionCode |
string |
Inventory transaction code to be used by Mobile Expert Transaction Engine to issue from stock. |
|
MobileExpert |
System |
MobileExpert |
DEFAULT_ASSET_CODE |
string |
Default asset on work order (generated from Mobile Expert application) |
|
MobileExpert |
System |
MobileExpert |
JOBFROMMOBILE |
string |
Default job status of work order (generated from Mobile Expert application) |
|
MobileExpert |
System |
MobileExpert |
DAFAULT_STANDARD_TIME |
string |
Default standard time for work order (generated from Mobile Expert application) |
|
MobileExpert |
System |
MobileExpert |
COSTCODE |
string |
The default Cost Code which will be used if the Cost Code sent back from the handheld is found to be invalid or not entered. |
|
Invoicing |
System |
Invoicing |
ONEINVOICENUMBERPERJOB |
bool |
If set this value to true then each invoice will have other number |
|
AgilityWebService |
System |
AgilityWebService |
UseBudgetCode |
bool |
|
|
AgilityWebService |
System |
AgilityWebService |
EmployeeLookupField |
string |
|
|
AgilityWebService |
System |
AgilityWebService\ InventoryTransactions |
IssueToEmp |
string |
Status code for inventory transaction issue to employee (for webservice) |
|
AgilityWebService |
System |
AgilityWebService\ InventoryTransactions |
ReturnFromEmp |
string |
Status code for inventory transaction return from employee (for webservice) |
|
AgilityWebService |
System |
AgilityWebService\ InventoryTransactions |
StockCount |
string |
Status code for inventory transaction stock count (for webservice) |
|
AgilityWebService |
System |
AgilityWebService\ InventoryTransactions |
StockTransfer |
string |
Status code for inventory transaction stock transfer (for webservice) |
|
AgilityWebService |
System |
AgilityWebService\ InventoryTransactions |
GoodsReceipt |
String |
Status code for inventory transaction goods receipt (for webservice) |
|
AgilityWebService |
System |
AgilityWebService\ InventoryTransactions |
IssueToWO |
String |
Status code for inventory transaction issue to work order (for webservice) |
|
AgilityWebService |
System |
AgilityWebService\ InventoryTransactions |
ReturnToStock |
String |
Status code for inventory transaction return to stock (for webservice) |
|
AgilityWebService |
System |
AgilityWebService\ Security\Inventory |
FullAccessGroups |
String |
A parameter used to define user’s groups which have full access to Agility Mobile inventory transaction and functions. If user is defined in one of these groups then he has access to following Agility Mobile transactions and functions:
All user has access to issue and return inventory transactions. |
|
AgilityWebService |
System |
AgilityWebService\ Security\Inventory |
CanCreateStoreGroups |
String |
A parameter used to define user’s groups which can create store (if entered store code doesn’t exist) during issue or return transaction in Agility Mobile |
|
AgilityWebService |
System |
AgilityWebService\ Security\Inventory |
CanCreateBinGroups |
string |
A parameter used to define user’s groups which can create bin (if entered bin code doesn’t exist) during issue or return transaction in Agility Mobile |
|
POAuthorization |
System |
Inventory\POAuthorization |
Enabled |
bool |
This value determine if purchase order authorisation functionality will be enabled |
|
POAuthorization |
System |
Inventory\POAuthorization |
ApprovedPOStatus |
string |
Status code to be used for purchase order after approval process. |
|
POAuthorization |
System |
Inventory\POAuthorization |
InApprovementPOStatus |
string |
Status code to be used for purchase order which is during approval process |
|
POAuthorization |
System |
Inventory\POAuthorization |
AwaitingApprovalPOStatus |
string |
Status code to be used for purchase order after it is created |
|
POAuthorization |
System |
Inventory\POAuthorization |
RejectedPOStatus |
string |
Status code to be used for purchase order after approval process has been rejected. |
|
POAuthorization |
System |
Inventory\AutoPurchaseOrders |
ApprovalGroupForAutoPO |
string |
A code of approval group for automatically generated purchase orders. |
|
POAuthorization |
System |
Inventory\AutoPurchaseOrders |
AccountCodeForAutoPO |
string |
Account code for automatically generated purchase orders. |
|
Contracting |
System |
Contracting |
ContractingInUse |
bool |
It is used to enable contracting module |
|
FastNet |
System |
FastNet\ FirstWeekOfYear |
FirstWeekOfYear |
String |
The FirstWeekOfYear can have one of the following settings: 'System' - First week of year specified in system settings ; 'Jan1' - Week in which January 1 occurs; 'FirstFourDays' - Week that has at least four days in the new year (complies with ISO standard 8601, section 3.17); 'FirstFullWeek' - First full week in new year. |
Mobile Lite Parameters
|
Module |
User |
Parameter Path |
Parameter Name |
Parameter Type |
| |
|
MobileLite |
System |
MobileLite\ExportToMobileFilters |
woJob |
String |
String expression which filters when job update is sent to Alite. Default value filters only jobs which have changed StartDate, DueDate, ResponseTargetDate, Priority , FullDescription and AssetID: woJob.DueDate != woJob.DueDate& or woJob.StartDate != woJob.StartDate& or woJob.ResponseTargetDate != woJob.ResponseTargetDate& or woJob.PriorityID != woJob.PriorityID& or woJob.FullDescription != woJob.FullDescription& or woJob.AssetID != woJob.AssetID& | |
|
MobileLite |
System |
MobileLite\ExportToMobileFilters |
woJobTask |
String |
String expression which filters when jobtask update is sent to Alite Default value filters only jobs which have changed task job status and description: woJobTask.Description != woJobTask.Description& or woJobTask.JobStatusID != woJobTask.JobStatusID& |
|
|
MobileLite |
System |
MobileLite\ExportToMobileFilters |
woSchedule |
String |
String expression which filters when jobtask update is sent to Alite Default value filters only jobs which have changed schedule status : String expression which filters when schedule update is sent to Alite | |
|
MobileLite |
System |
MobileLite\AgilityForAndroid\ |
HideResponseTimerStatus |
String |
This parameter define for which job status (on Agility for Android) the second timer should be turned off. Entered string should be a mobile status code after translation i.e. "ArrivedOnSite". Note: This status in Agility have to have 'SetRespondedAt' flag set to true. | |
|
MobileLite |
System |
MobileLite\AgilityForAndroid\ |
SecondAlarmDate |
String |
Parameter contains string expression to calculate Second Timer Alarm Date to display Alarm in MobileLite | |
|
MobileLite |
System |
MobileLite\AgilityForAndroid\ |
SecondTimerClockDate |
String |
Parameter contains string expression to calculate Second Timer Clock Date to display Alarm in MobileLite | |
|
MobileLite |
System |
MobileLite\AgilityForAndroid\ |
SecondWarningDate |
String |
Parameter contains string expression to calculate Second Timer Warning Date to display Warning in MobileLite | |
|
MobileLite |
System |
MobileLite\ |
HtmlListDetails |
String |
Parameter contains string expression to calculate Job Short Description displayed in Android Lite. | |
|
MobileLite |
System |
MobileLite\ |
HtmlNewJobDialog |
String |
Parameter contains string expression to calculate Job Short New Job Dialog displayed in Android Lite. It is in fact no HTML, because Alite not display it as HTML but as normal text so no HTML encoding could be used. Default value is pmAsset.Description + ": " + woJob.FullDescription | |
|
MobileLite |
System |
MobileLite\ |
ClockDate |
String |
Parameter contains string expression to calculate Clock Date to display Alarm in MobileLite. Default value is woJob.DueDate | |
|
MobileLite |
System |
MobileLite\ |
WarningDate |
String |
Parameter contains string expression to calculate Warning Date to display Warning in MobileLite. Default value is DATEADD(woJob.DueDate,"Minute",-4) | |
|
MobileLite |
System |
MobileLite\ |
AlarmDate |
String |
Parameter contains string expression to calculate Alarm Date to display Alarm in MobileLite. Default value is DATEADD(woJob.DueDate,"Minute",-2) | |
|
MobileLite |
System |
MobileLite\ |
ShowLastXCompleted |
int |
View details of (XX) work orders on alite Asset Enquiry form. Default value is 10. | |
|
MobileLite |
System |
MobileLite\ |
AppendStatusCommentsToCompletionComments |
bool |
This parameter will control whether the status comments will be added to the Task and Job Completion comments or not. If the value is to TRUE, status comments will be added to Job & Task completion comments as well as to woJobLog table. If the value is set to false the status comments will be added to woJobLog only. Should save data format like “Feedback functionality". |
Using System Parameters
Cascading Style Sheets
The flexibility within Agility allows for style sheets to be applied to the system determines the style (e.g. fonts and colours) of the Agility interface.
Creating Style Sheets
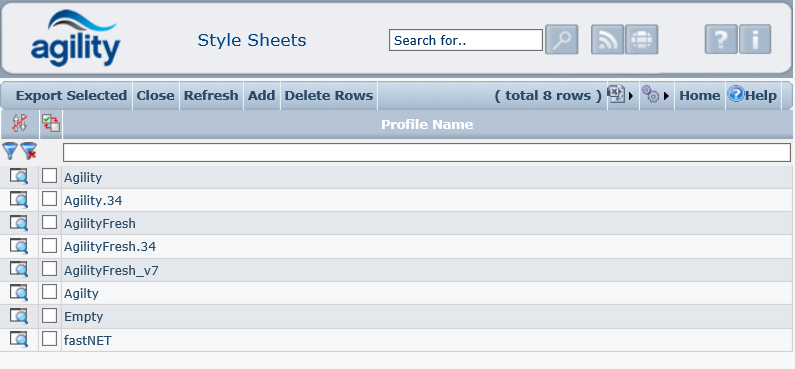
Style Sheets
To export a style sheet(s), select the style sheet(s) to export and click on the Export Selected Profiles menu button.
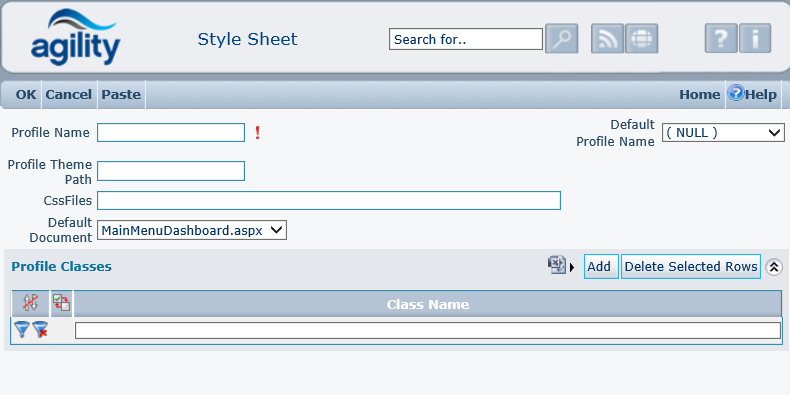
Click on Add New to create a new Style Sheet:
The Profile Name field is a mandatory field which should records the unique name of the Profile.
The Default Profile Name is a drop-down list showing all the existing style sheets defined within the system. This can be used to select an existing style sheet which is to provide a basis for the new style sheet definition.
The List of Profile Classes grid details style sheet classes within the style sheet profile.
Click on Add to define a new Profile Class:
Select the desired Class Name from the drop-down list. This identifies all available Profile Classes within the system.
It is possible to define several attributes for a Style Class. Click on Add within the List of Attributes grid to define a new attribute:
The element Name is mandatory and allows the user to quickly select the element from a drop-down list.
The Usage and Value fields allow parameters to be entered for the element.
For additional information on style sheets, please refer to the Agility Customisation Guide.
Import / Export Style Sheet
The CSS file input field is used when importing a style sheet. Click on the Browse button to select the file to import.
Specify the new profile name in the Profile Name field.
The Default Profile Name field is a drop-down list detailing all the existing style sheets in the system. This can be used to specify an existing style sheet which will be the basis for the new Profile. If you wish to merge the imported file into the existing style sheet, ensure that the Merge Profile field is checked.
To export a style sheet, simply select the desired style sheet:
Click on Do export to export the style sheet.
Another method to export Style sheets is via the Style Sheet List form detailed above.
Audit Trail
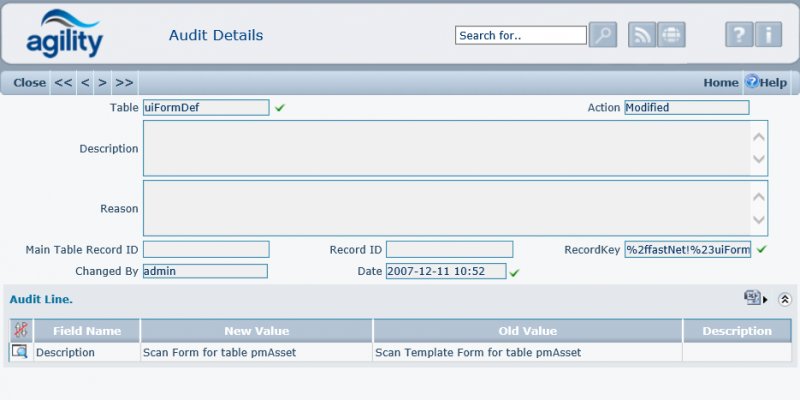
Functionality exists within Agility to log changes to any field within the system. This can be defined by a user with administrative access to the system.
Accessed from System Configuration >> Audit Trail >> Audit Trail Control
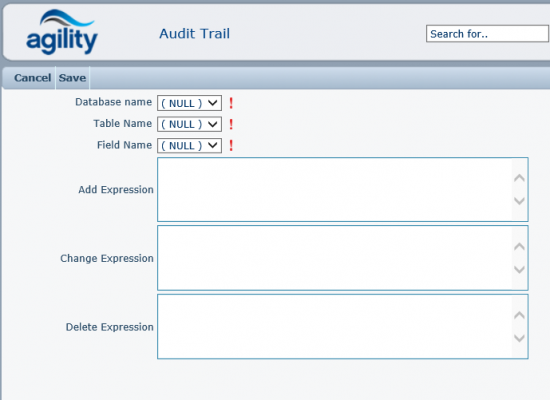
Click on Add New to create a new field to be monitored.
Database Name
The Database Name field should be set to ‘sxp’
Table Name
The Table name identifies the table where the field to be audited is located. This is a combo box listing all tables in the database.
Field Name
The Field Name is the name of the field to be audited. This is a combo box listing all the fields in the table selected in the Table Name field.
Add/Change/Delete Expression
These fields store expressions to calculate value to fill field Description for syAuditLine when record is created/modified/deleted.
Description stored in syAudit is sum of descriptions from all its lines.
An audit log is created each time an audited field is changed. This is recorded in the syAudit and syAuditLine tables. The following information is logged:
- Table Name
- Field Name
- Old value
- New value
- Date / time stamp
- UserID
- Reason for change (if any)
- Action code
- Description
- MainTableRecordID
- RecordID
Accessed from System Configuration >> Audit Trail >> Audit Trail Control
Details:
Status Translations
Mobile Expert
Work Order and Task Statuses are user-defined within Agility. To enable this functionality when the software is being used with Mobile Engineer, it is necessary to maintain a list of Status Translations. This relates Statuses within Agility to those defined within Mobile Expert.
Click on Add New to define a new Status Translation:
Agility Status Code
This is a drop-down list of all the Statuses defined within Agility.
Mobile Expert Transaction Code
This contains a drop-down list of all Statuses defined within Mobile Engineer.
To define a Status Translation, select the relevant Agility status from the Agility Status Code field. Then select the equivalent Mobile Expert Transaction Code.
Agility for Android
Similar to Mobile Expert Status Translation
Work Order and Task Statuses are user-defined within Agility. To enable this functionality when the software is being used with Mobile Engineer, it is necessary to maintain a list of Status Translations. This relates Statuses within Agility to those defined within Agility for Android.
Click on Add to define a new Status Translation:
- Mobile Status - This is new status code.
- Mobile Description - This is how status will be displayed on Agility for Android
- Agility Status - This is a list of Agility statuses.
Predefined statuses have 'IsSystem?' flag set to TRUE. These statuses cannot be deleted, their 'Mobile Status' cannot be changed. When replicating or copying current 'System' status, SYSTEM flag will be reset to FALSE.
Document Registry
The Document Registry is used to upload and hold any kind of document within the application. This might be for a document that will be used frequently. The documents held in this register are available to attach to any part of the system where the attachment menu or grid is displayed e.g. in work orders, equipment, employee
Accessed from System Configuration>>Document Registry
Click on Add New to add a new document to the Document Registry:
Category
This is free text. It can be used to group documents together.
Code
This is free text. It is a short name for the document. This field must be entered.
Description
This is free text and is a description of what the document is.
Attachment Select the Local or Shared file from the File Mode drop down list.
Local File
If Local File is selected then a browse option is given to navigate to the file:
Click the Browse button and select the file. When the file has been selected the path will be displayed on the form. Click on Update to load the document into the registry.
If Shared File is selected then a field to input the pathname will be displayed.
The full path and file name should be entered. This will provide only a link to the document; it will not load the document into the form.
The shared file option can be used for adding a link to a website, rather than typing the full pathname, type the website URL e.g. http://www.SoftSolsGroup.com

